Building the Schedule
From Studio > Schedule, you can drag and drop object definitions from the Components panel onto the Design palette to design your study schedule and forms.
Drag & Drop or Time & Events Editor
Depending on your study’s configuration, you may have the option to use the Time & Events Schedule Editor or the Drag & Drop Schedule Editor.
If your study uses the Time & Events Schedule Editor, opening Studio > Schedule shows that editor, with a link to Use drag and drop editor.
If your study doesn’t use the Time & Events Schedule Editor, opening Studio > Schedule opens the Drag & Drop Editor.
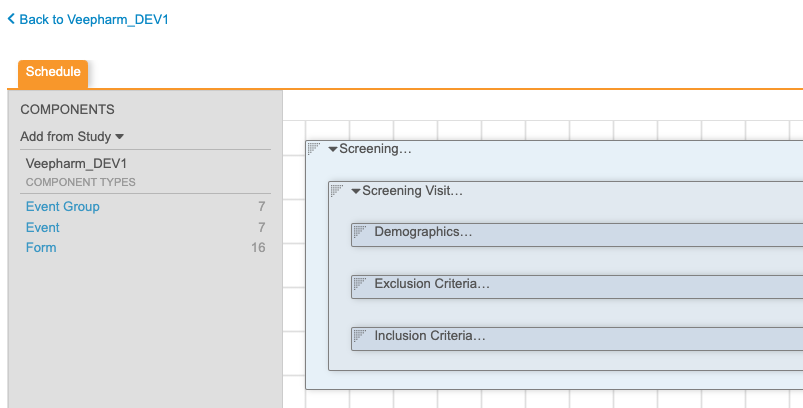
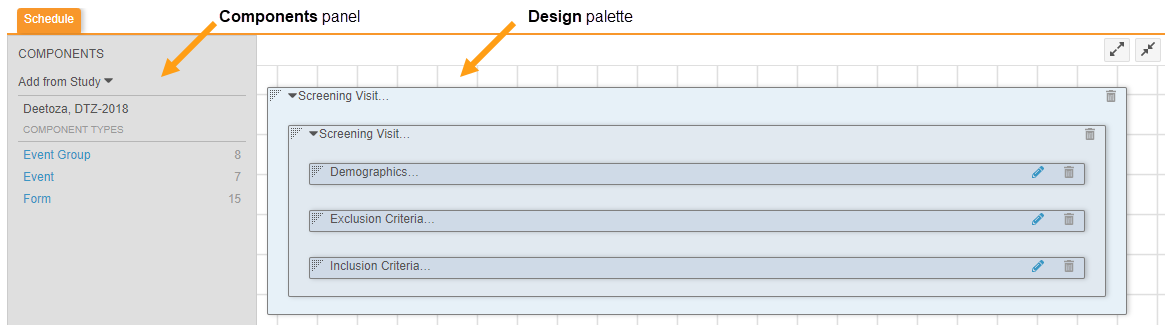
Using the Drag & Drop Schedule Editor
The Schedule page is divided into two main areas: the Components panel and the Design palette. The Components panel allows you to select from the study object records you created elsewhere in Studio (such as Event Groups and Forms). You can drag and drop those components onto the Design palette in order to build your study schedule. The order in which you place components onto the palette is the order they appear in the Casebook.
Add Components to the Schedule
To add a component to the design palette, click and drag it from the Components panel to the Design palette. When you can drop your component, you’ll see a green line or a green plus (+) with an orange highlight.
To add multiple Events to an Event Group, or multiple Items to an Item Group, you can drag and drop your object definition just below the previous one, while still inside the dotted line boundary of the group.
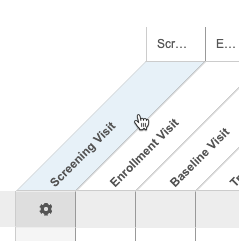
You can reorder your object definitions by clicking the shaded top-left corner and dragging the object definition to a new location on the design palette.
Remove Components from the Drag and Drop Schedule
Remove Objects from the Study Schedule before Deletion: You must remove objects from the study schedule before deleting them. Otherwise you may encounter subsequent versioning issues.
To remove components from the study schedule:
- Navigate to Studio > Schedule.
- On the component you want to delete, click the Remove icon ().
Restoring Dynamic Definitions: You can re-add dynamic definitions that were removed in previous Casebook versions using either the Schedule (time and events editor) or Design (drag and drop editor) views. Vault automatically retrieves and applies the previous dynamic settings from any deployed version, even if versions were skipped.
Collapse & Expand
You can collapse and expand components to easily view all of your components at once. To collapse all components, click the Collapse button on the design palette. This collapses all components into their Event Groups. Click Expand to return to your regular view.
You can also collapse and expand individual components. Click the Arrow button in the component header to collapse or expand a component.
How to Build your Study Schedule
After creating all of your object definitions, you can use them to design your study schedule. Open Studio > Schedule to build your schedule and forms.
Adding Event Groups & Events
To add your Event Groups and Events to your study schedule:
- Navigate to Studio > Schedule.
- Click Event Groups to see a list of all the Event Groups available for your Study.
- Click and drag the first Event Group in your Study onto the design palette. When you can drop your Event Group, a green plus (+) displays on your cursor.
- Click and drag the next Event Group onto the design palette. Repeat this step for each additional event group.
- Click the Close icon () to close the Event Groups list.
- Click Events.
- Click and drag your Event into your Event Group. Events can only be added to Event Groups.
- Repeat step 5 for all of your Events.
- Optional: Click the Remove icon () to remove Event Groups and Events from your schedule. Note that this does not delete the object definitions. This only removes that object from the design palette and the study schedule.
Adding Forms to Events
- Navigate to Studio > Schedule.
- Click Form to see a list of all the Forms available for your Study.
- Click and drag the first Form in your study into an Event. A Form can only be added to an Event.
- Repeat step 3 for all Forms in your Study.
- Optional: Click the Remove icon () to remove Forms from your schedule.
Now you can add Item Groups and Items to your Form and configure how those display to data entry users.
Using the Time & Events Schedule Editor
From the Time & Events Schedule Editor, you can create Event Groups, Events, and Forms (the definition object records), define the order of events in your study, and assign Forms to Events.
Sorting Components in the Schedule Editor
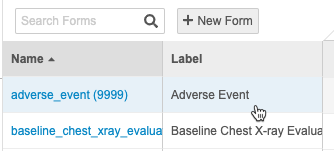
You can sort the list of Forms by Name or Label. You can also bring the Forms associated with a certain Event to the top of the list in the order they appear within the event.
To sort by Name or Label in ascending order, click that column header. To sort in descending order, click the column header a second time. Vault indicates the sort order in the column header using carets (ICON for up and ICON for down).
To bring the Forms associated with an Event to the top of the list, click the Event Group Label.
Define the Schedule Order of Event Groups & Events
To add and order Event Groups and Events:
- Navigate to Studio > Schedule for your Study.
-
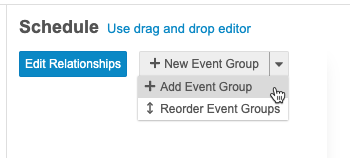
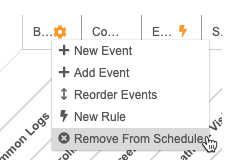
From the Event Group menu, select + Add Event Group.
-
Select the Event Groups to add to your schedule. You can use the Select All checkbox to select all available Event Groups in your study.

- Click Add.
- From the Event Groups menu, select Reorder Event Groups.
- Drag and drop your event groups into the desired order.
- Click Button.
-
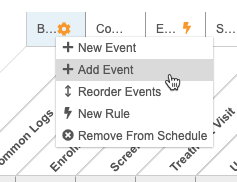
From the Event Group Actions menu, select + Add Event.
- Select the Events to add to your schedule. You can use the Select All checkbox to select all available Events in your study.
- Click Add.
- From the Event Actions menu, select Reorder Events.
- Drag and drop your events into the desired order.
- Click Button.
- Repeat steps 8 through 13 for each Event.
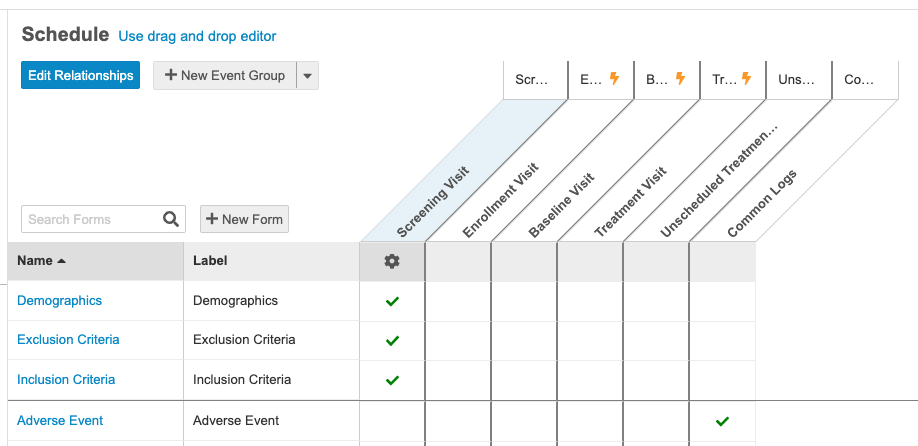
Assign Forms to Events
To assign Forms to Events.
- Navigate to Studio > Schedule for your Study.
- Click Edit Relationships.
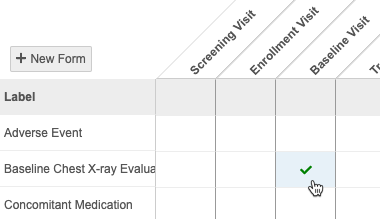
- Select the check circle () for each Form that you want to include in an Event.
- Click Save.
Dynamic Study Design with Rules
You can configure rules to conditionally add Event Groups, Events, and Forms to your Casebook. For example, you can configure a rule that conditionally enables the Pregnancy Test form based on the entered value for the Gender item.
See Creating Rules in Studio for details about creating rules for dynamic study design.
Create Add Schedule, Add Event & Add Form Rules
You can create Add Schedule, Add Event, and Add Form rules (dynamic rules) from the schedule editor. Doing so opens the Rule Editor with the rule action and identifier already set.
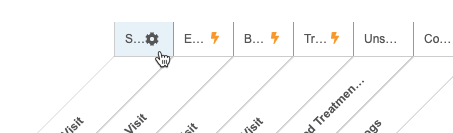
Vault displays a Dynamic icon () on components that are subject to a dynamic rule. A Dynamic Rule Warning icon () is displayed on dynamic components that are not associated with a rule.
Creating an Add Schedule Rule
To navigate to the Rule Editor from the schedule editor to create an Add Schedule rule:
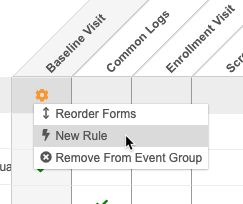
-
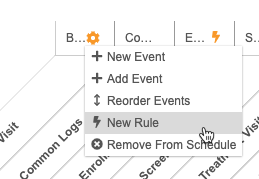
Select New Rule from the Event Group Actions menu
-
The Rule Editor opens with the rule action and identifier set for the Add Schedule rule.
Creating an Add Event Rule
To navigate to the Rule Editor from the schedule editor to create an Add Event rule:
-
Select New Rule from the Event Actions menu.
-
The Rule Editor opens with the rule action and identifier set for the Add Event rule.
Remove Components from the Schedule
You can remove components from the schedule. Removing a component doesn’t delete the design definition, only the relationship of it to the schedule.
Remove Objects from the Study Schedule before Deletion: You must remove objects from the study schedule before deleting them. Otherwise you may encounter subsequent versioning issues.
If you have already published a version of your Casebook Definition, you can deploy a version that removes Event Groups, Events, or Forms, but if there is data against any casebooks in Data Entry you will be unable to run a retrospective amendment to move Subjects to the new version. See Managing Casebooks & Versions for more information.
When you delete the component, Vault will warn you that you are creating a destructive change. If you need to determine what destructive changes you’ve made, run Compare Versions between your current version and the previous version or versions. In the comparison report, review the Schedule worksheet for records in the list that aren’t present in your latest version. This process applies to all destructive changes, including Item Groups and Items.

Restoring Dynamic Definitions: You can re-add dynamic definitions that were removed in previous Casebook versions using either the Schedule (time and events editor) or Design (drag and drop editor) views. Vault automatically retrieves and applies the previous dynamic settings from any deployed version, even if versions were skipped.
How to Remove an Event Group
To remove an Event Group:
- Navigate to Studio > Schedule for your study.
- Hover over the Event Group you want to remove to show the Event Group Actions menu.
-
From the Event Group Actions menu, select Remove From Schedule.
- In the confirmation dialog, click Remove. Vault removes the Event Group and its associated Events from the schedule.
How to Remove an Event from an Event Group
To remove an Event from an Event Group:
- Navigate to Studio > Schedule for your study.
- Hover over the Event you want to remove to show the Event Actions menu.
-
From the Event Actions menu, select Remove From Event Group.
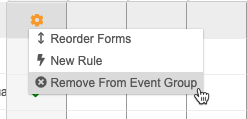
- In the confirmation dialog, click Remove. Vault removes the Event from the Event Group.
How to Remove a Form from an Event
To remove a Form from an Event:
- Navigate to Studio > Schedule for your study.
- Click Edit Relationships.
- Clear the radio button for the Form in the Event column you want to remove it from.
- Click Save.
Create an Event Group
To add an Event Group:
- From the Event Groups menu, select + New Event Group.
- Enter a Label for the Event Group.
- Optional: Update the Name. Vault automatically generates the Name from your entered Label by converting it to lowercase and replacing whitespace with underscores.
- Select an Event Group Type. Learn more about the available types here.
- Optional: If you selected EDC for Event Group Type, you can choose to select the Repeating checkbox to make your Event Group a repeating one.
- Optional: Enter an External ID. If you don’t enter an External ID, Vault automatically generates one.
- Optional: Click Advanced to show additional properties. From here, you can enter Description and Help Content. Learn more about those properties here.
- Optional: Click Save and New to save this Event Group and immediately create another one.
- Click Save.
- In the Properties panel, click Edit.
- Edit properties for your new Event Group as needed.
- Click Save.
Create an Event
To add an Event:
- Locate the Event Group that you want to add your Event into.
- Hover over the Event Group to display the Event Group Actions menu.
- From the Event Group Actions menu, select + New Event.
- Enter a Label for the Event.
- Optional: Update the Name. Vault automatically generates the Name from your entered Label by converting it to lowercase and replacing whitespace with underscores.
- Select an Event Type.
- Enter a Short Label.
- Optional: Enter an External ID.
- Optional: Click Advanced to show additional properties. From here, you can enter Description and Help Content. Learn more about those properties here.
- Optional: Click Save and New to save this Event and immediately create another one.
- Click Save.
- In the Properties panel, click Edit.
- Edit properties for your new Event as needed.
- Click Save.
Create a Form
To add a Form:
- Click + New Form.
- Enter a Label for your Form.
- Optional: Update the Name. Vault automatically generates the Name from your entered Label by converting it to lowercase and replacing whitespace with underscores.
- Optional: Select the Repeating checkbox to make your Form a repeating one.
- Optional: For repeating Forms, set a Repeat Maximum. Learn more about Form properties here.
- Enter a Short Label. This label displays in areas where the Label is too long to display, such as in Design view.
- Optional: Enter an External ID. If you don’t enter an External ID, Vault automatically generates one.
- Optional: Click Advanced to show additional properties. From here, you can enter Description and Help Content. Learn more about those properties here.
- Optional: Click Save and New to save this Form and immediately create another one.
- Click Save.
- In the Properties panel, click Edit.
- Edit properties for your new Form as needed.
- Click Save.
How to Access the Properties Panel
| To access the Properties panel for an Event Group, click the Event Group Label section header. |
|
| To access the Properties panel for an Event, click the Event Label column header. |
|
| To access the definition-only Properties panel for a Form, click in the table cells for Name or Label. Don’t click the hyperlinked form name, as this opens the Form in the Drag & Drop Editor. |
|
| To access the schedule Properties panel for a Form, click the Checkmark for the Form in the Event column. |
|
Event Window Configuration
The Event Window for an event is the range of dates in which the Event is expected to occur. You can configure this window for each Event from the Properties panel. You can also choose to have Vault create a system query any time an Event Date falls outside the configured window, or when the Event Date occurs in the future.
Event Window Configuration: If you do not configure an event window before data is entered, the system will use the default Event offset of 0 days to set planned dates for Events that are added to the schedule. Planned dates for existing events are not updated when the Event Window configuration changes.
Post Go-Live Event Window Implementation: If you add or update event windows to an Event after your Study has been deployed, you must run an amendment and then run a Run Rules job for all system-generated rules to open queries against those windows.
Post Go-Live Event Window Removal: Changing the Event Window Offset Type to None after deploying your study to production may cause a conflict with existing data in your development (DEV) or test (TST) environments, and an error dialog may display. To prevent data conflicts, delete existing casebooks that were created using the previous Event Window from your environment and try again.
How to Create a Window for an Event
To create an event window for an Event:
- Add the Event to the study schedule.
- Click the Event to open the Properties panel.
- In the Properties panel, click Edit.
- For Offset Type, select Previous Event (to use the last Event in the schedule), Specific Event (to select an Event), or None (to have no offset).
- If you selected Specific Event in step 4, select an Offset Event Group and Offset Event to select the Event.
- For Day Range Early and a Day Range Late, enter the earliest (before) and latest (after) possible number of days that an Event could occur in relation to the Planned Date (determined by the Offset Days and Offset Event properties) . This is the range of dates from the Planned Date that an Event can occur within.
- Enter a number of days for Offset Days. This is the number of days that the Event is offset from the chosen Offset Event. Vault uses this number to create a planned date for the event.
- Optional: Selecting an Offset Event displays the Open Query property. By default, this is set to Inherit, meaning that Vault will create out of window queries only if your study has the Open Query on Out of Range Event Dates setting set to Yes. You can override this setting by selecting Yes or No. See details below.
- Click Save.
Day Range, Offset Days & Offset Event
The Day Range Early, Day Range Late, Offset Days, and Offset Event properties combined create the “event window”. This is the window of days in which it is expected for an Event to occur, in relation to another event in the schedule.
For Offset Days, enter the number of days that the Event is offset from the chosen Offset Event. Then, select an Event that occurs before the current Event for Offset Event. Vault uses these properties to create a Planned Date for your Event (or the basis of a range of dates). For example, if your Baseline Visit event is offset by 20 days from your Enrollment Visit, Vault sets the Planned Date for the Baseline Visit to be 20 days after the actual date of the Enrollment Visit. If you would like your event’s planned date to be a range of possible dates, use the Day Range Early and Day Range Late event window properties.
For Day Range Early and Day Range Late, enter the possible number of days before and after the Planned Date (as defined by the Offset Event and Offset Days properties) for an Event. Vault uses these to create a window of possible dates for your Event, for example, “February 1 - February 14” instead of only “February 7”. When a user enters an Event Date that falls outside of this range, Vault shows a warning. If you don’t provide values for these properties, Vault uses a single date as the Planned Date for your Event.
Note the following when entering Day Range, Offset Days, and Offset Events:
- If you don’t enter at least a “0” for Day Range Early and/or Day Range Late, the range, or part of the range, won’t display in Data Entry
- If you enter a Day Range Early and Offset Days but no Day Range Late, the range will be “On or After {DayRangeEarly}”
- If you enter a Day Range Late and Offset Days but no Day Range Early, the range will be “On or Before {DayRangeLate}”
- If you enter both Day Range Early and Day Range Late and Offset Days, the range will be “{Early} - {Late}”
- If you want a specific date to show, enter “0” for both Day Range Early and Day Range Late
Out of Window Queries
You can configure your vault to automatically open a query against an Event Date that falls outside of the specified event window. This is controlled by the Open Query property on the Event Definition. By default, Open Query is set to Inherit on every event. Inherit means that Vault looks to the study setting Open Query on Out of Range Event Dates to determine whether or not to open a query on out of window dates for the Event.
You can override this inheritance by selecting Yes or No for the Open Query property on any event. If you select Yes, Vault will create out of window queries for that Event, regardless of the study setting. If you select No, Vault will not create out of window queries for that Event.
Note that the Open Query property only displays in the Properties panel after you select an Offset Event.
| Setting | Inherit |
|---|---|
| Yes | Create out of window queries for all Events with a configured event window |
| No | Do not create out of window queries for any Events, unless there is an event-level override. |
Learn how to manage your study’s settings.
Future Date Queries
Select the Future Date checkbox in the Properties panel for any Event that should not have an Event Date in the future. When the Future Date checkbox is selected for an Event, Vault creates a system query for any Event Date occurring in the future.
What’s Next
Now that you’ve created your study schedule, you can design each of your Forms. See Designing Forms for more information.