Navigation in Studio
Veeva EDC contains a study design and management interface, EDC Studio, to enhance the experience of clinical programmers as they design their studies. Using Studio, clinical programmers can quickly create studies and manage study amendments for their organizations.
Tasks in this application area are typically performed by Study Designers or Vault Owners.
Accessing Studio
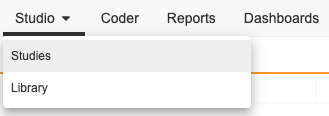
To access the Studio study design and configuration area, click the Studio tab in the primary navigation bar.
My Studies
Once you click the Studio tab, Vault opens the My Studies page, a listing of Studies in your vault.

By default, this page shows automated deployment studies. You can select the Manual radio button to show your manual deployment Studies (those studies created prior to the 19R3 release that have not been upgraded to automatic deployments), or navigate to those manual studies directly from the breadcrumb menu.

You can search for specific Studies and filter the list by Organization. This search uses AND. For example, searching for “Study Name” would return results for “Study Name” (“StudyANDName”), not search results for “Study” OR “Name”.

At any time, you can click My Studies in the breadcrumb menu to return to this listing page.

From the My Studies page, you can click a Study Master to open the Study Instances page. Then, you can click a Study Instance to open Studio for that instance.
For manual deployment Studies, clicking the Study opens the Studio area for that study right away.
Studio Header
Once you’ve opened a Study, the header area in Studio includes several key navigational and informational items.

Breadcrumb Menu
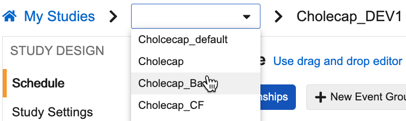
In the header, Vault shows a breadcrumb menu, which you can use to switch between Studies and return to the My Studies page.

You can select a new Study in the breadcrumb menu. This opens the Study Instances page for that Study for automatic deployment studies. For manual studies, this opens that Study in Studio.
Instance Type
Vault displays a badge with the instance type for each Study Instance. This does not apply to manual deployment studies.

Version & Build Numbers
Vault displays both the casebook version number and the study build number in the header as “Version: {version#}.{build#}”. The casebook version number represents the numbered version. Vault increments this by one (1) each time you create a new version. The build number represents the number of changes since the last version. Vault increments the build number each time there is a change to any object after a version is created.
Once you create Version 1 of your Study, the Build Number starts at 1. For each change you make, such as adding a new definition or creating a rule, Vault increments the Build Number by 1. So, if you add Event Group first, Vault would then set the build number from 1 to 2. Vault continues to increment the build number for each change until you create a new version, even if you deploy. Once you create a new version, the build number resets to 1.
You can hover over this number to view additional details about the Study and version.

Published Indicator
If the current casebook version is unpublished, Vault displays an Unlocked icon in the header. If the current casebook version is published, Vault displays a Locked icon instead.

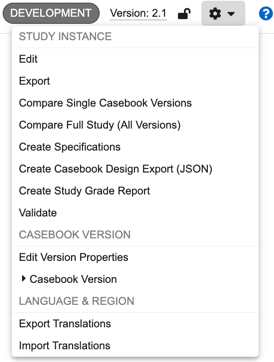
Actions Menu
The Studio Actions menu is in the header area. Learn more about the available actions below.

Selecting a Casebook Version
By default, Studio opens the most recent casebook version. You can perform actions on a certain version within Studio by selecting a version from the Actions menu. For example, you may want to check the Properties of an Item Group Definition that was removed in the most recent version. You can select a previous version that still contains that Item Group Definition and view its configuration in the Properties panel.
To view a different casebook version:
- In the Actions menu, click to expand Casebook Versions.
- Select the Casebook Version that you want to view.
- Optional: Perform additional actions on this version from the Actions menu.
Available Actions
The following actions are available in the Studio actions menu:
- Edit: Edit the Name and External ID of the Study Instance (not available for manual deployment studies).
- Compare Single Casebook Versions: Compare single casebook versions, generating a difference report as a downloadable Excel™ file.
- Compare Full Study (All Versions): Compare all versions of a Study against all versions of another Study, , generating a difference report as a series of Excel™ files.
- Create Specifications: Create a Study Design Specification (SDS) or Annotated PDF of your study design
- Validate: Run your casebook version through publishing validation, a series of tests to check for common study design issues.
- Publish: Locks a casebook version for edits and allows the version to be deployed. This action is only available after a casebook version passes publishing validation.
- Edit Version Properties: Edit the Name and Description of the casebook version. This information displays to users in EDC Tools.
- Create New Version: Create a new casebook version. This action is only available when the most recent casebook version is published.
For manual deployment studies, the Import and Export actions are also available. See details here.
Help Link
In Studio, Vault displays this Help button on each page. You can click this button to easily navigate to the appropriate help topic in the Veeva CDMS online help.

Studio Navigation Panel
You can use the Navigation panel to move between different areas of Studio.
The Navigation panel in Studio allows you to access these areas:
- Schedule: Create and view the schedule for your Study. Depending on your study’s configuration, this may open the Time & Events Schedule Editor or the Drag & Drop Schedule Editor. Learn more.
- Study Settings: Configure various settings for your Study and create a Signature Definition, where you can define an Attestation Statement. Learn more.
- Assessments: Create Assessments to collect subject data outside of Casebooks. Learn more.
- Email Groups: Create Email Groups to receive notifications associated with Send Email rules. Lead data managers assign Users to these groups from EDC Tools. Learn more.
- Form Links: Create Form Links to allow data entry users to create relationships between two or more common Forms.
- Protocol Deviations (When Enabled): Create Categories, Subcategories, and Severities to group Protocol Deviations. Learn more.
- Review Plans: Create Review Plans to manage SDV and DMR requirements in your study. Learn more.
- Data Loader (When Enabled): Create Import Definitions to reference when importing third party data into Veeva EDC. Learn more.
- View Sets: Create View Sets and Views to allow for formatted export of your study’s execution data. Note that this feature may not be available in your vault. Contact Veeva Services for details.
- Codelists: Create Codelists and Codelist Items to use for data collection in your study.
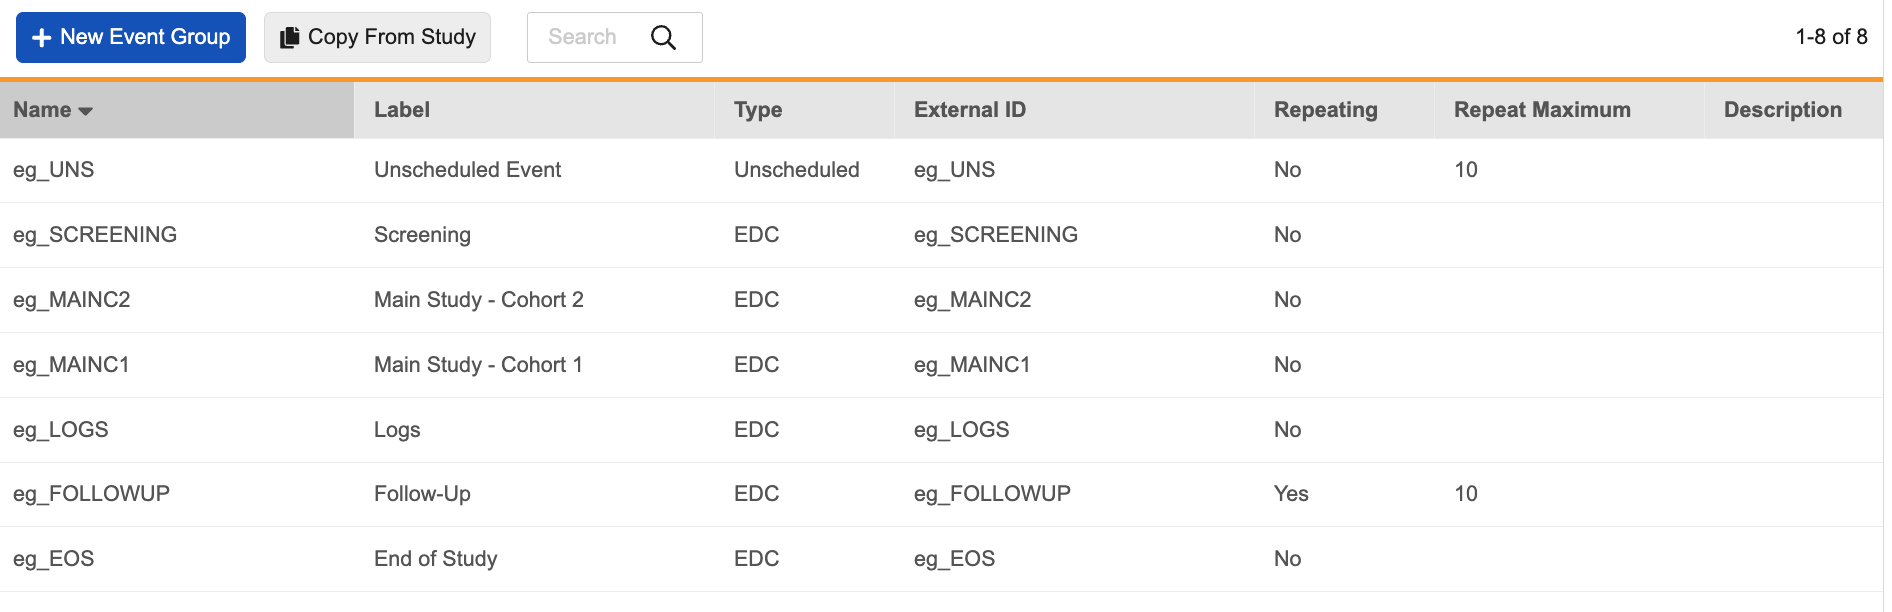
- Event Groups: Create Event Groups to use when building your study’s schedule.
- Events: Create Events to contain your Forms for your study’s schedule.
- Forms: Create data collection Forms for site users to enter data into.
- Item Groups: Create Item Groups to group together Items (fields) on your Forms.
- Items: Create Items, which are questions or fields on a Form, to use for data collection in your study.
- Units: Create Units and Unit Items to allow data entry users to select a unit type when entering data. Learn more.
- Lab Panels: Create Lab Panels to allow data entry users to collect lab data. This is only available in Studies where Labs is enabled.
- Subject Groups: Create Subject Groups to represent Arms, Cohorts, and Substudies for your Study. Learn more.
- Imaging Exams: Create Imaging Exams to allow data entry users to upload imaging exams. Learn more.
- Safety Settings: Manage study-level safety integration configuration. Learn more.
- Form Configurations: Configure individual Forms for send to the Safety System.
- Study Drugs: Manage Study Drug records for use in Safety-EDC Connection safety configuration.
- Rules*: Create data validation rules to validate data, derive data values, and conditionally display records in a Casebook based on user-entered data. Learn more.
- Casebook Variables: Create and map casebook variables for use in your rules.
- Comparison Rules Easily create rules that compare date- and datetime-type Items in the Comparison Configurator.
- User Defined Rules: Create custom rules of all other types in the Rules Editor.
* Depending on your study’s configuration, you may have a single Rules link (in the Study Design section of the Navigation panel), which opens the standard Rule Editor, or have a Rules section, which includes Casebook Variables, Comparison Rules, and User Defined Rules (Rule Editor). If your study is using version 2.0 of the data model, you will have a Rules section.
In Studio help topics, “Studio > Schedule”, “Studio > Event Groups”, and similar labels mean to navigate into Studio for your Study and then the appropriate area within Studio using the Navigation panel.
Study Object Listings
Other than Schedule and Settings, all items in the Navigation panel open listings of that type of record. For example, opening Studio > Codelists opens a list of Codelist Definition records in your study.
In these listings, you can search for existing records using the Search Bar. This search uses both AND and OR. Move through the record list with the Pagination menu.
You can also create new records using the + New {Object} button.
EDC Studio does not display Definition for each object name in the Studio user interface. Even though the objects aren’t labeled with Definition, you are creating definition object records whenever you are working in Studio.
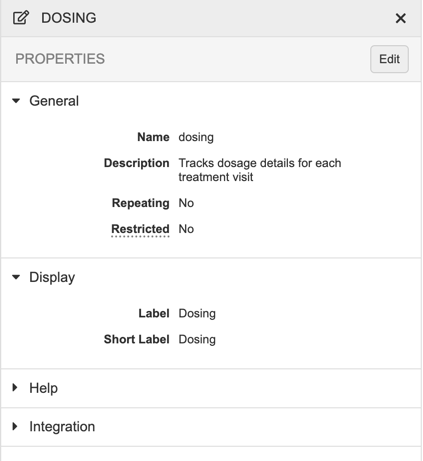
Properties Panel
In Studio, you can use the Properties panel to manage your object definitions. The fields available in the Properties panel depend on which type of object or definition you’re editing.
To access the Properties panel for a record, click anywhere in the record’s row. To open the Properties panel from Studio > Schedule, click on the Component in the design palette.
To see a list of the available properties and what they do, see the Design Properties Reference.
Schedule
With 19R3, we replaced Browse and Design view. Instead, you can access the former Design view from Studio > Schedule.
In Schedule, you can drag and drop object definitions from the Components panel onto the Design palette to design your study schedule and forms.
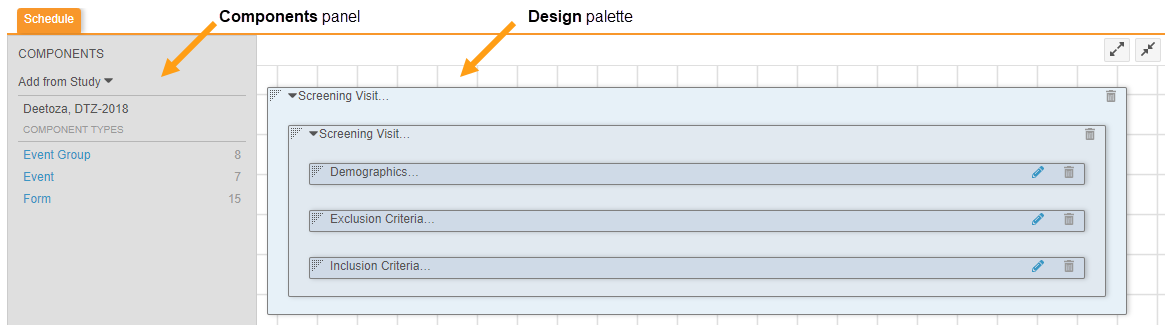
Learn more about building a schedule.
Related Permissions
Users with the Vault Owner security profile or CDMS Study Designer study role can perform all actions within Studio by default. If your organization uses user-defined Study Roles, your role must grant you access to the Studio tab and your security profile must grant you permission to create and edit records in all design and study objects.