Configuring Form Linking & Item-to-Form Linking
During data collection, it’s often necessary to relate the data from two or more repeating forms together to group similar or related data or indicate cause and effect. For example, an Adverse Event can be linked to one or more Concomitant Medications that are related to that Adverse Event. You can also link individual items to forms using the drag and drop schedule editor by dragging the Form Link Item Type onto your form layout.
Configuring Form Linking
When you link forms using Form Linking, a jump link to the linked form is displayed at the top of the form that data is entered into.
To link forms:
- Navigate to Studio > Study Design > Form Links.
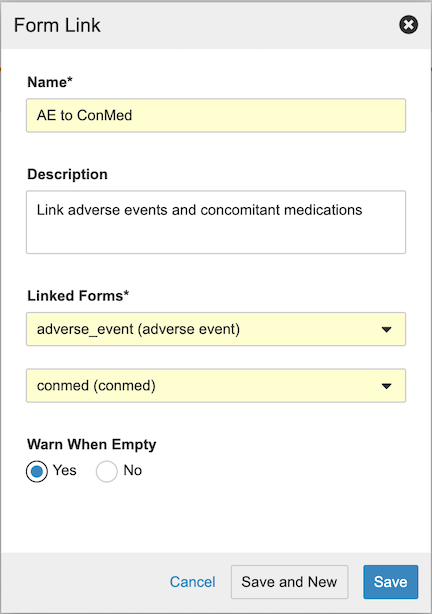
- Click the + New Form Link button to open the Form Link dialog.
- Create a Name for the linked forms.
- Select which forms you’d like to link from the Linked Forms dropdown menus.
- Choose whether or not you’d like Vault to warn Sites in Data Entry when no form links have been added to a form under Warn When Empty.
- Once these fields have been completed, click Save and New or Save. Clicking Save and New will save your Form Link and allow you to create another immediately after saving.
Deleting a Form Link
If you would no longer like certain forms to be linked, you can delete a Form Link in the Studio tab. Deleting a Form Link removes the ability to link selected forms in EDC.
To delete a Form Link:
- Navigate to Studio > Studio Design > Form Links.
- Hover over the name of the Form Link that you’d like to delete to prompt the Actions menu to appear.
- From the Actions menu, select Delete.
Configuring Item-to-Form Linking
You can link individual items to forms through Item-to-Form linking. This allows you to display data from the linked form in the form link item.
Configuring a Form link Item
To configure Item-to-Form linking:
- Navigate to Studio > Schedule and click Use drag and drop editor.
- Click Edit Form () to open the Form you want to add the Item-to-Form link to.
- On the Components panel, drag the Form Link Item to the desired location on the Form.
- In the New Form Link Item popup, enter the item’s Label and Name, and select the Form you want to link from the Linked Form dropdown menu.
- Click Save.
Configuring Display Items
Once you’ve created the Form Link Item, you can configure up to five items to display from the linked form in the Item Properties panel. Only non-repeating items can be selected, and any items in a repeating item group will be hidden in the Display Items dialog.
To configure Display Items:
- Navigate to the Item Properties panel in the Drag and Drop Editor or Studio > Items.
- In the Properties panel, in the Data Type section under Display Items, click Edit.
- In the Display Items dialog, use the Arrow buttons to add Available Items in the left column to the Selected Items column on the right.
- Click Save.
Deleting an Item-to-Form Link
You can remove the Item-to-Form link from a form in the Drag and Drop Editor in the Studio tab.
To delete an Item-to-Form Link:
- Navigate to Studio > Schedule and click Use drag and drop editor.
- Click Edit Form () on the Form.
- Locate the Form Link item and click Remove ().