Creating Rules (V1)
18R3 & Earlier
You can create data validation rules by using the rules engine to validate data in Veeva EDC. Vault can then perform certain tasks based on the evaluation of the rule:
- Create a system-generated query once a user leaves the field.
- Display Event Groups in a Study based on entered data.
- Conditionally enable and disable certain Items based on entered data.
You can also use formulas to define unit conversions. When you have defined unit conversions for your Study, Veeva EDC can convert and store entered values with the correct unit, regardless of a data entry user’s localized entry format.
Expression Engine Version: The content below refers to the original formula grammar and rule editor (Expression Engine V1) from before the 19R1 release in April 2019. If your Study was created after to the 19R1 release, see Creating Rules (V2).
System-Managed Data Validation Rules
Data validation rules can enforce constraints on single Items. Veeva EDC uses the properties you define in the Properties panel for Item Definitions to create system-managed data validation rules. Veeva EDC automatically creates data validation rules for the following properties:
- Required field (Required checkbox)
- Range validation (Minimum Value and Maximum Value)
- Future date validation (Future Date)
By default, Vault doesn’t list system-managed rules in the User Defined Rules tab. If your organization wants to display these rules in Studio, you can choose to do so.
To show system-managed rules in the User Defined Rules tab:
- Navigate to Admin > Business Admin > Study Settings.
- Click + Create.
- For Name, enter “show_system_rules”.
- For Study, select your Study.
- For Value, enter “true”.
- Click Save.
When enabled, system-managed rules are viewable in Studio’s Rules tab, but you can only edit them from the related Item Definition’s Properties panel. System-managed rules don’t have the rule name highlighted in blue and aren’t clickable.
Rule Properties
You can perform additional configuration on your rules from the Properties panel. Required properties have a yellow background. For an explanation of available properties, see Rule Design Properties.
Data Validation Queries with Rules
You can create data validation rules across multiple items, as well as create rules for single items not based on the properties for system-managed rules. When an entered Item value does not match your defined criteria, Vault creates a query.
- Navigate to the Rules tab.
- Click + New Rule.
- Enter a Name.
- Choose a Form where your rule will apply.
-
In the Criteria tab, enter your Expression. You cannot save a rule until your expression’s syntax is valid.
- Click the Actions tab.
- From the Action Type drop-down, select Query.
-
Enter an Item for the query to Post To. You must use the full, exact Item name (Name) field from the Properties panel).
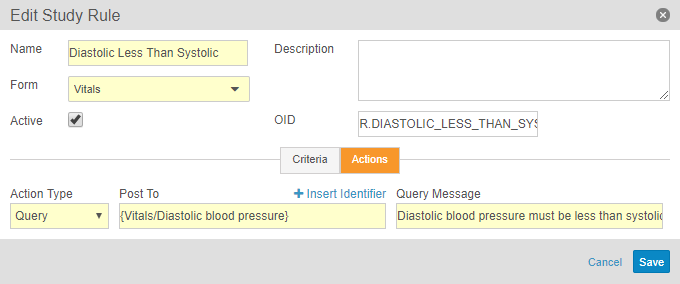
- Enter a Query Message. This text displays as a query comment on the form.
- Click Save.
The data validation rule is now active in your study. To deactivate any existing rules, deselect the Active checkbox.
Data validation rules display as clickable links in the Rules tab. Clicking the link reopens the Add Study Rules dialog, where you can edit your rule. To open the Properties panel for a rule you created, click the rule’s row next to the link.
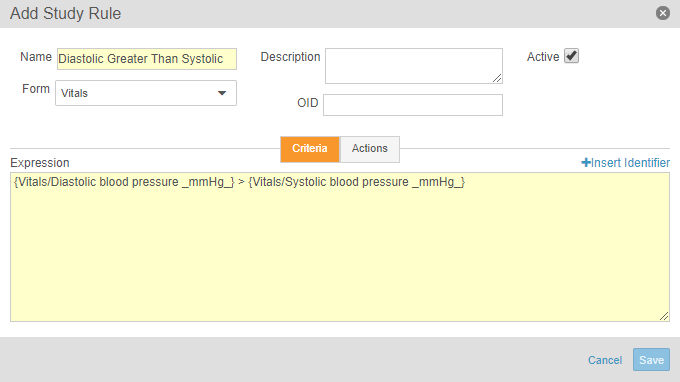
Example Data Validation Rule
{Vitals/Diastolic Blood Pressure} > {Vitals/Systolic Blood Pressure}
In this example, Veeva EDC generates a query if the leftmost item value, Diastolic Blood Pressure, is greater than the rightmost item value, Systolic Blood Pressure. Both of these items are on the Vitals form. Because this formula includes two identifiers, each identifier is surrounded by curly braces.
Referencing a Casebook Version Number
You can configure a data validation rule to evaluate only subject Casebooks on a certain version. For example, you could have a rule run on all Casebooks with a Version less than 8. This type of rule is useful when you’ve updated your Casebook Definition in such a way that a certain rule is no longer valid based on the new design.
To reference a Version number, use the following syntax: {@casebook__v.casebook_def__vr.version__v}.
dateTimeDiff({Demographics/Birth Date Time}, {Screening}) >= 0 &&{@casebook__v.casebook_def__vr.version__v} > 7
In the example formula above, the rule determines if the difference of the subject’s Birth Date & Time and the date and time of their Screening event is greater than or equal to 0 only when the casebook version is greater than 7.
Archiving (Deleting) Rules
Deleted rules are Archived. Archived rules behave in the same way as Inactive rules. Vault excludes these rules from validations and documentation, deploys them (in the Archived status), and prevents users from marking them as Active. That prevents these rules from executing.
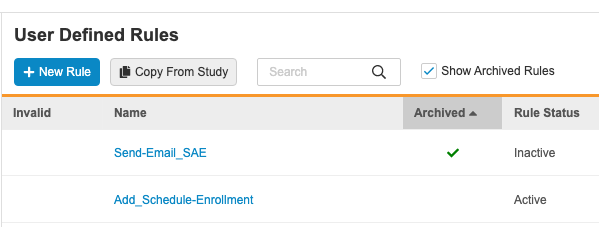
By default, archived rules aren’t included in the User Defined Rules listing. Select the Show Archived Rules checkbox to include them. Archived rules have a green checkmark () in the Archived column.
How to Archive a Rule
To archive a rule:
- Navigate to Studio > User Defined Rules for your Study.
- Locate your rule in the list.
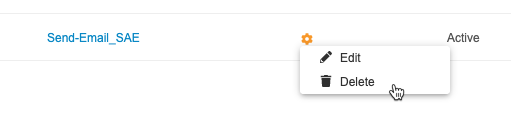
- Hover over the rule’s Name to show the Actions menu.
-
From the Actions menu, select Delete.
- In the Delete Rule confirmation dialog, click Delete.
Your rule is now Archived. Select the Show Archived Rules checkbox to show it in the list.
How to Restore a Rule
To restore an archived (deleted) rule:
- Navigate to Studio > User Defined Rules for your Study.
- Select the Show Archived Rules checkbox.
- Locate your rule in the list.
- Hover over the rule’s Name to show the Actions menu.
- From the Actions menu, select Restore Deleted Rule.
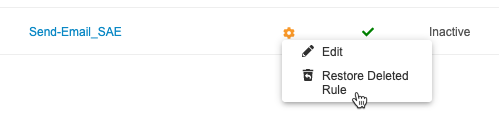
Vault restores the rule. The rule is now active and will execute normally.
Dynamic Study Design with Rules
You can use data validation rules in your Study to dynamically add Event Groups based on user-entered data. For example, you can configure rules to control which Event Groups appear in a Casebook based on a subject’s cohort or randomization number. You can also use data validation rules to dynamically enable and disable data collection items based on another Item value.
To create a dynamic study design rule:
- Navigate to the Rules tab.
- Click + New Rule.
- Enter a Name.
- From the Criteria tab, enter your Expression. When the formula you enter returns True with the user-entered data, Veeva EDC adds the Event Group, Event, or Form, or enables the Item.
- Click the Actions tab.
- From the Action Type drop-down, select Add Schedule to add an Event Group, Add Event to add an Event, Add Form to add a Form, or Skip Item to conditionally enable an Item.
-
From the Set Action to Object drop-down, select the Event Group, Event, Form, or Item that you want Vault to add or enable. Note that you can only select Events and Forms with the Dynamic checkbox selected with Add Event and Add Form action types.

- Click Save.
Event Groups
With this data validation rule, when a user enters data that Veeva EDC evaluates as True, Veeva EDC automatically adds the specified Event Group to that Casebook.
You must use data validation rules to surface any Event Groups after the first Event Group in a Study. If you simply want to display all of your Event Groups for a Study at once, you can configure rules to do so. See the example below.
textEquals({ItemGroup/Item}, _Item_value_)
To display all Event Groups, use an Item on the first Form in your Study. Include all possible values in the formula, so that the formula returns true no matter which Item value is entered. You’ll need to configure a rule for each Event Group you want to display. For example, if a study has two cohorts, and the cohorts are split into Event Group A and Event Group B, you must create one rule to add Event Group A and another rule to add Event Group B.
Events & Forms
Before using dynamic Events and Forms, you must contact Veeva Support to enable this feature.
You can conditionally add Events and Forms to a Casebook based on user-entered data by configuring a rule using the Add Event or Add Form action type on the controlling Item. When that rule evaluates as True, Veeva EDC automatically adds the dependent Event or Form to the Casebook. If the rule evaluates as False, Vault does not add the Event or Form.
To use a Event Definition or Form Definition with these rules, you must select the Dynamic checkbox on that Event or Form in the Properties panel.
For example, you can create a rule that adds the Follow Up Visit event when a user selects the Follow Up Visit Required checkbox on a form.
To conditionally add multiple Events or Forms, enter multiple Identifiers in the Set Action to Object field, separated by a comma. Note that you can only enter multiple Events for an Add Event rule and multiple Forms for an Add Form rule.
Unlike dynamic Event Groups, you do not have to create Add Event and Add Form rules to show any Event or Form in your Study. These rules are intended for use on an ad hoc basis to conditionally add Events and Forms, similar to the functionality available for dynamic fields.
Deleting Add Event & Add Form Rules
Unlike other rule types, Add Event and Add Form rules create an additional object record upon rule execution: Rule Result. If you need to delete a rule of these types, and the rule has already been executed, you will first need to delete all existing Rule Result records related to the rule.
Note that you can delete these rules without the steps below if you have not yet published your Casebook Definition.
To delete Rule Result records:
- Navigate to the Rule Result object from Admin > Business Admin.
- Locate all Rule Result records with the rule you want to delete in the Rule Definition field. You can choose to add a Rule Definition column by choosing Edit Columns from the Actions menu.
- On each Rule Result record, choose Delete from the Actions menu for each Rule Result record.
- Click OK.
Fields
To conditionally enable a data entry Item or Item Group, configure a rule using the Skip Item action type on a single, controlling Item. When the skip-item rule evaluates as True, Veeva EDC automatically disables the dependent Item or Item Group. If the rule evaluates as False, Veeva EDC leaves that dependent Item or Item Group enabled.
In the current release, you can only use a single, boolean- or codelist-type Item as your controlling Item in the expression.
However, you can choose to set multiple possible values for the controlling Item as conditions for disabling a dependent Item or Item Group by using OR statements in your expression.
For example, you can build a rule that conditionally disables the Pregnancy Test Result item based on the Gender item.
textEquals({Screening Visit/Demographics/Creation Criteria/Gender}, Male)
With this rule, set the Skip Item action to the Pregnancy Test Result item. Vault evaluates the user-entered data for Gender and disables the Pregnancy Test Result item when the Gender item is set to Male.
To conditionally enable multiple Items or Item Groups, enter multiple Identifiers, separated by a comma. The example below would enable or disable the Pregnancy Test and Birth Control items.
{Creation Criteria/Pregnancy Test}, {Creation Criteria/Birth Control}
Note that Vault does not create required Item queries on disabled Items.
Derive Values with Rules
You can use rules in your Study to automatically fill an Item field with a derived value. Before you can use this feature, an Admin must contact Veeva Support to enable it.
In the current release, Set Item Value-type rules are single-Form. Any Items you reference in the expression must be on the same Form as the derived Item.
To create a rule to derive an Item value:
- Create or edit an Item Definition and set it to the Derived Item Type.
- Navigate to the Rules tab.
- Click + New Rule.
- Enter a Name.
- From the Criteria tab, enter your Expression. Veeva EDC populates the Item with the result of this expression. Note that the data type returned by this expression must match the data type expected for the Item.
- Click the Actions tab.
- From the Action Type drop-down, select Set Item Value.
- From the Item drop-down, select the Item that you want Vault to populate with the calculated result of the expression. Note that only Items with Derived selected for Item Type are available.
- Click Save.
Example Set Item Value Rule
On a Form, you may want to include an Item field for BMI. Instead of having your investigators calculate each subject’s BMI independently, you can configure Veeva EDC to derive this Item value automatically. Create an Item Definition for BMI and set the Item Type property to Derived. The BMI item must be on the same Form as the Height and Weight items.
Create a rule with the following expression, and then choose the Set Item Value action and select your BMI item.
{Vitals/Weight}/({Vitals/Height}*{Vitals/Height})
Once the user completes the Form, Veeva EDC will automatically populate the BMI item field with the result of the expression.
Set Subject Statuses with Rules
You can use rules in your Study to automatically set a subject’s Status based on user-entered data.
Vault maintains a history of each subject’s status over time. If a user later edits the controlling data, causing the rule to evaluate as false, Vault returns the Subject to the previous (most recent) status.
Available Subject Statuses
The following options are available for subject Status:
- Pre Screen
- In screening
- Screen Failure
- Enrolled
- Randomized
- End of Treatment
- Withdrawn
- Complete
Vault only allows you to move a Subject into a more advanced Status. For example, you can move a subject from Enrolled to Randomized, but you can’t move a subject from Complete to Enrolled.
Vault records either the Event Date or the vale for a date or datetime Item as the date for the status change. Vault records this date using different fields on the Subject object (subject__v), depending on the target Status. Note that the Pre Screen status doesn’t have a date field on Subject because it’s the initial subject status.
- In screening → Screened Date (
screened_date__v) - Screen Failure → Screen Failed Date (
screen_failed_date__v) - Enrolled → Enrolled Date (
enrolled_date__v) - Randomized → Randomized Date (
randomized_date__v) - End of Treatment → End of Treatment (
end_of_treatment_date__v) - Withdrawn → Withdrawn Date (
withdrawn_date__v) - Complete → End of Study Date (
end_of_study_date__v)
If you choose an Item for the status change date, that Item must be of the Date or DateTime data types and must not belong to a repeating Item Group. For unknown dates and times, Vault replaces the unknown part of the date or time with the minimum (earliest) possible value.
When a rule evaluates to true, Vault always adds a status date for a particular Status, regardless if that status is the latest or whether the subject actually moved into that status.
When the rule that sets the most advanced status is rolled back, for example, due to a form being reset, Vault also removes the subject status date for that status. If you have Enable Subject Status Date Rollback set to Yes in Studio > Settings, then any status date stored for a subject will be removed when the associated Subject Status rule evaluates to false.
When you have Enable Subject Status Date Rollback set to No in Studio > Settings, if a rule that is not setting the most advanced status evaluates to false, Vault doesn’t remove the subject status date for that status.
Set Subject Status Rules Created Pre-20R1
If you created any Set Subject Status rules prior to the 20R1 release (April 2020), you can continue to use them without choosing a date. However, if you edit the rule, you won’t be able to save your rule until you’ve chosen a date for the status change.
Set Subject Status & Subject IDs
If your Study uses the by_site subject ID generation method, Vault will increment the subject’s ID each time that a rule returns that Subject to the In Screening, regardless of existing Subject ID values.
Example Set Subject Status Rule
You may want to automatically set a subject’s Status as In screening once there is an Event Date for your screening event. You can do so using a Set Subject Status rule.
Create a rule with the following expression, and then choose the Set Subject Status action type and the In screening status.
Not(IsBlank(@Screening.Screening.event_date__v)
Once the Event Date for the Screening event is not blank (after a data entry user enters a date), Vault will update the Status for that Subject to In screening.
Send Email Notifications with Rules
You can use rules in your Study to automatically send an email notification to a group of users when certain conditions occur.
Learn more about sending email notifications.
Available Rule Action Types
The following Action Types are available for rules in Veeva EDC:
| Action Type | Fields | Result |
|---|---|---|
| Open Query | Query Level, Item/Event, Query Message |
When the expression evaluates as True, Vault will create a query on the selected Item or Event Date with the entered Query Message (field labeled "Enter message" in the Rule Action panel). Query messages have a 500 character limit. Special characters can be used in query messages, but they may not appear correctly in export files. |
| Add Event Group | Event Group | When the expression evaluates as True, Vault will add the selected Event Group to the casebook schedule. |
| Add Event 1 | Event | When the expression evaluates as True, Vault will add the selected Event to the casebook schedule. |
| Add Form 1 | Form | When the expression evaluates as True, Vault will add the selected Form to the casebook schedule. |
| Disable 4 | Identifier | When the expression evaluates as True, Vault will disable the selected Item. |
| Add Assessment 2 | Assessment | When the expression evaluates as True, Vault will create an Assessment. |
| Set Subject Status | Status | When the expression evaluates as True, Vault updates the subject's status to the selected status, and records the status change date. If the subject's current status and the status for the rule are the same, no change occurs. |
| Create Integration Record1 | N/A | When the expression evaluates as True, Vault creates an Integration Task Record. |
| Set Derived Value | Item | Vault populates the selected Item with the calculated result of the expression. |
| Send Email | N/A | When the expression evaluates as True, Vault sends an email, using the configured Subject and Message, to a pre-configured recipient group. |
| Progressive Display 2, 3, 4 | N/A | In the current release, this action type is only available for system-generated rules. To configure Progressive Display, edit an item's properties from Studio > Schedule. Learn more. |
| Override Review Plan | Review Plan Task, Override default plan with | When the expression evaluates as True, Vault overrides the default Review Plan for the Form (the Form Definition selected in the Rule Details panel) with the chosen Review Plan. |
| Set as Ready to Randomize 5 | N/A | When the expression evaluates as true, Vault marks the subject as Ready for Randomization, which enables the Randomization option in the Data Entry tab. |
|
1 Contact Veeva Support to enable this action type. 2 This action type is only available in vaults where Role by Study is enabled. Contact Veeva Support to enable Role by Study in your vault. 3 This action type is only available in studies using the automated deployment model. 4 The availability of this action type depends on the Rules Version field on the Study Configuration record. If the Rules Version is "2", the Disable action is not available. 5 This action type is only available in studies with Randomization configured. |
||
Rule Processing Order
After a data entry user completes a Form, Veeva EDC processes rules in the following Action Type order:
- Set Item Value
- Add Schedule
- Add Event
- Add Form
- Query
Within each rule type, Veeva EDC processes rules in the following order:
- Single Form Rules (controlling and dependent objects are in the same Form)
- Cross Form - Same Event Rules (controlling and dependent objects are in different Forms)
- Cross Form - Cross Event Rules (controlling and dependent objects are in different Events)
Vault processes rules in this order so that any Query-type rules that are affected by the derived Item value or any added Event Groups, Events, and Forms can be processed with all expected data present.
Formulas for Unit Conversion
You can also use formulas to define unit conversions. See Defining Default Units & Conversions in Studio.
Available Operators & Functions
Several operators and functions are available for use in data rule validations. See the Veeva Formula Reference Guide for a complete list.
Guidelines for Formulas
Use the Name of the Item Group and the Item to identify Items in your formula. If the study design uses the Item more than once, identify the Item hierarchically until it is unique. If there are multiple identifiers in your formula, use curly braces around the {identifier}. If your formula contains multiple operators, use parentheses. Vault handles formulas from left to right. For nested functions, Vault handles the sub-functions from left to right before handling the parent functions. Vault handles arithmetic and logical operators before other types of operators, following the standard order of operations. You can override the order of operations using parentheses. Note that Veeva EDC treats numbers as floats, resolving them at the end of a formula evaluation.
Guidelines for Expressions
Use these guidelines for writing an expression:
- Decimal points are periods, regardless of your Vault’s locale.
- The maximum expression length is 1,500 characters.
- When an expression includes multiple identifiers, surround identifiers with {curly braces}.
- You must define an Item hierarchically, until it is unique, and separate identifiers with a forward slash:
{Event/Form/Item Group/Item}. Example:{Baseline Visit/Vitals/Blood Pressure/Systolic blood pressure} - To define the units of a value, append the Unit name between underscores.
Example:
Pulse_bpm_orDiastolic blood pressure_mmHg_
Guidelines for Functions
Use these guidelines for adding functions to a formula expression:
- Function names are case-sensitive.
- Functions may have one or multiple arguments. Different functions allow different numbers of arguments.
Guidelines for Boolean-Type Items
When you write a formula referencing a boolean-type Item, use true for Yes (selected checkbox) and false for No (unselected checkbox).
Error Handling
Any syntax errors must be resolved before you can create or update your rule. When you click out of the Criteria field, Vault displays Expression is invalid unless your formula syntax is correct. The following are common syntax errors:
- Return types are mismatched. For example, if the return type is Date, but your expression returns a number, you will receive an error.
- Your formula is missing a closing parenthesis, or you have mismatched parentheses.
- You have an incorrect number of arguments in your function. For example, you have three arguments in an
if(expression, value 1, value 2)function. - Your function has an incorrect parameter value.