Managing Casebook Versions & Amendments
Once a study designer publishes a casebook version in Studio, you can easily manage your casebook versions site-by-site in the EDC Tools > Casebook Versions.
- For details about publishing casebook versions, see Working with Casebook Versions in Studio.
- For more information about how casebook versioning works in Veeva EDC, see Casebook Versioning Overview.
Prerequisites
Users with the standard CDMS Lead Data Manager application role and a Security Profile that grants access to the EDC Tools can perform the actions described above by default. If your vault uses custom Application Roles, your role must have the following permissions:
| Type | Permission Label | Controls |
|---|---|---|
| Standard Tab | EDC Tools Tab | Ability to access the EDC Tools tab |
| Functional Permission | Manage Amendments | Ability to initiate subject transfers and retrospective amendments from EDC Tools |
If your Study contains restricted data, you must have the Restricted Data Access permission to view it.
Learn more about Study Roles.
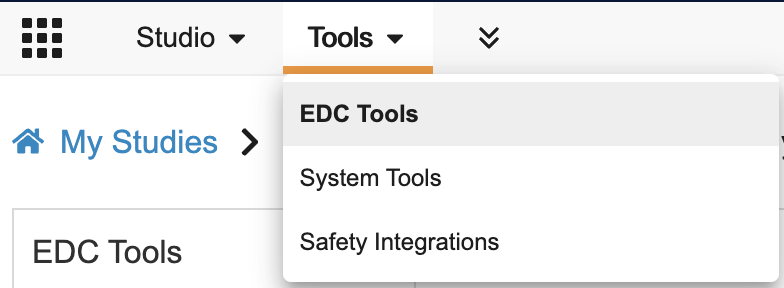
Accessing EDC Tools
To access the EDC Tools administration area, click the Tools tab in the primary navigation bar, and then click EDC Tools.
Casebook Versioning
Veeva EDC’s casebook versioning feature allows studies to iterate on their designs. A study team can publish and use an initial version of the study, and then if changes are required during execution, they can amend the design with a new version.
Casebook Amendments
Whenever your sponsor makes a change to your study design, you can use casebook amendments to update your sites to use that new version.
With retrospective casebook amendments, Vault updates all existing casebook data to reference the new version, modifying any previously collected data to comply with the new version. For example, if a new version removed the Secondary Baseline Visit form from the study, a retrospective casebook amendment would remove the Secondary Baseline Visit form from any existing Casebooks, even if the site already collected data for that form.
Navigating EDC Tools > Casebook Versions
In EDC Tools, you’ll manage your casebook versions from the Casebook Versions tab. Casebook Versions has three (3) subtabs:
- All Versions
- Active Versions by Site
- Amendment History
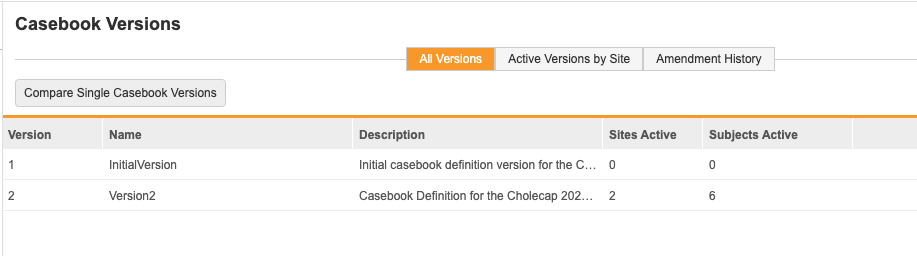
All Versions
From All Versions, you can view a list of all existing Casebook Definition versions for your Study. You can see the number of subjects and sites active on each version.
You can also compare two casebook versions in your Study or compare a casebook version to another Study, either in the current vault or another vault. This creates a comparison report Excel™ file. Learn more about comparing casebook versions.
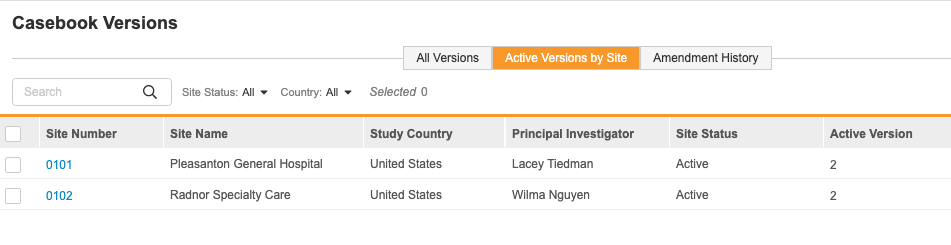
Active Versions by Site
From Active Versions by Site, you can view a list of sites within your study, and what casebook version is currently assigned to each site. You can also initiate casebook amendments and transfer subjects from Active Versions by Site. Note that the amendment options do not display until more than one published version exists for your study.
Amendment History
From Amendment History, you can view a list of all past amendments within your study. You can use this subtab to review past amendments, including which Subjects and Sites were impacted, and view summary and log files for each amendment.
You can choose to group amendments by Site or None (the default grouping). When you group by Site, you can easily see the number of amendments and updated Subjects for each of your Sites.
Deploying to Sites
Once a study designer has published the initial version of your Casebook Definition, and, if applicable, imported it from a development to production vault, Vault automatically assigns the most recent, published version available to newly created sites.
For example, if you created two sites in January 2019, when there was only one published version of your study, those sites were automatically assigned to that first version. Since then, there were two more versions added to your study. When you create a new site, Vault automatically assigns the new site to the most recent version, Version 3.
As you add new versions to your Study, you will need to update the Active Version of your Sites. The Active Version is the version that Vault uses to create new Casebooks at that Site.
Update a Site’s Active Version
You can update the Active Version assigned to one Site, or you can assign the same Active Version to multiple Sites at once.
Update the Active Version for a Single Site
To update the Active Version of a single Site:
- Navigate to your Study in EDC Tools.
- Open Sites.
- Click the Site Number of the Site you want to update. Vault opens the Edit Study Site dialog.
- Select a new Active Version from the drop-down.
- Click Save.
You can now run an amendment to update existing Casebooks at the site or subject level to the new casebook version.
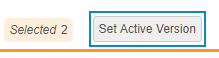
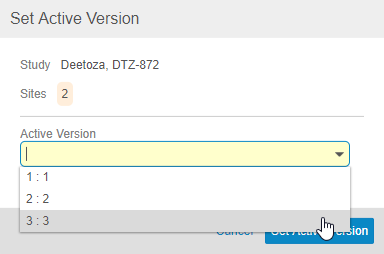
Update the Active Version for Multiple Sites
To update the Active Version of multiple Sites:
- Navigate to your Study in EDC Tools.
- Open Sites.
-
Select Sites to update.

- Optional: Select the All Sites checkbox in the header to select all Sites.
-
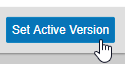
Click Set Active Version. Vault opens the Set Active Version dialog.
-
Select an Active Version from the drop-down.
-
Click Set Active Version.
- Vault updates the Active Version for all selected Sites. From this point forward, all Casebooks created within these Sites will be based on the assigned Active Version.
You can now run an amendment to update existing Casebooks at the site or subject level to the new casebook version.
How to Initiate a Retrospective Amendment
Once a study designer has published a new version of your study, and that version has been deployed to your current environment, you can deploy it to sites using a retrospective casebook amendment. Note that Vault does not apply amendments to any Casebooks that are locked or that contain locked Forms.
When applying a new casebook version to multiple Studies in the same vault, or to multiple sites in a large Study, you may need to run the Retrospective Amendment job in batches. Learn more about Retrospective Amendment Job Considerations for Large or Multiple Studies.
Frozen forms may become unfrozen if an amendment updates the form. If the amendment encounters a locked form, it skips the subject.
Vault automatically uses the first Event Group and Event in the study’s schedule to apply the new version.
Prerequisite: Before you can initiate an amendment, the version that you want to use must be available in your environment and you must first update the Active Version of any site you’re upgrading.
To initiate a retrospective casebook amendment:
- Navigate to your Study in EDC Tools.
- Click Casebook Versions.
- Click Active Versions by Site.
- Select the Sites you want to move to the new version. You can choose one, some, or all of your Sites.
- Click New Retrospective Amendment or select New Retrospective Amendment from the site’s Actions menu.
- Select the Target Version. This is the new version that you are moving sites onto.
- Set the scope of your amendment:
- Select Update all subjects to update all subjects at the chosen sites.
- Select Update specific subjects to select individual subjects to update. If you choose this option, Vault displays a list of subjects. Select each Subject that you want to receive the amendment.
- Status for Changed forms: To keep any existing, submitted forms in the Submitted status, select Leave as Submitted for Status for Changed Forms. To set the status of any modified forms as In Edit, select Set to In Progress.
- Click Run Now. Vault begins a job to apply your retrospective amendment to your sites. Rules must be run in a separate job after the retrospective amendment is complete. Vault sends you an email notification when the job is complete. You can view the job’s status and log from EDC Tools > Jobs.

When the job is finished, your amendment is applied. The new version is now the Active Version for all sites that you amended. Any new casebooks will reference that version. Existing casebooks have been promoted to the new version. Because retrospective amendments update collected data, Vault may create system-generated queries after the amendment for any data that doesn’t conform to the new version.
Retrospective Amendments and Locked Forms: Vault does not apply amendments to any Casebooks that are locked or that contain locked Forms.
Frozen Items & Post Go-Live: If you make changes Post Go-Live that affect a frozen item then run a retrospective amendment on that item, the item will become unfrozen during Post Go-Live. If changes made Post Go-Live don’t impact frozen items, these items will remain frozen.
Default Data Values: If you added default data for an Item Group in your new version, the default values aren’t applied to existing Forms. To apply these values to an existing Form, a user must reset the Form.
Run Rules After Design Changes: We recommend that you initiate a Run Rules job from EDC Tools > Rules after you make an amendment or make post go-live changes to rules. This ensures that your casebooks are fully updated and cleans up obsolete rule results that were made irrelevant.
Retrospective Amendment Job Considerations for Large or Multiple Studies
The processing time for a Retrospective Amendment job depends on the number of Subjects in your Studies. Retrospective Amendment jobs run on larger Studies can block other Retrospective Amendment jobs in the same vault. This can also be an issue when running Retrospective Amendment jobs for multiple Studies at the same time. The variables that can impact run duration for Retrospective Amendment jobs include:
- Number of Studies a Retrospective Amendment job is being run on simultaneously
- Number of Sites in a Study
- Number of Subjects in a Study
If you find that prolonged processing durations for Retrospective Amendment jobs are impeding your workflow on a regular basis, there are several steps you can take to reduce the impact. To avoid prolonged Retrospective Amendment jobs blocking other Retrospective Amendment jobs in your vault, you can do the following:
- Run the Retrospective Amendment job on several Sites from the Study at a time by selecting a subset of Sites or Subjects for processing in each job. For example, if your Study has three sites with 20 Subjects, and 20 Sites with 2-5 Subjects, you could run a Retrospective Amendment job on the large Sites as one batch, and on the small Sites as another batch. When running the Retrospective Amendment job in batches, you can view the amendment history to track what changes have already been queued for the Study.
- If possible, avoid running Retrospective Amendment jobs on multiple Studies on the same day.
If you regularly have to split Retrospective Amendment jobs into batches and it impedes your workflow, you can reach out to Veeva Services to discuss other options.
Retrospective Amendment Impact on Frozen Data
Vault will automatically retain the frozen status on unimpacted data and will unfreeze data as appropriate where there are changes to the impacted forms when performing a retrospective amendment.
You can expect the following behavior after a retrospective amendment is run:
- Unit/Codelist Item: When labels change, the Codelist Item is not unfrozen when the change is applied to the frozen Codelist Items
- Item: When Type, Label, Short Label, or Hint Labels are changed, the Item is unfrozen if there is a change to the Item
- Item Group: When Override Label or Short Label are changed, the Item Group is unfrozen if there is a change to the Item Group
- Form: When form properties change (e.g., form label or description), the Form is not unfrozen when the change is applied to the frozen Form
- Event: When a form is added or removed from an Event, the Event is not unfrozen when the change applies to the frozen Event
- Casebooks: When a Casebook is frozen and there is a change to the subject, the Casebook is not unfrozen when the change applies to the frozen Casebook
- Newly added Items, Item Groups, Forms, and Events will be added in an unfrozen state (newly added Item Groups will have all the items added in an unfrozen state)
Retrospective Amendment Job Log and Output File
Vault provides a CSV job log for retrospective amendment jobs. The output file and log for a successful retrospective amendment job include an output file in CSV format and a log file in TXT format. This log includes details about which objects were affected by the job and whether or not the job was successful on each object.
When your retrospective amendment job is completed, you can download your output files from EDC Tools > Job History. To access these files, click the icon () in either the Log or File column.
The CSV output file you can export for the retrospective amendment job contains the following columns:
- Casebook ID: The ID of the amended Casebook object
- Target Casebook Version: The target version number of the new Casebook Version
- Result: Whether an error occurred for the given Casebook object
- Message: The error message code if an error occurred
Destructive Changes
You must have destructive changes enabled for your study to run a retrospective amendment job that contains a destructive change.
When you attempt to run an amendment that contains a destructive change, Vault first determines if there is a destructive change. Then Vault determines if there are any Casebooks with form data in any version. If there is form data, and the amendment contains a destructive change, the retrospective amendment fails, even if none of the data was in the selected source version or if none of the data would’ve been directly impacted by the targeted version.
Destructive changes include the following actions:
- Removing (deleting) an Event Group from a Casebook Definition
- Removing (deleting) an Event from an Event Group
- Removing (deleting) a Form from an Event
- Removing (deleting) an Item Group from a Form
- Removing (deleting) an Item from an Item Group
- Moving any child study object from its parent study object, such as moving an Event from its original Event Group to a different Event Group, as this requires the deletion and recreation of the child object
Learn more about study design changes and destructive changes.
In Studio, Vault displays a warning when you remove any of these definition relationships. You can identify destructive changes by comparing the latest Casebook Definition version to the previous Casebook Definition version. After downloading the output file, review the Schedule tab. Any change where the Type column is “Object”, the Difference column is “Modified”, and the Latest Version is “[Not Present]” is a destructive change.
When an amendment fails due to destructive changes, your organization has two options:
- Initiate the process to allow the destructive change with the amendment.
- Create a new casebook version and restore the removed component. This way, the Casebook Definition version no longer contains a destructive change, and an amendment onto that version would succeed.
Changes Allowed Between Versions for Retrospective Amendment
The table below reviews the changes allowed between versions for retrospective amendments:
| Object | Change | Supported? | Notes |
|---|---|---|---|
| Event Group | Name |
No | |
| Event Group | Properties: Label, Description, External ID, Display Override Label, and Help Text |
Yes | |
| Event Group | Delete the Event Group |
Yes | |
| Event Group | Repeating to Non-Repeating |
No | You can only change from Non-Repeating to Repeating, not vice versa. |
| Event Group | Non-Repeating to Repeating |
Yes | |
| Event Group | Increasing or Decreasing the Repeat Maximum Value |
Yes | A decrease of the Repeat Maximum for an Event Group only applies to new instances of the Event Group. |
| Event Group | Changing the Event Group Type to EDC from Unscheduled and vice versa |
No | |
| Event | Name |
No | |
| Event | Properties: Label, Description, External ID, Display Override Label, and Help Text |
Yes | |
| Event | Delete the Event |
Yes | |
| Event | Change the Event Type |
No | |
| Event | Change from Dynamic to Non-Dynamic and vice versa |
Yes | |
| Event | Changes to the Event Window Configuration |
Yes | |
| Form | Name |
No | |
| Form | Properties: Label, Description, External ID, Display Override Label, and Help Text |
Yes | |
| Form | Delete the Form |
Yes | |
| Form | Repeating to Non-Repeating |
No | You can only change from Non-Repeating to Repeating, not vice versa. |
| Form | Non-Repeating to Repeating |
Yes | |
| Form | Increasing or Decreasing the Repeat Maximum Value |
Yes | |
| Form | Change from Dynamic to Non-Dynamic |
No | You can only change from Non-Dynamic to Dynamic, not vice versa. |
| Form | Change from Non-Dynamic to Dynamic |
Yes | |
| Form | Change from Restricted to Unrestricted or vice versa |
No | |
| Form | Add an Item Group to the Form |
Yes | |
| Item Group | Name |
No | |
| Item Group | Properties: Label, Description, External ID, Display Override Label, and Help Text |
Yes | |
| Item Group | Delete the Item Group |
Yes | |
| Item Group | Repeating to Non-Repeating |
No | You can only change from Non-Repeating to Repeating, not vice versa. |
| Item Group | Non-Repeating to Repeating |
Yes | |
| Item Group | Increasing or Decreasing the Repeat Maximum Value |
Yes | |
| Item Group | Change an Item Group’s Default Data |
Yes | Item group default data can change from version to version, but these changes won’t show on the form until the form is reset. |
| Item | Name |
No | |
| Item | Properties: Label, Description, External ID, Display Override Label, and Help Text |
Yes | |
| Item | Delete the Item |
Yes | |
| Item | Change the Item’s Data Type |
No | |
| Item | The following changes to Allow Unknown (Date): No selection to No selection, No selection to Day, No selection to Month & Day, Day to Day, Day to Month & Day, or Month & Day to Month & Day |
Yes | |
| Item | The following changes to Allow Unknown (Date): Day to No Selection, Month & Day to Day, or Month & Day to No Selection |
No | |
| Item | The following changes to Allow Unknown (DateTime): No selection to No selection, No selection to Time, No selection to Day and Time, No selection to Month, Day and Time, Time to Time, Time to Day and Time, Time to Month, Day and Time, Day and Time to Day and Time, Day and Time to Month, Day and Time |
Yes | |
| Item | The following changes to Allow Unknown (DateTime): Time to No Selection, Day and Time to Time, Day and Time to No Selection, Month, Day, and Time to No Selection, Month, Day, and Time to Time, Month, Day, and TIme to Day and Time |
No | |
| Item | Increase to Precision and Length for number, unit, and text (length only) type Items |
Yes | |
| Item | Decrease to Precision and Length for number, unit, and text (length only) type Items |
No | |
| Item | Remove an Item’s Codelist |
No | |
| Item | Changes to Edit Check Properties |
Yes | |
| Form Link | Removal |
Yes |
Form Status Post-Amendment
If you chose the Leave as Submitted for Status for Changed Forms option in step 8 above, submitted Forms remain in the Submitted status.
If you chose Set to In Progress, submitted Forms are set to In Progress except for the following amendment changes:
- Adding a Unit Item to a Unit
- Adding a Codelist Item to a Unit
- Increasing unit Precision and Length
- Changing Label text