Managing Sites
Lead data managers and study administrators can manage their Sites from the EDC Tools area of Veeva EDC. In the Sites tab, they can create new Sites for site personnel to use when conducting the Study.
Managing Sites in Clinical Operations - EDC Connected Studies: Sites in studies connected to Veeva CTMS must be created and managed through CTMS. Sites cannot be created or deleted through Veeva EDC, and their connected fields cannot be edited.
Prerequisites
Users with the standard CDMS Lead Data Manager application role and a Security Profile that grants access to the EDC Tools can perform the actions described above by default. If your vault uses custom Application Roles, your role must have the following permissions:
| Type | Permission Label | Controls |
|---|---|---|
| Standard Tab | EDC Tools Tab | Ability to access the EDC Tools tab |
| Functional Permission | View Study Sites | Ability to view Sites in EDC Tools |
| Functional Permission | Edit Study Sites | Ability to create and edit Sites from EDC Tools |
| Functional Permission | Manage Study Milestones | Ability to lock and unlock Studies and Sites, as well as set the Billing Status for study environments from EDC Tools |
Learn more about Study Roles.
Viewing Study Sites
To view all the sites in your Study, open the EDC Tools tab in your vault, and then open the Sites tab. In this tab, you can view a list of all the Study Site records associated with your Study that you have permission to view, with columns for site details (fields on the Study Site object).
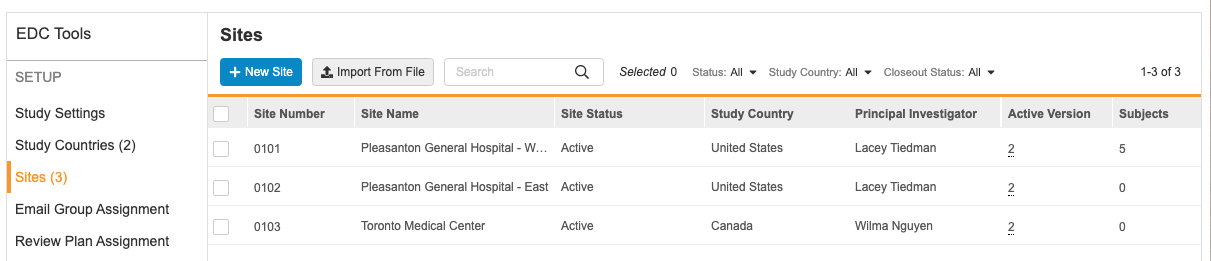
You can click on a column to sort by that column. You cannot sort by the Subjects or Users column.
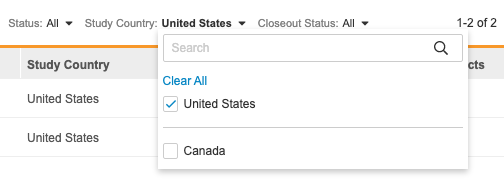
You can also filter your sites by Status, Study Country, or Closeout Status. Select a value from the filter menu to filter by it. You can search for individual values to filter by. To remove a filter, click Clear All in the filter menu.
You can view additional details about a site by clicking the Site Number, which opens the Edit Study Site dialog.
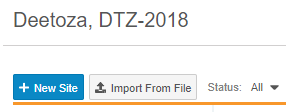
How to Create a New Site
To create a new Site:
- From EDC Tools, open the Sites tab.
-
Click + New Site.
 This opens the New Study Site dialog.
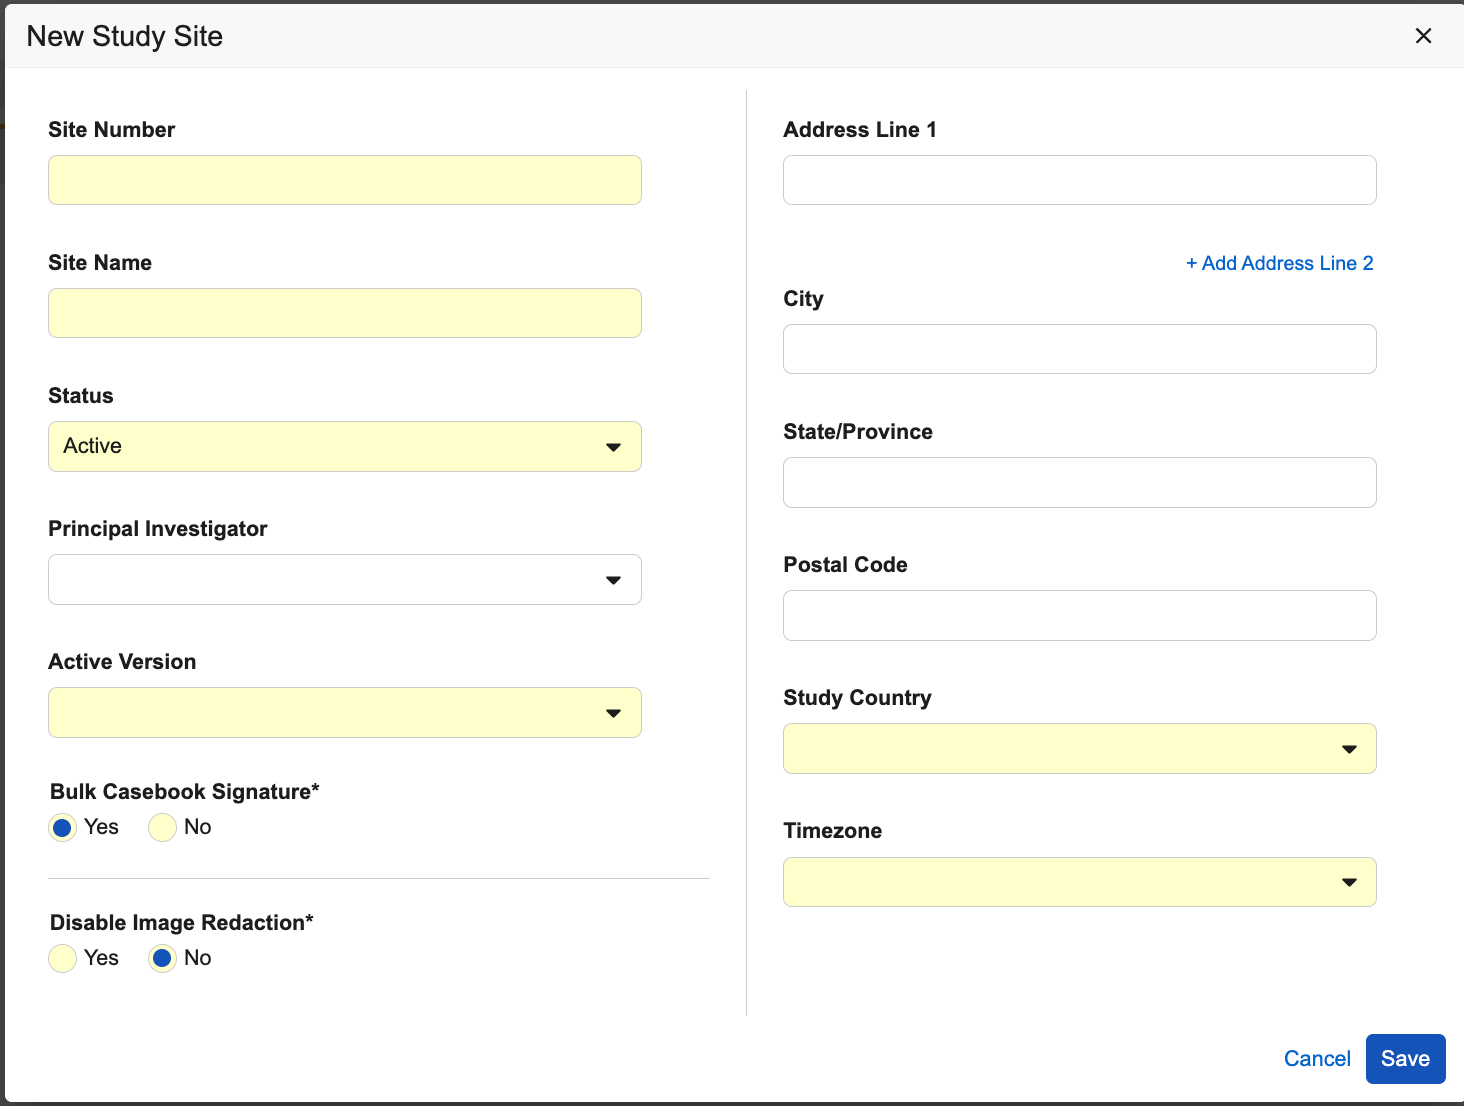
- Enter a Site Number.
- Enter a Site Name.
- Select a Status.
- Select a Principal Investigator.
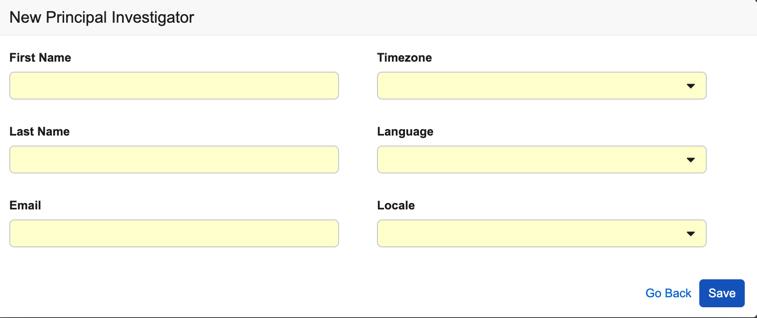
 If the Principal Investigator doesn’t exist:
- Select + Create New Principal Investigator.
- Enter the user’s First Name and Last Name.
- Enter the user’s Email.
- Select the user’s Timezone.
- Select the user’s Language.
- Select the user’s Locale.
- Optional: Enter the user’s Phone number.
- Click Save.
- Select an Active Version.
- Optional: Your Site may include default values (Number of Allowed Subjects and Subject Status Exclusions) for the dynamic site enrollment quota, if that feature is enabled for your study. You can override these defaults on a site-by-site basis. See details below.
- Enter your site’s Address.
- Optional: Choose whether to allow Bulk Casebook Signature for the Site.
- Optional (for imaging-enabled Studies): Choose whether to Disable Image Redaction for the Site.
- Select a Study Country. If the Study Country doesn’t exist:
- Select + Create New Study Country.
- In the Manage Study Countries dialog, use the shuttle menu to move Countries into the Study Countries panel.
- Click Save.
- Select a Study Country if not already selected.
- Select a Timezone.
- Click Save.
Update a Site’s Active Version
If you create a Site before a deployment (before an Active Version is available), you will need to assign an Active Version to the Site after deployment.
You can update the Active Version assigned to one Site, or you can assign the same Active Version to multiple Sites at once.
Update the Active Version for a Single Site
To update the Active Version of a single Site:
- Navigate to your Study in EDC Tools.
- Open Sites.
- Click the Site Number of the Site you want to update. Vault opens the Edit Study Site dialog.
- Select a new Active Version from the drop-down.
- Click Save.
Update the Active Version for Multiple Sites
To update the Active Version of multiple Sites:
- Navigate to your Study in EDC Tools.
- Open Sites.
-
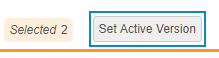
Select Sites to update.

- Optional: Select the All Sites checkbox in the header to select all Sites.
-
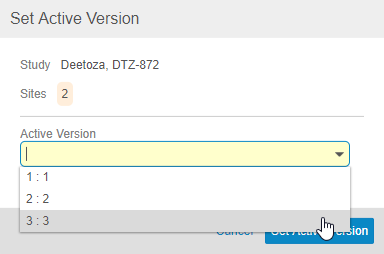
Click Set Active Version. Vault opens the Set Active Version dialog.
-
Select an Active Version from the drop-down.
-
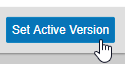
Click Set Active Version.
- Vault updates the Active Version for all selected Sites. From this point forward, all Casebooks created within these Sites will be based on the assigned Active Version.
Dynamic Site Enrollment Quota
This feature reduces the administrative burden of managing site enrollment by introducing automated, real-time enrollment caps at the site level to prevent over-enrollment and manage study budgets effectively.
For each site, you can determine the number of allowed subjects. Vault counts the total number of subjects and subtracts the number of subjects in any of the excluded statuses. Once that count meets the quota, Vault disables the + New Casebook button for that site and disables casebook creation via any custom integrations.
Note that you can transfer Subjects into Sites regardless of the quota count.
How to Edit a Site
To edit a Site:
- Navigate to your Site in Tools > EDC Tools > Sites.
-
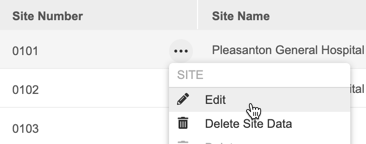
From the Actions menu, select Edit.
- Make your changes.
- Click Save.
Changing a Site’s Timezone: Vault runs the Recalculate Normalized DateTime Values job if you change the site’s timezone. This job updates any datetime values to the site’s new timezone.
How to Delete a Site
- Navigate to Tools > EDC Tools > Sites for your Study.
- Scroll to the Site that you want to delete.
- Hover over that site’s Site Number to show the Actions menu ().
-
From the Actions menu, select Delete.
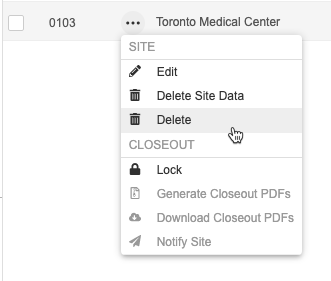
- In the Delete Study Sites confirmation dialog, click Delete.
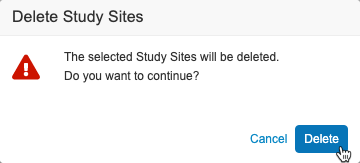
If you need to delete a site in a Production environment, you can do so in EDC Tools if there are no subjects in that site.
Deploying to Sites
Once a study designer publishes the initial version of your Casebook Definition, you can assign that to your Sites via the site’s Active Version field.
As you add new versions to your Study, you will need to update the Active Version of your Sites. The Active Version is the version that Vault uses to create new Casebooks at that Site. You can use an amendment to update existing Casebooks to the new version.
Update a Site’s Active Version
You can update the Active Version assigned to one Site, or you can assign the same Active Version to multiple Sites at once.
Update the Active Version for a Single Site
To update the Active Version of a single Site:
- Navigate to your Study in EDC Tools.
- Open Sites.
- Click the Site Number of the Site you want to update. Vault opens the Edit Study Site dialog.
- Select a new Active Version from the drop-down.
- Click Save.
You can now run an amendment to update existing Casebooks at the site or subject level to the new casebook version.
Update the Active Version for Multiple Sites
To update the Active Version of multiple Sites:
- Navigate to your Study in EDC Tools.
- Open Sites.
-
Select Sites to update.
- Optional: Select the All Sites checkbox in the header to select all Sites.
-
Click Set Active Version. Vault opens the Set Active Version dialog.
-
Select an Active Version from the drop-down.
-
Click Set Active Version.
- Vault updates the Active Version for all selected Sites. From this point forward, all Casebooks created within these Sites will be based on the assigned Active Version.
You can now run an amendment to update existing Casebooks at the site or subject level to the new casebook version.
Exporting Sites
You can export a list of your study’s Sites to CSV or Excel. You can use this file for offline review or to import these Sites into other Studies that use the same sites. You can also modify the file and use it to import those Sites.
To export Sites:
- Navigate to Tools > EDC Tools > Sites for your Study.
- From the Actions menu (), select CSV or Excel.
- Vault begins a job to export your Sites. When finished, Vault sends an email notification.
- Click the link in the email to download the file.
Vault uses “$Study_Site-Export_$ExportDate” for the filename. The export file contains the following columns, with one row for each Site:
- Site Number
- Site Name
- Site Status
- Study Country
- Principal Investigator Name (if provided for your Study)
- Principal Investigator Email (if provided for your Study)
- Principal Investigator Language (if provided for your Study)
- Principal Investigator Locale (if provided for your Study)
- Principal Investigator Timezone (if provided for your Study)
- Principal Investigator Phone (if provided for your Study)
- Address
- Timezone
- Active Version
- Subjects
- Users
- Closeout Status
- Bulk Casebook Signature (if enabled in your Study)
- Disable Image Redaction (if enabled in your Study)
Importing Sites
You can also create new Sites in your Study in bulk by importing them as Site records from a CSV (.csv) file.
Excel Localization for .CSV Files: Veeva Clinical Data uses commas as the default separator for .CSV files. If your system is configured in a non-English language, you may encounter errors when attempting to upload .CSV files created or modified in Excel. We recommend that you change the localization of your system to English while working on the .CSV to avoid this issue.
Creating the Import File
The 26R1 release introduces the Just-in-Time VeevaID registration model and the person__sys object for user management. Because of these changes, site import templates differ depending on whether the Enable Person and Just in Time VeevaID User Creation setting is active. These updates are part of a phased release. All customers will have the new registration model and user management changes by the 26R2 general release.
26R1 & Later
If the Enable Person and Just in Time VeevaID User Creation setting is active in your vault, use the following template to create an import file:
If your Study is using the Bulk Casebook Signature feature, you must use the template that includes the Bulk Casebook Signature column:
Download the Template CSV with the Bulk Casebook Signature Column
If your Study is using the Veeva EDC Imaging, you must use the template that includes the Disable Image Redaction column. Note that if your Study uses both the Bulk Casebook Signature feature and Veeva EDC Imaging, you must ensure your template contains the columns for both of those features:
Download the Template CSV with the Disable Image Redaction Column
To create the import file:
- Download the template and open it in your preferred editor.
- Add a row for each Site you want to add to your Study.
- Save your file.
25R3 & Earlier
If you do not have the Enable Person and Just in Time VeevaID User Creation setting active in your vault, use the following template to create an import file:
If your Study is using the Bulk Casebook Signature feature, you must use the template that includes the Bulk Casebook Signature column:
If your Study is using the Veeva EDC Imaging, you must use the template that includes the Disable Image Redaction column. Note that if your Study uses both the Bulk Casebook Signature feature and Veeva EDC Imaging, you must ensure your template contains the columns for both those features:
To create the import file:
- Download the template and open it in your preferred editor.
- Add a row for each Site you want to add to your Study.
- Save your file.
File Restrictions
- CSV file must be smaller than 20mb.
- Use CSV UTF-8 encoding, or don’t use any special characters.
Required Columns
All of the following columns are required in your file:
| Column | Description |
|---|---|
| Site Number | Enter your site’s Site Number. The Site Number displays in all site listings. If a Site Number contains a leading zero, for example, 0101, you must format the column in the CSV file as text before saving the file. Then, you must upload without reopening the file again. Reopening clears any formatting from the CSV, which removes the leading zeros. |
| Site Name | Enter your site’s Site Name. |
| Site Status | Enter one of the following Site Statuses for your Site:
|
| Study Country | Enter your site’s Study Country. You can view a list of Study Countries that have been added to your Study from EDC Tools > Study Countries. If the Study Country of a site has not been added to your Study, enter the Country, and Vault will automatically add the Study Country record upon import. The Country record must exist in your vault before you can add it as a Study Country. By default, your vault contains 249 Country records configured according to the ISO 3166-1 standard Country names. You can create new Country records as needed from Admin > Business Admin. Contact Veeva Services for help adding Country records in your vault. |
| Timezone | Enter your site’s Timezone. See a list of timezone entry formats here. |
| Active Version | Enter the Name of the Active Version to assign to this Site. You can see a list of Active Versions from EDC Tools > Casebook Versions > All Versions. Use the value in the Name column. Any Casebooks created in the Site use the Active Version. If a Site is imported without an Active Version, you will need to assign an Active Version to the Site before it can be used. |
| Bulk Casebook Signature | (If the Bulk Casebook Signature feature is enabled for your Study.) Whether to enable the ability to sign multiple Casebooks at the same time for the site. |
| Disable Image Redaction | (If Imaging is enabled for your Study) Whether to disable DICOM pixel masking during imaging exam upload for the site. |
| Principal Investigator Name | (If Person_SYS is enabled for your vault) The name of the PI for the site. |
| Principal Investigator Email | (If Person_SYS is enabled for your vault) The email of the PI for the site. |
| Principal Investigator Language | (If Person_SYS is enabled for your vault) The language of the PI for the site. |
| Principal Investigator Locale | (If Person_SYS is enabled for your vault) The locale of the PI for the site. |
| Principal Investigator Phone | (If Person_SYS is enabled for your vault) The phone number of the PI for the site. |
| Allowed Subjects | Enter a number (0-1,000,000) of subjects allowed per site. Vault subtracts the number of subjects from any excluded status from the total number of subjects in the site. When that number meets the number of Allowed Subjects, Vault disables casebook creation for the site. |
| Status Exclusions | Enter a list (comma-separated) of Subject Statuses to exclude from the total number of allowed subjects. |
Case Sensitivity: The matching of values in the import file to those values in EDC is case-sensitive.
Importing the File
To import the file:
- Navigate to EDC Tools > Sites.
-
Click Import from File.
-
Click in the Drag and drop file here area to select a file (or drag and drop a file and skip to step 5).

- Browse to and select your file.
- Vault uploads the file and validates your new Site records. Validation results display in the Preview area. (See possible validation errors below)
- Optional: If your import file contains any validation errors, edit the file to resolve them. Then, re-upload.
- Once all of your new Site records are ready for import, click Import. Vault begins a job to import and create all of your new Site records. Vault sends you an email notification when the job is complete.
- Click Job History or Back to Study.
Import Statuses
There are three possible statuses for a new Site record as you prepare it for import:
| Status | Explanation |
|---|---|
| Error | There is at least one error on this row. Errors indicate missing or invalid values. |
| Warning | There is at least one warning on this row. Warnings indicate conflicts with existing Site records. |
| Ready for Import | This Site record is complete and can be successfully imported into the vault. |
Validation Errors
The table below lists possible validation errors and their resolutions:
| Error | Field | Explanation | Steps to Resolve |
|---|---|---|---|
Site already exists |
Site Number |
This Site already exists in your Study (based on the Site Number). |
Edit your file and either update the Site Number or remove the existing Site row. |
Duplicate Site Record |
Site Number |
Your import file contains duplicate Site rows, based on the Site Number. |
Edit your file and either update the Site Number or remove the duplicate row. |
Invalid Site Status |
Site Status |
Your import file lists an invalid Site Status value. |
Edit your file and enter one of the valid Site Statuses, listed in the table above. These are the only allowed values. |
Version[version] does not exist |
Active Version |
The Active Version you provided doesn’t match the Name of any Active Versions for the Study. |
Edit your file and update the Active Version to an existing version. You can see a list of version Names from EDC Tools > Casebook Versions > All Versions. |
[Field] is required |
All |
This field is required. |
Edit your file and provide a value for the required column. |
Study Country [Country] does not exist |
Study Country |
No Country record exists in your vault for the Study Country that was imported. |
You can create new Country records as needed from Admin > Business Admin. Contact Veeva Services for help adding Country records in your vault. |
The following columns are missing in the import file: Disable Image Redaction |
Disable Image Redaction |
Imaging is enabled for this Study but the Disable Image Redaction column is missing from the import file |
Ensure that the correct template is used for import. If Imaging is enabled for your Study, you must use a template that includes the Disable Image Redaction column. |
Imaging is not enabled for the study |
Disable Image Redaction |
Imaging is not enabled for this Study but the Disable Image Redaction column appears in the import file |
Ensure that the correct template is used for import. If Imaging is not enabled for your Study, you must use a template that does not include the Disable Image Redaction column. |
Disable Image Redaction value ( |
Disable Image Redaction |
An invalid value has been entered in the Disable Image Redaction column. Only Yes or No values are allowed in this column. |
Update the column to replace the invalid value with the correct value. |
The following columns are missing in the import file: Principal Investigator Name |
Principal Investigator Name |
Person_SYS is enabled for this vault but the Principal Investigator Name column is missing from the import file. |
Ensure that the correct template is used for import. If Person_SYS is enabled for your vault, you must use a template that includes the Principal Investigator Name column. |
The following columns are missing in the import file: Principal Investigator Email |
Principal Investigator Email |
Person_SYS is enabled for this vault but the Principal Investigator Email column is missing from the import file. |
Ensure that the correct template is used for import. If Person_SYS is enabled for your vault, you must use a template that includes the Principal Investigator Email column. |
The following columns are missing in the import file: Principal Investigator Language |
Principal Investigator Language |
Person_SYS is enabled for this vault but the Principal Investigator Language column is missing from the import file. |
Ensure that the correct template is used for import. If Person_SYS is enabled for your vault, you must use a template that includes the Principal Investigator Language column. |
The following columns are missing in the import file: Principal Investigator Locale |
Principal Investigator Locale |
Person_SYS is enabled for this vault but the Principal Investigator Locale column is missing from the import file. |
Ensure that the correct template is used for import. If Person_SYS is enabled for your vault, you must use a template that includes the Principal Investigator Locale column. |
The following columns are missing in the import file: Principal Investigator Phone |
Principal Investigator Phone |
Person_SYS is enabled for this vault but the Principal Investigator Phone column is missing from the import file |
Ensure that the correct template is used for import. If Person_SYS is enabled for your vault, you must use a template that includes the Principal Investigator Phone column. |
Value must be a whole number greater than 0 |
Allowed Subjects |
The value for Allowed Subjects must be greater than 0 and less than 1,000,000. |
Edit your file and enter an in range value for Allowed Subjects. |
A Number of Allowed Subjects value must be provided when Subject Status Exclusions is set using the study defaults |
Allowed Subjects |
The file doesn’t specify Allowed Subjects or Status Exclusions, and the Study has set default Status Exclusions, you must provide a number of Allowed Subjects. |
Edit your file and enter a value for Allowed Subjects. |
A Number of Allowed Subjects value must be provided in order to set Subject Status Exclusions |
Status Exclusions |
If you enter one or more statuses to exclude, the Allowed Subjects value must not be null. |
Edit your file and provide a value for Allowed Subjects. |
[Provided Status Value] is not a valid Subject Status |
Status Exclusions |
The provided status isn’t a valid option from the Subject Status Picklist Value Label. |
Edit your file and either remove or update the status. |