Creating Views in Studio
From Studio, you can create View Definitions, which Vault EDC uses alongside the Data Export job to export Study data into a readable CSV format. View Set Definitions are groups of View Definitions. A “view” represents a dataset for export to an analytics system, or to use for reporting. Each View Definition is a CSV within the View Set Definition’s ZIP file.
The View Sets tab may not be enabled in your vault. Contact your Veeva Services representative for details.
The actions described above are available to users with the Vault Owner security profile.
Creating a New View Set & New Views
To create a view, you’ll create a View Definition, grouped within a View Set Definition. A View Set Definition is a parent object that contains sets of View Definitions. Then you’ll add Column Definitions and determine what data each column displays with a Column Binding. Each row in the View is a Subject in the Study.
When an EDC Tools or Review tab user initiates a Data Export job from your View Set Definition, Vault EDC generates an independent CSV for each View Definition in your View Set Definition. The job outputs a ZIP file containing these CSVs, based on the View Set Definition.
Form-Based View Creation Best Practice
We recommend that you create a Study Data Extract view set, and then copy and make changes to View Definitions from that set to ensure complete data mapping coverage.
View Set Definition & View Definition
First, you must create a View Set Definition:
- From Studio, navigate to the Study for which you want to create a new View Set Definition.
- From Browse view, click into the View Sets tab.
- Click New View Set.

- Enter a Name.
- Click Save.
- Click Edit in the Properties panel and make changes to update your View Set Definition. Click Save. (See a list of editable properties here.)
Then, you can create new View Definitions within that view set:
- Click into your View Set Definition.
- Click + New View.
- Enter a Name.
- Optional: Enter a Description.
- Click Save.
- Create your Column Definitions, as well as any additional rows. See details below.
- Click Save. Vault validates your View Definition configuration before saving.
- Optional: Click Save and New to save your View Definition and begin creating another, without returning to Studio > View Sets.
Column Definitions & Mappings
Once you have created a View Definition, you must add Column Definitions to display data in the view. Each Column Definition represents a column in the CSV output file. Within each column are Column Binding Definitions (which map data to the column) and Column Mapping Rows (which map data within a column to a row).
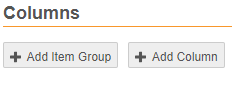
- Click + Add Column. Vault opens the New Column dialog.
- Enter a Name for the Column. The Name cannot include any spaces, special characters (except for dashes and underscores), or double underscores (__).
- Optional: Enter a Display name for the Column. The display name can include spaces. When populated, Vault can use this value instead of Name for the column header in the exported CSV file.
- Optional: Enter a Description.
- Select a Type. See the Column Types table below for details about the available types.
- Different fields display based on the selected Type. Fill the required fields.
- Optional: Select the Display Null Values checkbox to indicate that the data export must include a row for any time a Casebook has data to populate this column, even if there is no data for other columns. See details below.
- Optional: Select the Hidden checkbox to indicate that the data export should exclude this Column from the export file. See details below.
- For Direct columns, select an Object and Field to map your column to. (To map to the user-entered Item value, select Item and Value.)
- For Derived columns, click Create Formula to enter a formula for calculating the column value. For details about creating formulas, see the Vault CDMS Formula Reference Guide.
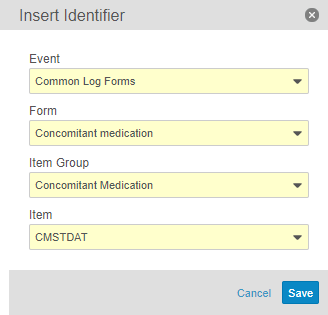
- Add identifiers using Select item. You must select an Event, Form, Item Group, and Item to map your data to, even if you are using a direct mapping to another object.
- Click Save. Vault validates your column configuration before saving. If there are no errors, Vault closes the New Column dialog.
- Optional: You can drag and drop Column Definitions to reorder them.
Once you finish creating all columns, rows, and mappings for your View Definition, click Save once more to save your entire View Definition. Vault validates your View Definition configuration before saving. Vault will not allow you to save your View Definition until all Column Definitions, Column Binding Definitions, and Column Mapping Rows are in the correct format.

Known Issue:
In the current release, there is no way to reference the Name or Sequence of repeating event groups (cycles).
Multiple Mappings per Column
You can also choose to map more than piece of data to a column for each Subject by adding rows. By using rows, you can include multiple data mappings per column. In the resulting export file, Vault will create two (or the total number of rows in your View Definition) rows for each Subject.
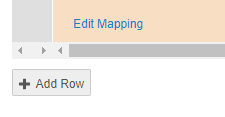
From the views editor, click + Add Row to create a new row. Vault creates a new row underneath your existing column row. By default, the row is a copy of the row above it. You can edit the columns and mappings.
To remove a row, hover over the row number, and click the Remove (x) icon.
Display Null Values Columns
If at least one of the Column Binding Definitions marked as Display Null Values for a column mapping row (shared Order value) is matched by instance data, then the entire row must be exported.
For example, a View Definition has columns defined as: Subject, Gender, Cohort, Height, Weight, Pulse. Your data manager may only need a Subject row to populate in the data export when there are values for Height, Weight, and Pulse. Subject, Gender, and Cohort are only contextual data and are not needed if there is no data for the other three columns. You can mark the Height, Weight, and Pulse columns as Display Null Values, and then when the data manager uses that View Definition for data export, the resulting CSV will only include rows for which there are values for those columns: Height, Weight, and Pulse.
Hidden Columns
You can also choose to exclude certain columns from your export file. This is especially useful for columns that you reference for a Derived-type mapping. Marking a column that is only needed as a reference for a Derived-type mapping allows you to display only the derived value, and not the references, making your export file easier to navigate.
Auto-create Columns for Item Groups
You can easily add a Column Definition for each Item in an Item Group from the views editor.
Create any columns that are outside of an Item Group before auto-creating columns for Item Groups.
- From the views editor, click + Add Item Group.
- Select an Event, Form, and Item Group.
- Click Save.
- Vault creates a Column Definition for each Item in the Item Group. You can then edit the columns as needed.
Note that you cannot drag and drop to reorder auto-created columns. Vault automatically orders these columns in the order the Items appear in the Item Group. Vault adds those Column Definitions diagonally (on a new row, but with the columns beginning at the end of the existing reference columns).
Editing Views, Columns & Mappings
You can easily edit existing View Definitions, Column Definitions, and Column Binding Definitions (mappings) from Studio > View Sets.
To edit a View Definition:
- From Studio > View Sets, click into your View Set Definition, View Definition to open the views editor.
- Make any changes.
- Click Save.
To edit a column:
- From the views editor, navigate to the Column Definition you want to edit.
- Click the Pencil icon in the header of the column.
- In the Edit Column dialog, make any changes. You can edit the Name or Description for the column. To edit any other fields, edit the mapping (see below).
- Click Save. Vault closes the Edit Column dialog.
- Scroll to the top of the views editor and click Save.
To edit a column mapping:
- From the views editor, navigate to the Column Definition containing the mapping you want to edit.
- Click Edit Mapping.
- In the Edit Mapping dialog, make any changes.
- Click Save. Vault closes the Edit Column dialog.
- Scroll to the top of the views editor and click Save.
Deleting Columns & Mappings
To delete a column or mapping, click the Trash icon and then click Delete in the confirmation dialog.
Types of Columns
There are four types of Column Bindings available for View Definitions:
| Type | Fields | Description | Example |
|---|---|---|---|
| Direct | Object, Field | Direct columns display a chosen field value from an object. | Show the Value (value__v) field from the Item (item__v) object. |
| Static | Value | Static columns display the Value. Note that this value will repeat for each row in the CSV. | Show the study number “DTZ-578”, entered for Value upon Column Binding creation. |
| Derived | Formula | Derived columns display the result of a formula expression. Note that you can only reference objects in the formula that are used in other columns in the View Definition. For example, to display a subject’s Age at Screening (calculated from the Screening Date and Date of Birth items), you must include both the Screening Date and Date of Birth as columns in your view. | Calculate and display a subject’s age. |
SAS-Enabled Views
You can design your View Definition so that users can export data for that View as a SAS file.
To create a SAS-enabled View Set Definition,
- Navigate to your View Set Definition in Studio > View Sets.
- Create or edit a View Set Definition record.
- In the Properties panel, click Edit.
- Select the SAS Enabled checkbox.
- Click Save.
- Create View Definitions within this set. For each View Definition, you will need to configure the SASS formatting on its columns. See details below.
For each Column Definition in your view, you’ll need to configure the SAS format for the export.
- From your View Set Definition, click SAS Format Panel. Each Column Definition displays as a row on the SAS Format Panel table.
- Click to enter a Column Label.
- Click to select a SAS Length, SAS Type, and Format. See the table below for details.
- Repeat steps 2 and 3 for each column.
- Click Save.
SAS Format Properties
You can edit the following formatting properties from the SAS Format Panel in the Views Editor.
| Field | Description |
| SAS Length | Enter the Length property from the related Item Definition. For derived or static columns with numbers or floats, use “8”. |
| SAS Type | Select either Char or Num. For Time, DateTIme, Date, Number and Float Items, use Num. For Text, use Char. For Boolean Items, you can use Num for 0/1 or Char for True/False, based on your preference. |
| SAS Format |
SAS Format accepts the following inputs:
For floats, use "w.d". "w" is the integer digits, and "d" is the number of decimals (from the Preicison property). Known Issue: |
Copying View Definitions with Save As
You can copy a View Definition from the views editor by using the Save As button.
To create a copy of a View Definition:
- Navigate to the View Definition you want to copy in the views editor from Studio > View Sets.
- Click Save As.
- Enter a new Name.
- Click Save.
- Vault creates a new View Definition record containing copies of all mappings within the original definition. You can now edit the new View Definition or reference it in Data Export jobs.
Using the View Definition
Once you have finished creating the View Definition, Study Tools users can initiate a Data Export job and select your View Definition. The resulting CSV will include the data and formatting specified in your View Definition.
Views for Connecting to Other Applications
You can configure a specialized view to export data into a connected CTMS application vault. See details here.