Managing Analytes, Units, & Codelists
The System Settings section of the Labs module includes the Analyte Library and General System Settings, where you can add and edit Units, Codelists, and configure general settings.
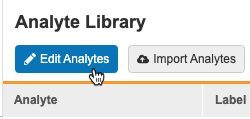
Analyte Library
The Analyte Library is a collection of Analytes that you can use to map your lab’s Normal Ranges. From the Analyte Library tab, you can add, edit, copy, import, hide, and archive analytes.
To edit the Analyte Library columns, export your library, or view an Audit Trail, select the gear icon to the right of the library table.
Add Analytes
To add Analytes:
- Navigate to Labs > System Settings > Analyte Library.
-
Click Edit Analytes.
- Click Add New Analyte.
- Enter a Name in the Analyte column.
- Enter a Label.
- Select the analyte’s Data Type.
- Select the Measurement Type.
- If applicable, select a Codelist.
- Repeat steps 3 through 8 for additional Analytes.
- When finished, click Done.
Edit Analytes
To edit Analytes:
- Navigate to Labs > System Settings > Analyte Library.
-
Click Edit Analytes.
- Click on the Cell you want to edit in the library table.
- Enter or select the updated value.
- When finished, click Done.
You must perform a Vault deployment after making any changes before the changes will be visible in TST and PRD environments. Learn more about making changes Post Go-Live here.
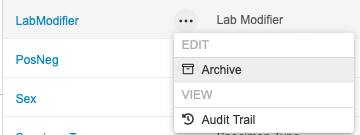
Hide an Analyte
You can hide an analyte to prevent that analyte from being used in future Lab Panel configurations.
To hide an analyte:
- Navigate to Labs > System Settings > Analyte Library.
- Locate the Analyte that you want to hide and hover over it to show the Actions menu.
-
From the Actions menu (), select Hide.
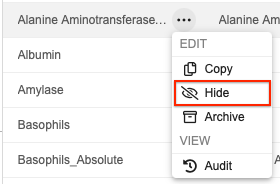
- In the Hide Analyte confirmation dialog, click Hide.
You must perform a Vault deployment after making any changes before the changes will be visible in TST and PRD environments. Learn more about making changes Post Go Live here.
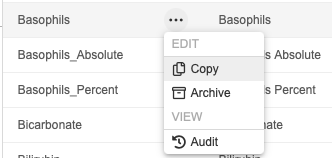
Archive an Analyte
You can archive an analyte if it isn’t In Use. Unlike deletion, archiving can be undone if necessary.
To archive an analyte:
- Navigate to Labs > System Settings > Analyte Library.
- Locate the Analyte that you want to archive in the list.
- Hover over the Analyte to show the Actions menu.
- From the Actions menu (), select Archive.
- In the Archive Analyte confirmation dialog, click Archive.
You must perform a Vault deployment after making any changes before the changes will be visible in TST and PRD environments. Learn more about making changes Post Go-Live here.
Import Analytes
You can import Analytes using this template:
Download the Analyte Import Template
Excel Localization for .CSV Files: Veeva CDMS uses commas as the default separator for .CSV files. If your system is configured in a non-English language, you may encounter errors when attempting to upload .CSV files created or modified in Excel. We recommend that you change the localization of your system to English while working on the .CSV to avoid this issue.
Case Sensitivity: The Specimen and Testing Method columns are case-sensitive when importing.
Required Columns
The following columns are required in your import file:
| Column | Details |
|---|---|
| Analyte | Enter the name of the analyte. |
| Label | Enter the analyte label. |
| Data Type Options | Enter Unit, Codelist, Text, and/or Number. If Unit and/or Codelist is selected, you must fill out the Measurement Type and Codelist columns, respectively. |
| Measurement Type | Enter the measurement type. You must have Units configured in System General Settings and your entry must exactly match the Unit Name. This column is required if the Unit data type is selected. |
| Codelist | Enter the codelist name. You must have Units configured in System General Settings and your entry must exactly match the Codelist Name. This column is required if the Codelist data type is selected. |
| Length | Enter the number of digits allowed to the left of the decimal places for normal ranges. |
| Precision | Enter the number of digits allowed to the right of the decimal places for normal ranges. |
Any columns not mentioned above are not required for import.
Validation Errors
The table below lists possible validation errors and their resolutions:
| Error | Explanation | Steps to Resolve |
|---|---|---|
| Field is required or field must not be empty | This field is required. | Provide a value for this field. |
| Name you are trying to add already exists | Unit/Codelist name already exists. | Enter a different name. |
| Duplicate Analyte | Analyte name already exists. | Enter a different analyte name. |
| Measurement Type is required | Measurement type is required when the Unit data type is selected. | Enter measurement type. |
| Codelist is required | Codelist is required when the Codelist data type is selected. | Enter a codelist. |
Lab Modifiers
Lab Modifiers allow Sites to use >, <, ≤, and ≥ when entering lab results to allow for results that are above or below the level of detection.
To configure Lab Modifiers:
- Navigate to Labs > Analyte Library.
- Click the gear icon to the top left of the library table and select Edit Columns.
- Add the Lab Modifier column and click Save.
- Click Edit Analytes and click inside the Lab Modifier column for the analyte that you’d like to allow modifiers for.
- Select the checkbox and click Done.
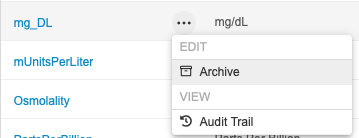
In Use Analytes
Once an Analyte is added to a Lab Panel in Studio, or if a Lab Location is using the Analyte, Vault marks the Analyte as In Use. Edits are restricted for In Use analytes and archiving isn’t allowed.
Once an Analyte is In Use, you can no longer update the following properties:
- Analyte Name
- Data Type
- Measurement Type
- Length
- Precision
Increase Precision: You can increase Precision and Length in DEV environments when an Analyte is In Use.
You can still make changes to the following properties:
- Labels
- SDTM Code
- LOINC Code
- Testing Method
- Specimen Type
You must perform a Vault deployment after making any changes before the changes will be visible in TST and PRD environments. Learn more about making changes Post Go-Live here.
Units
In the System General Settings tab, you can add or import Units and Codelists to use within your Labs configuration.
Changes to Precision: If your Study was created prior to 22R2 and isn’t using Versionless Labs, Vault will lock the Precision property after you save your Unit. To edit this property, you must make your changes in Studio.
To add a Unit:
- Navigate to Labs > System General Settings > Units.
- Click + New Unit.
- Fill the required fields.
- Create Unit Items by filling the required fields and clicking + Add Unit Item to add additional rows.
- Select the Standard radio button on the Unit Item that you want to use by default. Be sure to fill in the Unit Conversion field if applicable. See Defining Default Units & Conversions for more information on unit conversion formulas.
- Click Save.
If enabled, you can disable unit conversions if necessary. Contact Veeva Support for more information. Note that disabling unit conversions will result in the value_translated__v and translated_unit__v rule identifiers resolving in a null value.
To edit a Unit:
- Navigate to Labs > System General Settings > Units.
- Locate the Unit that you want to edit in the list.
- Click the unit’s Name to open it.
- In the Edit Unit dialog, make your changes.
- When finished, click Save.
To add or remove a Unit Item:
- Navigate to Labs > System General Settings > Units.
- Locate the Unit that you want to edit in the list.
- Click the unit’s Name to open it.
- To add a Unit Item:
- Click + Add Unit Item.
- Fill in the required fields.
- To remove a Unit Item, click Remove ().
- When finished, click Save.
To archive a Unit:
- Navigate to Labs > System General Settings > Units.
- Locate the Unit that you want to archive in the list.
- Hover over the unit to show the Actions menu.
-
From the Actions menu (), select Archive.
- In the Archive Unit confirmation dialog, click Archive.
In Use Units: You can’t archive a Unit if it is in In Use.
To export a list of Units as an Excel™ file:
- Navigate to Labs > System General Settings > Units.
-
From the Actions menu (), select Export.
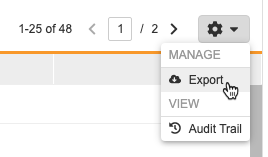
- In the Export dialog, click Close.
- Vault sends an email notification when your file is ready for download.
Importing Units
You can import units in the System General Settings tab by clicking the Import Units button in the Units subtab. Use the template below as your import file.
Download the Unit Import Template
If you have unit conversions disabled, your import file should include a Disable Unit Conversions column.
Required Columns
The following columns are required in your import file:
| Import Column Label | Corresponding Labs Module Label |
|---|---|
| Measurement Type Name | Name |
| Measurement Type | Type |
| Measurement Type Label | Label |
| Measurement Type Description | Description |
| Measurement Type External ID | External ID |
| Measurement Unit Order | N/A |
| Measurement Unit Name | Lab Unit Item Name |
| Measurement Unit Label | Lab Unit Item Label |
| Measurement Unit Default | Standard |
| Measurement Unit Abbreviation | Abbreviation |
| Measurement Unit Conversion | Unit Conversion |
| Measurement Unit External ID | External ID |
| Hidden | Archived |
Validation Errors
The table below lists possible validation errors and their resolutions:
| Error | Explanation | Steps to Resolve |
|---|---|---|
| Missing required value | A required value is missing from your import file. | Add the missing value to your import file and import again. |
| Character limit warning | One of the values in your import exceeds the character limit for its field. | Reduce the number of characters in the affected field. |
| Value not accepted | One of the values in your import isn’t accepted in the respective picklist, Yes/No field, or Number field. | Change the current value to an accepted value. |
| Duplicate unit/unit items in import file | Two or more rows share the same values for the Name or Lab Unit Item Name fields. | Update the values so that there are no duplicate rows. |
| Unit conversions in invalid format | The Measurement Unit Conversion isn’t formatted correctly. | Change the Measurement Unit Conversion to the correct format. |
| Default unit item can’t have a unit conversion | The Default Unit Item has a value in the Unit Conversion field. | Remove the value from the Unit Conversion field. |
| Units can only have one Default Unit Item | There’s more than one Default Unit Item in your import file. | Edit or remove the additional Default Unit Item. |
| Units do not have a Default Unit Item | There’s no Default Unit Item for the Unit Definition in your import file. | Designate a Default Unit Item. |
| Order number is not unique for the unit | The order number for your unit isn’t unique in your import file. | Edit the unit order number. |
| Cannot modify an archived Unit Item | Your import file contains modifications to an archived Unit Item. | Remove any modifications to archived units in your import file. |
| Cannot archive Default Unit Item | Your import file contains a row that will archive a Default Unit Item. | Remove or edit the specified row. |
| Accepted Characters | Your import file contains characters that aren’t accepted. Acceptable characters include: a-z, A-Z, 0-9, -, _ | Remove any characters that aren’t accepted. |
Codelists
To add a Codelist:
- Navigate to Labs > System General Settings > Codelists.
- Click + New Codelist.
- Fill the required fields.
- Create Codelist Items by filling the required fields and clicking + Add Codelist Item to add additional rows.
- Click Save.
To edit a Codelist:
- Navigate to Labs > System General Settings > Codelists.
- Locate the Codelist that you want to edit in the list.
- Click the codelist’s Name to open it.
- In the Edit Codelist dialog, make your changes.
- When finished, click Save.
To add or remove a Codelist Item:
- Navigate to Labs > System General Settings > Codelists.
- Locate the Codelist that you want to edit in the list.
- Click the codelist’s Name to open it.
- To add a Codelist Item:
- Click + Add Codelist Item.
- Fill the required fields.
- To remove a Codelist Item, click Remove ().
- When finished, click Save.
To archive a Codelist:
- Navigate to Labs > System General Settings > Codelists.
- Locate the Codelist that you want to archive in the list.
- Hover over the codelist to show the Actions menu.
-
From the Actions menu (), select Archive.
- In the Archive Codelist confirmation dialog, click Archive.
Note that you can’t archive a codelist if it is In Use.
To export a list of Codelists as an Excel™ file:
- Navigate to Labs > System General Settings > Codelists.
-
From the Actions menu (), select Export.
- In the Export dialog, click Close.
- Vault sends an email notification when your file is ready for download.
Importing Codelists
You can import codelists in the System General Settings tab by clicking the Import Codelist button in the Codelists subtab. You must use the CSV UTF-8 file format when importing.
Use the template below as your import file.
Download the Codelist Import Template
Required Columns
The following columns are required in your import file:
| Import Column Label | Corresponding Labs Module Label |
|---|---|
| Codelist Name | Name (128 characters maximum) |
| Codelist External ID | External ID (100 characters maximum) |
| Codelist Description | Description (256 characters maximum) |
| Codelist Item Order | N/A |
| Codelist Item Name | Lab Codelist Item Name (128 characters maximum) |
| Codelist Item Code | Lab Codelist Item Code (128 characters maximum) |
| Codelist Item Label | Lab Codelist Item Label (1500 characters maximum) |
| Codelist Item Description | Lab Codelist Item Description (256 characters maximum) |
| Hidden | Archive |
Validation Errors
The table below lists possible validation errors and their resolutions:
| Error | Explanation | Steps to Resolve |
|---|---|---|
| Missing required value | A required value is missing from your import file. | Add the missing value to your import file and import again. |
| Duplicate Entry in File | Two or more rows share the same values for the Name or Lab Codelist Item Name fields. | Update the values so that there are no duplicate rows |
| Character limit warning | One of the values in your import exceeds the character limit for its field. | Reduce the number of characters in the affected field. |
| Value not accepted | One of the values in your import isn’t accepted in the respective Yes/No or Number field. | Change the current value to an accepted value. |
| Order number is not unique | The order number for your codelist isn’t unique in your import file. | Edit the codelist order number. |
| Cannot modify an archived Codelist Item | Your import file contains modifications to an archived Codelist Item. | Remove any modifications to archived units in your import file. |
| Accepted Characters | Your import file contains characters that aren’t accepted. Acceptable characters include: a-z, A-Z, 0-9, -, _ | Remove any characters that aren’t accepted. |
System General Settings
The General Settings subtab allows you to configure Site Overrides and approvals for Lab Normals and Query Settings, as well as the option to create a Clinical Significance codelist. Click Edit at the top right of the page to edit these settings.
To add a Codelist Item to your Clinical Significance codelist, click Edit and select Add Codelist Item at the bottom of the page. See below for more information about current settings.
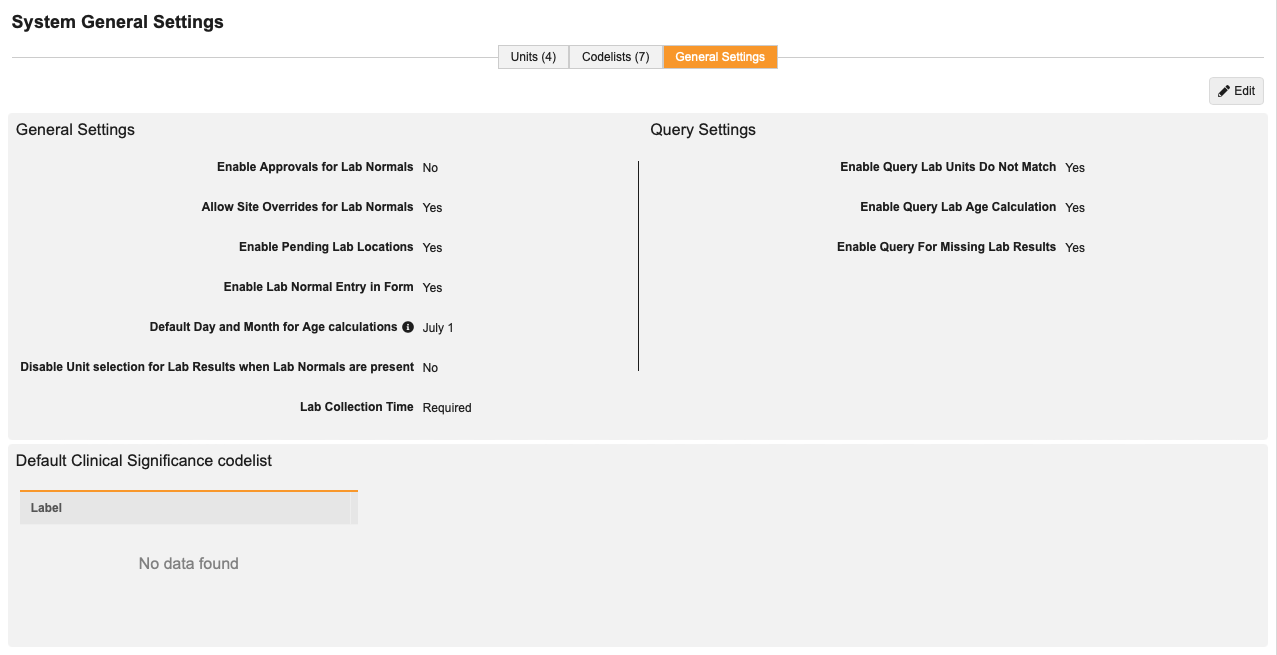
Clinical Significance & Deployment: Clinical Significance codelist values from this section (System General Settings) aren’t deployed via Vault deployments. Study-specific Clinical Significance codelist values, however, are deployed via Study deployment.
Enable Approvals for Lab Normals
| Setting | Description |
|---|---|
| Yes | When set to Yes, newly-created Lab Normals are automatically set to Pending Approval and must have their status manually changed to Active by the user. |
| No (Default) | When set to No, newly-created Lab Normals are automatically set to Active. |
Allow Site Overrides for Lab Normals
| Setting | Description |
|---|---|
| Yes (Default) | When set to Yes, Sites can update Lab Normals in Data Entry. |
| No | When set to No, Vault doesn’t allow Sites to update Lab Normals. |
Enable Pending Lab Locations
| Setting | Description |
|---|---|
| Yes (Default) | When set to Yes, Sites can add Lab Locations in Data Entry. These locations will display as Pending in the Labs tab. |
| No | When set to No, Vault doesn’t allow Sites to add Lab Locations in Data Entry. |
Enable Lab Normal Entry in Form
| Setting | Description |
|---|---|
| Yes | When set to Yes, Sites can enter Lab Normals on a lab form when the lab has a pending lab location or when the site selects “Lab Location not Found”, which is available if pending lab locations are not enabled for the study. |
| No (Default) | When set to No, Vault doesn’t allow Sites to enter Lab Normals on a lab form when the lab has a pending lab location or when the site selects “Lab Location not Found”, which is available if pending lab locations are not enabled for the study. |
Disable Unit Selection for Lab Results when Lab Normals are Present
| Setting | Description |
|---|---|
| Yes | When set to Yes, Sites can’t edit lab result units in Data Entry if Lab Normals are present. |
| No (Default) | When set to No, the system allows Sites to edit lab result units even when Lab Normals are present. |
Lab Collection Time
| Setting | Description |
|---|---|
| Required (Default) | When set to Required, Lab Collection Time is required. |
| Allow Unknown | When set to Allow Unknown, Lab Collection Time can be set to Unknown. |
| Always Unknown | When set to Always Unknown, Lab Collection Time is always set to Unknown. Sites will only be prompted to enter a date and the time will automatically be marked as Unknown in the audit trail. |
Importing and Exporting Translation Files
You can upload translated Codelists, Units, and Analytes in the Language & Region tab. Note that you must have the View All Lab Settings permission to view this tab and export files and the Manage Lab Study Settings permission to view, export, and import files. See Standard CDMS Study Roles for more information about roles and permissions.
Translated analyte, unit, and codelist values that are imported in the Labs module won’t inherit changes that you make after you create a lab panel. To make changes to translated values after creating a lab panel, update the values manually in Studio.
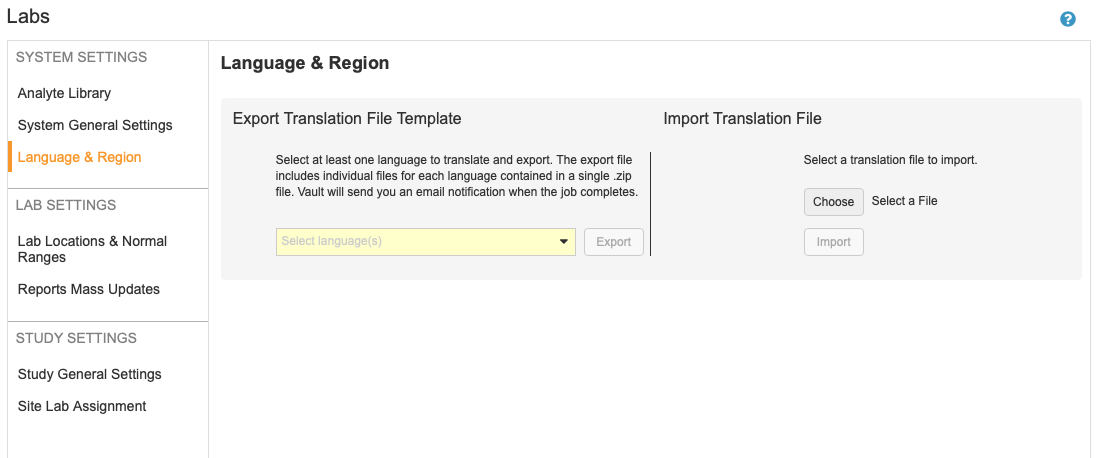
Importing files with Chinese characters: You must use the CSV UTF-8 file format when importing translation files with Chinese characters.
Translation outcomes vary between Global and Study-level labs and are dependent on which user is adding a lab panel. Refer to the table below as an example for the various outcomes available when the Spanish language is imported.
| Global Version | Study-level Version | |||
|---|---|---|---|---|
| Studio | EDC (logged in as Spanish user) | Studio | EDC (logged in as Spanish user) | |
| English User Adds New Lab Panel | Analytes/Units/Codelists are in English | Analytes/Units/Codelists are in Spanish | Analytes/Units/Codelists are in English | Analytes in Spanish, Units/Codelists in English* |
| Spanish User Adds New Lab Panel | Analytes/Units/Codelists are in Spanish | Analytes/Units/Codelists are in Spanish | Analytes/Units/Codelists are in Spanish | Analytes/Units/Codelists are in Spanish |
*You must manually add translation for units and codelists in Studio to appear in EDC.