Configuring E2B Studies
The safety integration between Veeva EDC and any third party safety system is based on the exchange of E2B XMLs (R3 version) via an AS2 Gateway. Appropriate integration configuration will send all required and complimentary safety-relevant EDC data to the safety system as safety cases. Examples which can result in the transfer include serious adverse events, adverse events of special interest as well as an unexpected pregnancy in a trial.
With the integration setup against a study design, any time a site creates an event that meets the criteria for a safety case initiation, Veeva EDC automatically generates a first-send and transmits the data to the safety system.
Related data can also be inserted into a safety case, by classifying those locations as one of these safety data types:
- Study Drug (product, or products under test in the clinical trial)
- Concomitant Medications
- Medical History
- Drug History
- Test Results
- Patient Characteristics
- In Case of Death
- Reporter / Sender Comments by System
Any updates to the safety case initiating or related data will automatically generate a follow-up send to be transmitted to the safety system in the given time interval.
Study designers configure this integration by mapping EDC study design Items to the E2B R3 elements. The inclusion of the mapped casebook elements into the safety case is additionally dependent on the configured inclusion rules, which give the option to include the mapped Items on all casebook Forms of a subject, those linked by the site to the safety case initiating form or that fall into a selected date range in relation to the initiating event.
The safety case can be created due to a single event or can be composed of multiple events. This is configured using site linking and/or date base inclusion rules.
The system accepts acknowledgements from the safety system (“ACK File”) to confirm that data was received and parsed correctly. This return information confirms the case status, message status, and provides error details, if any.
Summary information is available in the Safety Cases (V4) and Safety Messages - E2B (V4) reports to confirm integration status and health. Safety integrations also support automated nullification transmission, which happens if the criteria that initiated the initial transfer are no longer true. Examples include form reset (mistaken entry), or downgrade of an event. See nullifications.
Safety administrators set the timing of the first-send and the frequency of any follow-ups, plus other operational settings for the integration. See Safety Settings in Managing Safety Integrations for details.
Prerequisites
A user with the Vault Owner security profile must create a connection between Veeva EDC and the safety system.
Users with the standard CDMS Study Designer or CDMS Librarian study role can both view and edit safety configurations. If your organization uses user-defined Study Roles, your role must grant the following permissions:
| Type | Permission Label | Controls |
|---|---|---|
| Standard Tab | Studio Tab | Ability to access the Studio tab |
| Standard Tab | Library Tab | Ability to access the Library tab |
| Functional Permission | View Study Design | View-only access to Study Design |
| Functional Permission | Design Study | Ability to create study design definitions and a study schedule from Studio |
| Functional Permission | Manage Safety Configuration | Ability to design and configure for the safety integration of a Study. This includes determining which Forms are involved, which Items on those Forms are sent to the safety system, and what Inclusion Criteria dictate when to include or exclude form data in the Safety Case. |
| Functional Permission | View Library | Ability to view library Collections and their designs from Studio > Library |
| Functional Permission | Design Library | Ability to create study design definitions and a study schedule for a Collection from Studio > Library |
Learn more about Study Roles.
Safety Integration Type
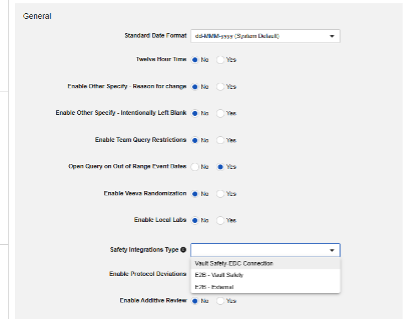
The first step in configuring safety integrations for Veeva EDC is the Safety Integration Type value in your study settings.
-
Navigate to your Study in Studio > Study Settings.
-
Click Edit in the middle (“General”) section.
-
For Safety Integrations Type, select E2B - External.

-
Click Save.
The Safety Integrations Type setting will be read only once it has a non-empty value. This is due to the nature of E2B style integration versus the Safety-EDC Connection studies. Should you need to toggle between the two, contact a Veeva representative for assistance and planning.
For more information on safety integrations using the Safety-EDC Connection, see Configuring Safety-EDC Connection Studies.
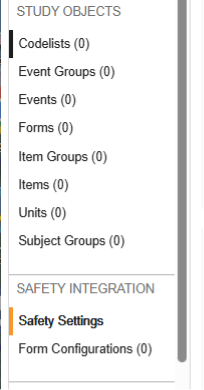
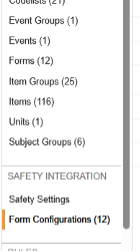
Once the overall integration type is saved, additional options will appear in the Studio navigation menu, Safety Settings and Form Configurations:
Safety Settings
Updating Settings
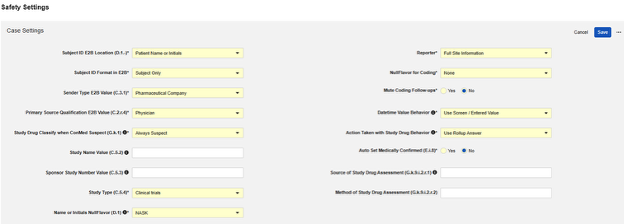
After setting the appropriate Safety Integration Type in the main study settings of Studio, the next step is to configure the safety case settings. These settings will affect all safety cases in the study, and can vary study by study.
- Navigate to your Study in Studio > Safety Settings.
- Click Edit.
-
Choose the appropriate values, or accept default values.
- Click Save.
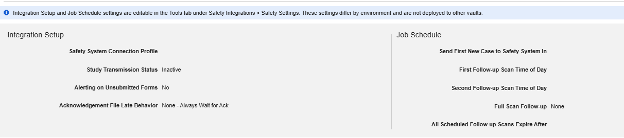
Note: The additional settings at the bottom of the Safety Settings page are not managed within Studio. They are shown for a reminder on deployed studies, i.e. when navigating Studio in a production or other downstream environment. These study operational settings are managed at Tools → Safety Integrations by safety administrators. See Safety Settings in Managing Safety Integrations for details.
Available Settings
| Setting | Default Value | Description | ||||||||||||||||||||||||
|---|---|---|---|---|---|---|---|---|---|---|---|---|---|---|---|---|---|---|---|---|---|---|---|---|---|---|
| Subject ID E2B Location (D.1.-) | Patient Name or Initials | Choose the E2B location in which the Veeva EDC Subject ID will be transferred for the current study:
|
||||||||||||||||||||||||
| Subject ID Format in E2B | Subject Only | Choose in which format to transfer the Veeva EDC Subject ID to the safety system.
|
||||||||||||||||||||||||
| Sender Type E2B Value (C.3.1) | Pharmaceutical Company | Choose which type of organization is sending the safety case from Veeva EDC to the safety
system. This value is passed via C.3.1. You can choose from the following organization types:
|
||||||||||||||||||||||||
| Primary Source Qualification E2B Value (C.2.r.4) | Physician | C.2.r.4 yields the Classification of the person assessing the study drug or treatment, as it relates to each Event of a Safety Case. You can choose from the following classification types:
|
||||||||||||||||||||||||
| Study Drug Classify when ConMed Suspect (G.k.1) | Always Suspect | The available choices:
This setting is only applicable when the study is configured to allow the data entry user to link forms classified Concomitant Medications to the Safety Case Initiation Event and override the default classification of ‘Concomitant’ (E2B value of ‘2’). Example: If the user chooses SUSPECT as they link the medication, the use of Always Interacting will override all study drugs in the transfer to Interacting, where they were otherwise deemed Suspect by the system. |
||||||||||||||||||||||||
| Study Name Value (C.5.2) | Optional: Set the value for Study Name in the E2B file. When left blank, the entry is omitted from the E2B content. | |||||||||||||||||||||||||
| Sponsor Study Number Value (C.5.3) | Optional: Enter a Study Number to override the value in the E2B file. When left blank, the existing Study Label is used. | |||||||||||||||||||||||||
| Study Type (C.5.4) | Clinical trials | Select the Study Type (C.5.4). Select from the following:
|
||||||||||||||||||||||||
| Name or Initials E2B NullFlavor (D.1) | NASK |
Use this setting for a null flavor value at E2B location D.1 (Name or Initials), provided it isn’t the location selected for the study setting Subject E2B Location (D.1.*). Choices include:
|
||||||||||||||||||||||||
| Reporter | Full Site Information | Select from choices:
The reporter locations in E2B will populate based on the information setup for the Site in Veeva EDC. |
||||||||||||||||||||||||
| Null Flavor for Coding | None |
Select how to handle missing values for coding, when there is no MedDRA coding value. This setting only applies to locations in your Veeva EDC Study design where you are configuring to do coding and have applied an E2B location for the safety transfers. Choose from these options:
The locations of coding in E2B are:
|
||||||||||||||||||||||||
| Mute Coding Follow-ups | No |
When set to Yes, this setting stops Veeva EDC from sending follow-ups when the only change is the assignment of a new or different code to a medical term coded in Veeva EDC (Events, Medical History, Death Causes). Any other change to data that is part of the safety case will still initiate a follow-up send. When set to No, Veeva EDC sends follow-ups for safety cases for any change to data that is part of the safety case, including any changes to coding of medical terms. If you primarily perform coding in the safety system, it is recommended to set this option to Yes to prevent unnecessary follow-ups for changed coding assignments to the safety system. |
||||||||||||||||||||||||
| DateTime Value Behavior | Use Screen / Entered Value | When configuring safety data against datetime fields on an EDC form, this option indicates which value to send. You can choose from Use Screen / Entered Value to use the value as entered by the site, or you can choose Use Normalized (UTC) Value to use the datetime normalized to UTC using the site time zone, offsetting the screen value. | ||||||||||||||||||||||||
| Action Taken with Study Drug Behavior | Use Primary SAE Answer | This setting only applies if the study design allows for multiple events in one safety case. The transfer of additional events with the primary event, which initiated the safety case, can be configured using the respective inclusion rules (see Study Drug Inclusion Criteria). In those situations, the safety case would comprise multiple answers for the action taken with the study drug. As such, a method for which answer is used in the E2B transfer is required. Select from choices:
When using the rollup answer, all answers of the events included in the safety case will be taken into account. The most severe action taken will be transferred via G.k.8 to the safety system. The order of precedence is:
For example, with two events, one answer of Dose Reduced, the other Dose Not Changed, the overall answer is Dose Reduced. |
||||||||||||||||||||||||
| Auto Set Medically Confirmed (E.i.8) | No | This setting determines the inclusion of “Medical Confirmation by Healthcare Professionals” (E.i.8) in the safety case, and for every case Veeva EDC transmits. Select Yes to include. If you select No, E.i.8 will be omitted from the E2B XML The most common use for this is Yes, since the safety cases are originating from a clinical site / investigator. | ||||||||||||||||||||||||
| Source of Study Drug Assessment (G.k.9.i.2.r.1) | Optional: For Source of Study Drug Assessment (G.k.9.i.2.r.1) and Method of Study Drug Assessment (G.k.9.i.2.r.2), enter a static value to apply to all cases. The Result (G.k.9.i.2.r.3) of assessment is a field answered by site user, configured on the Study Drug type. The most commonly used value for this setting is Healthcare Professional. | |||||||||||||||||||||||||
| Method of Study Drug Assessment (G.k.9.i.2.r.2) | Optional: For Method of Study Drug Assessment (G.k.9.i.2.r.2), enter a static value to apply to all cases. The most commonly used value for this setting is Global Introspection. | |||||||||||||||||||||||||
| Include Secondary Event Site Links to Case | Yes | Using Yes for this setting will include related data linked to secondary events of the case, not just the primary safety case initiating event. |
Form Configurations
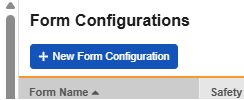
After updating the main Safety Settings (previous section), the next step is to configure which specific forms of the full study design will participate in the safety integration. These are setup at Studio > Form Configurations:
Note that the “New Form Configuration” button will only become active after the configuration of the Safety Settings.
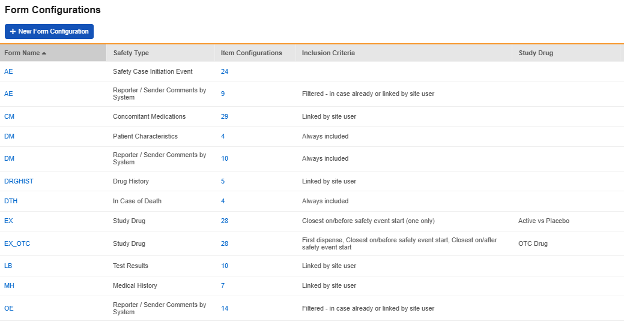
An example of a study’s summary list of configured forms:
Safety Data Types
Each form configured for safety integration includes a Safety Data Type. These types represent the standard data model/type in any safety system.
The safety configuration types for Veeva EDC are summarized as follows:
| Type | E2B (R3) Location | Notes |
|---|---|---|
| Safety Case Initiation Event | E.* |
|
| Study Drug | G.* |
|
| Concomitant Medications | G.* |
|
| Medical History | D.7.* |
|
| Drug History | D.8.* |
|
| Test Results | F.* |
|
| Patient Characteristics | D.1 thru D.6 |
|
| In Case of Death | D.9.* |
|
| Reporter / Sender Comments by System | H.2 or H.4 |
|
How to Create a Form Configuration
To create a new safety form configuration:
-
Navigate to Studio > Form Configurations.
-
Click + New Form Configuration.
-
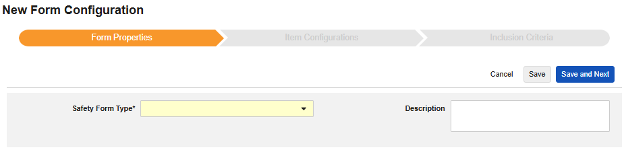
Proceed with the three steps (tabs) of configuration.
If you have the update permission for safety integration configuration, but do not see the button, first ensure your Safety Settings are saved first.
The options Form Properties, Item Configurations, and Inclusion Criteria are described in detail in the later sections of this documentation by safety type.
At each step, the Save button will save that information without advancing to the next step. The Save and Next button will save the information and move forward to the next step.
Delete a Form Configuration
You can delete a single Form Configuration or delete all Form Configurations at once to start over. If you have Safety Cases associated with a Form Configuration, Vault disables the delete option.
To remove a single Form Configuration:
- Navigate to Studio > Form Configurations for your Study.
- Hover over the Form Configuration Name to show the Actions menu.
- Select Delete.
- In the confirmation dialog, click Delete.
Deleting a safety form configuration does not affect the EDC form design itself in any way. Deleting an EDC form that was used for mapping to a safety form from the study will also delete its associated safety form configuration(s).
Copy Form Configurations
In the current release, the only way to copy safety form configuration information is via Copy Forms. The other copying levels, Copy Event Groups and Copy Events, don’t support the copying of form level safety configuration.
If an Event Group or Event is copied (Forms within) from a source library/study, and those Forms contain safety form configuration information, simply use Copy Forms with the Use Existing / Update with Changes options as a subsequent action.
Copying safety form configurations while performing core copy of Forms is optional.
In the Include section, you must select Safety Configuration to copy previously configured configurations.
Scenarios to bring in existing safety configuration while copying:
-
Copy while copying new forms: Here, the AE form design does not yet exist in the target study:
-
Copy later: This is done when you have previously copied in Forms, perhaps through Copy Event Groups or Copy Events, or used Copy Forms without the safety configuration included initially. Update with Changes must be checked. This sequence will copy “what fits”, i.e. in cases of form adjustments. Here, the AE form already exists in the target study:

To copy safety configuration for a form:
- Navigate to Studio > Forms.
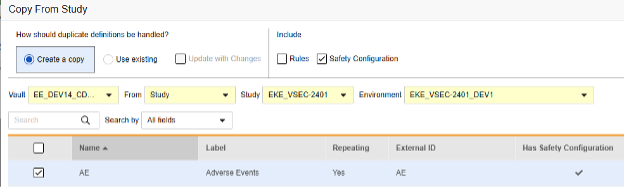
- Click Copy From Study.
- Select Create a copy or Use existing / Update with Changes as appropriate (see the examples above)
- Select the Safety Configuration checkbox to also copy any safety configuration associated with the form. Vault indicates which forms have safety configurations in the dialog’s Has Safety Configuration column. Note that this requires a Study Role with the Manage Safety Configuration permission. The Safety Configuration checkbox will be disabled if the source study and target study do not match regarding safety configuration. They must both have it set up, and be using the same Safety Integrations Type.
- Select a Vault.
- For Copy From Study, choose where you want to copy from (From Another Study or From Library.)
- Select a Study Environment to copy from.
- Search or scroll to locate the Form Definition(s) you want to copy.
- Select the Form(s) you want to copy.
- Click Copy Forms. Vault begins copying the Form Definition into your Study.
- Optional: In the Copy from Study dialog:
- Click View Summary to see a list of the copied forms and the status of the copy.
- If you copied 20 or fewer Forms, click View Log to see detailed status information for each object record copied.
- If you copied more than 20 Forms, Vault will send you an email notification with a link to download the log file when finished.
- When finished, click Close. Once you click Close, you can no longer access the summary or log file.
- Always visit the safety form configuration for copied forms after the copy. Adjustments to mappings / value translations might be necessary.
For more information on copy forms, see Copying Designs.
The Safety Configuration checkbox will be disabled if the source study and target study do not match regarding safety configuration. They must both have it set up, and be using the same Safety Integrations Type.
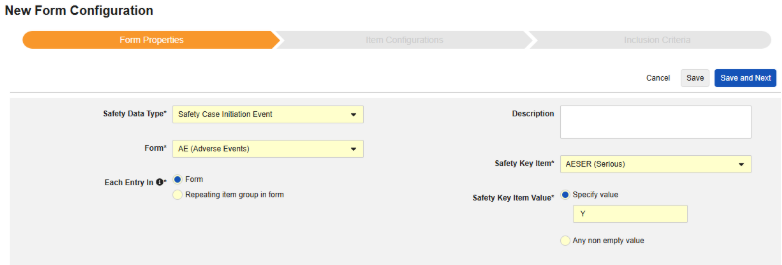
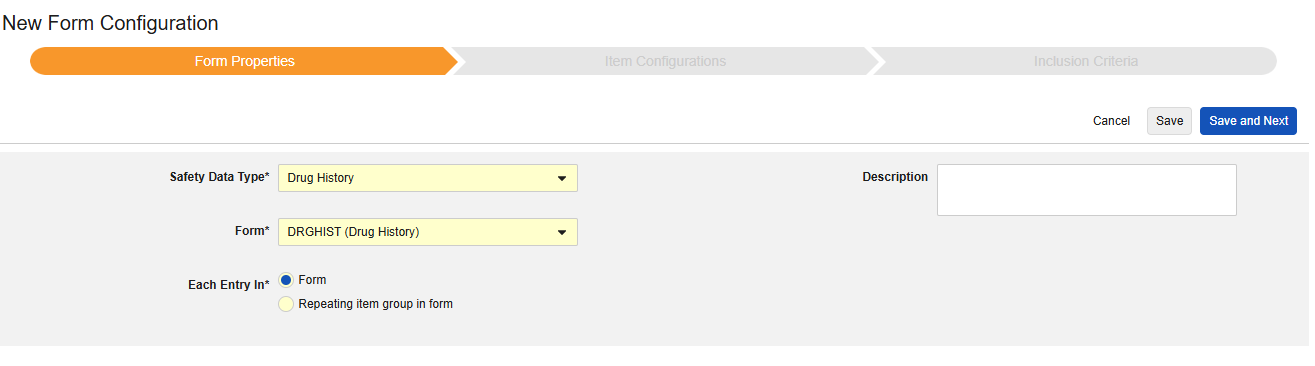
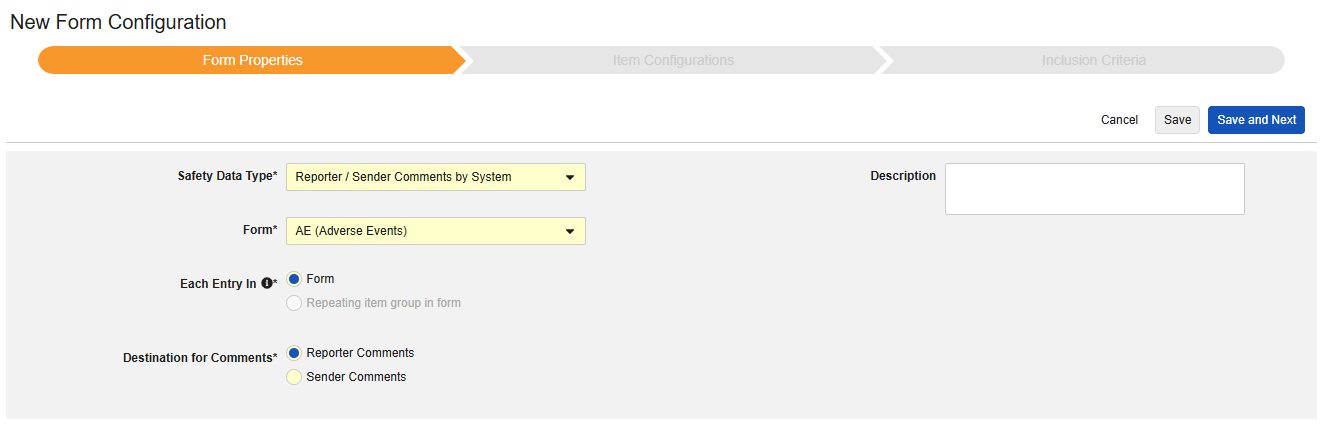
Form Properties
The first step of safety form configuration is the Form Properties. After selecting the Safety Type from the dropdown, general properties about the configuration are applied, with available properties differing by Safety Type:
| Safety Data Type | Properties | |||||
|---|---|---|---|---|---|---|
| Form | Safety Key Item | Each Entry In | Product Info | System Comment Destination | Description | |
| Safety Case Initiation Event | * | * | * | |||
| Study Drug | * | * | * | * | ||
| Concomitant Medications | * | * | ||||
| Medical History | * | * | ||||
| Drug History | * | * | ||||
| Test Results | * | * | ||||
| Patient Characteristics | * | |||||
| In Case of Death | * | |||||
| Reporter / Sender Comments by System | * | * | ||||
|
* Indicates that this property is present required for the Safety Data Type. Indicates that this property is present optional for the Safety Data Type. |
||||||
- Form requires the selection of the EDC form for mapping to the safety-relevant items.
- Safety Key Item is a special property that evaluates whether the form is considered for case initiation or inclusion before any other criteria. For the Safety Case Initiation Event type, it drives the initial send (or later nullification) of the overall case. For the Study Drug type, it’s the initial criteria for inclusion before other date based criteria are evaluated.
- Each Entry In is a setting to indicate how to group information into the various safety data types based on how the EDC form is designed. Examples and further details can be found in the next section. This is crucial to understand for proper safety configurations.
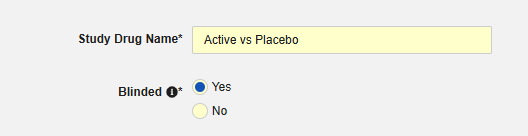
- Product Info is information about the known study drug of the trial, name, blinding (or not), indication, which study group it applies.
- System Comment Destination only applies to the transfer of EDC data via Reporter / Sender Comments by the system in a standardized way.
- Description is optional helpful text for the study designer.
Each Entry In - Design Considerations
Definition
The Each Entry In concept on the Form Properties of a safety form configuration is key to the configuration for the data transfer. It specifically tells Veeva EDC to either consider the data on a (repeating) form or the data on a repeating item group on a form. The option has two choices:
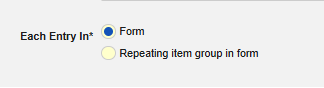
- Form: Data entered on a form in non-repeating item groups is considered for transfer. The form can be repeating to e.g. allow for multiple events in a study, however, the item groups on the form must not be repeating.
- Repeating item group in form: Data entered in a repeating item group on a form is considered for transfer. In this case, multiple events would be represented by each repeat of the item group rather than a form repeat.
Some item configurations on the form will have different available choices, from the from Each Entry In form property. Most item configurations of the type are meant as a ‘single entry’, but some outliers are required to be non-repeating only, or, no restriction (repeating or non-repeating items). Refer to the sub-sections by type, later in this documentation, for detailed information on the outliers, see Item Configurations
Each Entry In: Form
Veeva best practice for study design with a safety integration recommends using repeating forms throughout the different safety types:
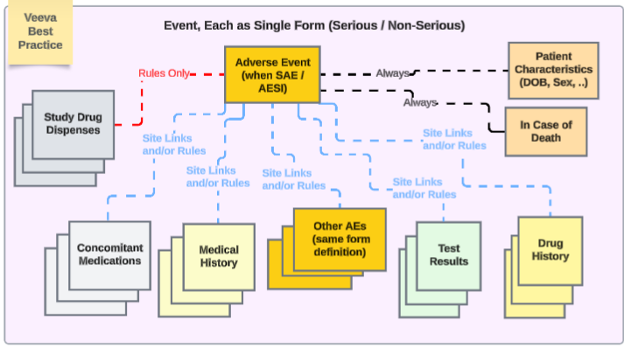
In the example:
- Adverse Event form - whether non-serious or serious - uses the same form design. This avoids the upgrade / downgrade issue for site users, having to move it from one location (non serious AE form) to another (serious, SAE form), and vice versa.
- If multiple event safety cases are to be managed by EDC users, use inclusion of other serious or non-serious events to a primary event via date rule and/or specific site linking.
-
The other safety data types are each repeating forms, except for singular answer information (Patient Characteristics and In Case of Death). Note that ‘repeating forms’ in this sense is either:
- The form is defined as repeating (e.g. a log form)
- Or, its a non-repeating form that occurs across the study visit schedule (e.g. Study Drug in Visit 1, then Visit 2, and so on)
- Depending on the study need, site opinion (linking) and/or date based inclusion rules can include the appropriate related data across the different types.
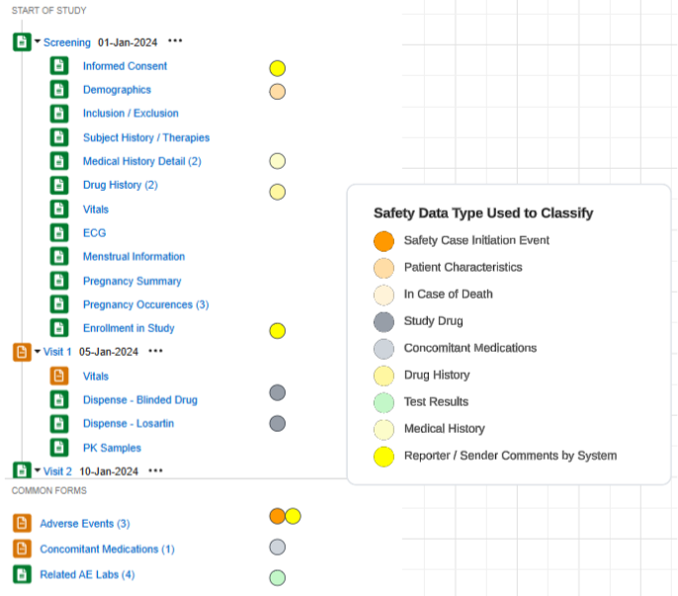
An example study using this configuration, and the safety data types applied to forms of the study design:
Each Entry In: Repeating Item Group vs. Form
Consider this study as example of using both options for Each Entry In:
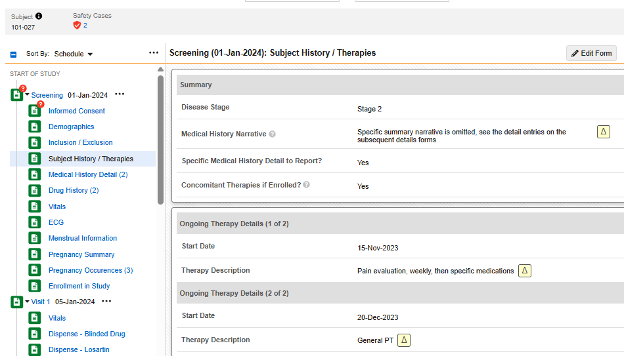
-
The form Subject History / Therapies asks a few non repeating questions in the first item group:
- When answering Yes to Specific Medical History Detail to Report?, a dynamic rule (on form submit) opens up the next form in the schedule - Medical History Details. Forms entered there comprise a medical history entry, per form.
- When answering Yes to Concomitant Therapies if Enrolled?, progressive display is used to show a repeating item group on the same form. Entries for medical history are entered as - each - a repeating item group in that same form, as necessary.
-
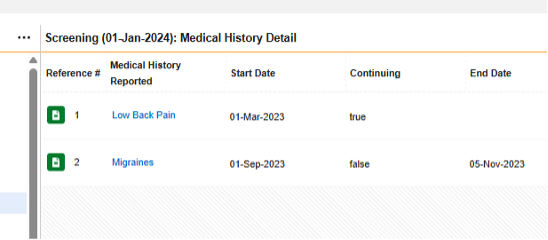
The form Medical History Details repeats, but has all non-repeating item groups / questions contained in its design, thus Each Entry In = Form
-
In the pictured example above, the safety configuration that would consider there to be four medical histories for the safety case is:
- Form CTHERAPY (Subject History / Therapies):
- Type = Medical History
- Each Entry In = Repeating item group in form
-
Form MH (Medical History Details):
- Type = Medical History
- Each Entry In = Form
- Form CTHERAPY (Subject History / Therapies):
Each Entry In: Related Safety Data Embedded in the Event form
For studies that have event related safety data embedded in the Safety Case Initiation Event form, the approach looks like this:

Item groups embedded in the Event form can cover, as repeating item groups, study drug dispenses, drug history, medical history or test results, and as non-repeating item groups, in case of death. In this case, no standalone form is set up in the study design for this embedded data.
To transfer safety related data for such study design where relevant information can be entered by a site user when an event will initiate a safety case, the EDC form already mapped to the Safety Case Initiation Event data type can be mapped to other safety data types, including Concomitant Medications, Medical History, Drug History, Study Drug, Test Results, or In Case of Death.
- Note that no embedded data can be configured for the Safety Case Initiation Event or Patient Characteristics safety data type. The Reporter / Sender Comments by System data type already support dual usage on the Safety Case Initiation Event data type.
- If an EDC form already mapped to the Safety Case Initiation Event data type is being mapped to another safety data type, the Each Entry In field automatically selects Repeating item group in form.
- Note that the Each Entry In field for the In Case of Death, Patient Characteristics, and Reporter / Sender Comments by System safety data types only allow the Form option for this field.
Each Entry In: Repeating Item Groups for Events
For studies that will track multiple events in a safety case in one EDC form design, the approach looks like this:
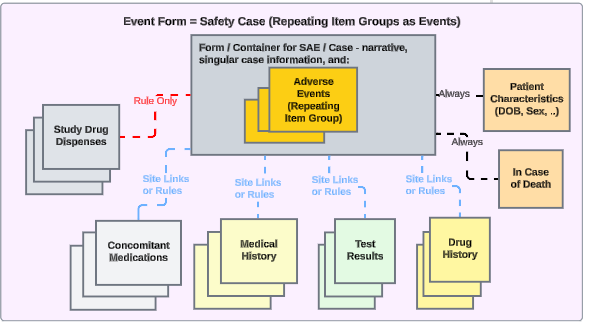
- The safety case would initiate per just the existence of the form with the events.
- This study design will require Each Entry In to be set to Repeating item group in form.
Safety Key Item / Value
The Form Properties settings Safety Key Item and Safety Key Item Value evaluate the initiation of a case or the form inclusion into a case. They apply to these safety types:
- Safety Case Initiation Event - when the system evaluation is true, the first transfer to a safety system is being initiated. Conversely, when the system deems the evaluation false and a previous safety case was transmitted, a nullification will be sent to the safety system
- Study Drug - when the system evaluation is true, the dispense information on the form is deemed eligible for inclusion into the case. Further evaluation of the study drug inclusion criteria will finally determine the data transfer with the safety case.
Note that for the reference of the Safety Key Item Value to a Codelist will require the specification of the codelist code, not codelist label.
Here are several common examples for the Safety Case Initiation Event type:
Example 1:
-
The Safety Key Item refers to the Codelist Item “AESER” and expects the Codelist Code “Y” to initiate the safety case.
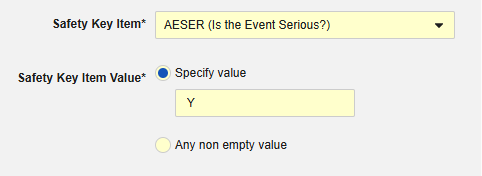
The Safety Key Item refers to the following item on the AE form. Note that the Safety Key Item Value requires the Codelist Code whereas the site user will choose from the Codelist Labels.
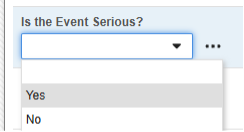
- The first submit of such a form with this prescribed answer will make the form eligible for a safety transfer of the form, plus any related data.
- The transfer will happen at the timing configured in the operations study settings - more information here.
- Additionally, for the transfer to proceed, the E2B field E.i.1.1a (Reaction / Event as Reported by the Primary Source in Native Language) must also have a non-empty value on the form.
- This example uses the serious question on the adverse event form to drive sending a safety case (or not). This field - in any study/form design - is also usually mapped to the E2B location E.i.3.1 (Term Highlighted by the Reporter)
At some time after the first send to safety, either of these conditions could no longer be fulfilled. (e.g. Serious = No, or lack of Event Reporter / Event Term value). If so, the system will automatically send a Nullification follow-up to the safety system indicating it is no longer qualified as a safety case. No specific site action is necessary, regarding the safety integration, once the site user modifies the form data.
Example 2:
- The first example used an E2B location (E.i.3.1) as the Safety Key Item. However, any field can be used for the purpose, even one not used to map to E2B fields.
- In this example, we instead use a more general more general question from the AE form:
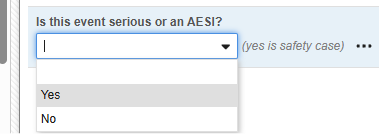
While this is not the main serious question on the form, it allows to initiate a safety case for both a serious adverse event as well as an ‘Adverse Events of Special Interest’ (AESI), which might be non-serious, but still require data to be sent to the safety system.
Example 3:
- In the following example, the safety case initiation, and nullification, is more transparent for the site user, while still using one Safety Key Item Value:
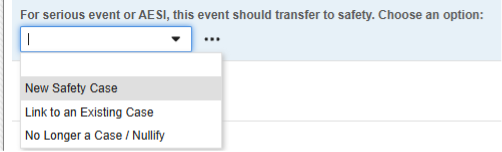
-
The choices of this codelist:
- “New Safety Case” (its codelist code) is used for the Safety Key Item Value. Consequently, only this selection will initiate a safety case.
- “Link to an Existing Case” - when answered, this code will evaluate the Safety Key Item Value to false. Thus, the form won’t initiate a standalone / additional case. Instead Studio rules would be used to ensure the site user links the current form to another event that initiated a safety case.
- “No Longer..” - would be used for an event that did qualify previously for a safety case and was transferred. While the site user indicates a downgrade or nullification, the EDC system will evaluate the codelist code of this selection to false. This will result in a Nullification follow-up for the previously initiated safety case.
Nullifications
Follow-ups are sent by Veeva EDC whenever data changes happen that reside in a safety case. Nullification is a special kind of follow-up that has these properties:
-
It happens when either of these is the case:
- The Safety Key Item and Safety Key Item Value evaluation becomes false
- Or, the value of the item on the EDC form for E.i.1.1a becomes empty
- It will be noted as a nullification type E2B message
- It is the last send for a safety case to the safety system
- Note: The first send for the case occurred previously. Veeva EDC will re-evaluate the two conditions above at first send (i.e. after the initial send timer) and do an immediate nullification of the safety case without a send to the safety system. This will happen most commonly when the site user makes a mistake, resets the form, etc before the timer for the first send ends.
- E2B requires a nullification reason on such a transfer. The study can be configured to ask the site user. If it is not configured for site answer or the site fails to answer, the system will use a default reason: “The case no longer satisfies conditions from when it was initially sent. This can include events now downgraded to non serious, or user action removing all events.”
Common examples of nullification:
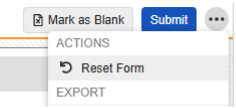
-
Reset of EDC form.
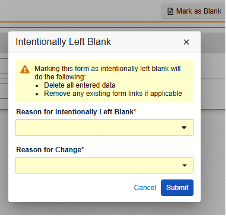
-
Intentionally Left Blank on the EDC form after previous form submission.
-
‘Downgrade’, e.g. what used to satisfy a safety case via Safety Key Item/Value, is no longer the situation, but the event still persists
Once a nullification occurs for a safety case in Veeva EDC, it will not revert back to an active safety case. Should that same form be changed to make the Safety Key Item / Value true and E.i.1.1a non-empty in value once more, a new safety case is created and sent. The original safety case does not resume.
By Safety Data Type
Safety Case Initiation Event
The form configuration of this safety data type is critical to initiate the process of transferring a safety case. All other safety data types are then brought into the case per their configured rules.
To create a new safety form configuration for this type:
- Navigate to your Study in Studio > Form Configurations.
- Click the New Form Configuration button.
- Select Safety Case Initiation Event for Safety Data Type.
- Select the Form to apply to this configuration type.
- Choose an appropriate selection for Each Entry In. This selection depends on the design of your form. See Each Entry In Design Considerations for more information and examples.
- Optionally indicate a Description.
- Indicate the appropriate Safety Key Item / Safety Key Item Value. Note: For codelist item definitions, the codelist code must be specified.
- Click Save or Save and Next.
The Safety Data Type, Form, and Each Entry In settings will be non-editable after being saved. Additional configuration at the Item Configurations and Inclusion Criteria tabs rely on these settings. To change either of these settings, the form configuration must be deleted and created again.
Study Drug
This safety data type is used to track dosing / dispensing information of a study drug, i.e. those the clinical study is testing against subjects. The information will flow to the products / drugs section of a safety case. (G.* section of E2B). Multiple forms can be used with the type.
To create a new safety form configuration for this type:
- Navigate to your Study in Studio > Form Configurations.
- Click the New Form Configuration button.
- Choose Study Drug for Safety Data Type.
- Select the Form to apply this configuration type.
- Choose an appropriate selection for Each Entry In. This selection depends on the design of your form. See Each Entry In Design Considerations for more information and examples.
- Note: If the EDC form already mapped to the Safety Case Initiation Event has been selected, Each Entry In defaults to Repeating item group in form.
- Indicate a Study Drug Name. IMPORTANT: This value should typically be a direct match to how the drug is named in the target safety system. Consult documentation of the target safety system for how it handles the transfer of a study drug for G.* locations in E2B.
-
Indicate whether the study drug is considered Blinded (or not) in the trial. This property is only an indication and used for reporting purposes only. All data is transferred unblinded to the safety system, even if a restriction applied to the data in EDC.
-
Optionally choose a Subject Group in the study design that this study drug only applies to. With this set, any subject not in the group will have the study drug omitted from the safety transfer.

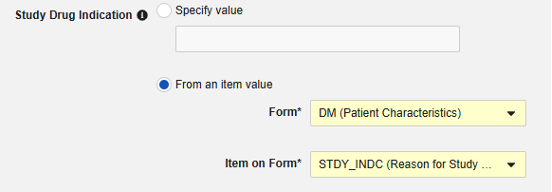
- Optionally indicate Study Drug Indication to apply to all cases of a subject. There are two options:
-
Specify Value: This is a static value that will apply to all subjects / all cases

-
From an item value: This is a specific Item from the casebook, i.e. the indication can differ by subject. IMPORTANT: This value should be from a value recorded once across the casebook design, not the study drug form itself, e.g. a reason for enrollment and being on that study drug. Examples of the usage of each.
-
- Optionally indicate a Description.
- Indicate the appropriate Safety Key Item / Safety Key Item Value. For the study drug type, the evaluation is used to consider a form/dispense eligible for inclusion to the transfer. Additional inclusion criteria (see Study Drug Inclusion Criteria) are also evaluated to bring in the appropriate dispenses of the study drug to the safety case.
- Click Save or Save and Next.

The Safety Data Type, Form, and Each Entry In settings will be read only once initially saved. Additional configuration at the Item Configurations and Inclusion Criteria tabs rely on these settings. To change any of these settings, the form configuration must be deleted and created again.
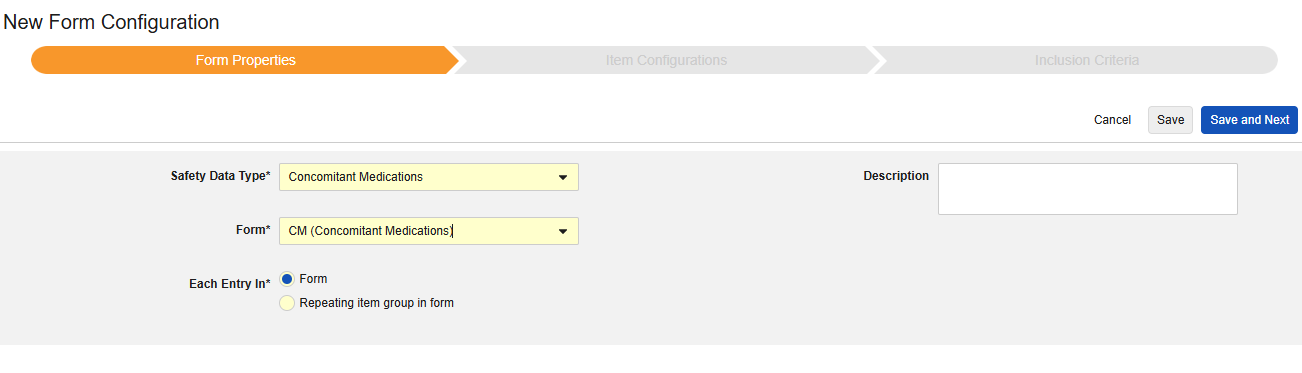
Concomitant Medications
This type of safety configuration is applied to concomitant medication forms of the study. The information will flow to the products / drugs section of a safety case. (G.* section of E2B) Multiple forms can be used with the type.
To create a new safety form configuration for this type:
- Navigate to your Study in Studio > Form Configurations.
- Click the New Form Configuration button.
- Choose Concomitant Medications for Safety Data Type.
- Select the Form to apply this configuration type.
- Choose an appropriate selection for Each Entry In. This selection depends on the design of your form. See Each Entry In Design Considerations for more information and examples.
- Note: If the EDC form already mapped to the Safety Case Initiation Event has been selected, Each Entry In defaults to Repeating item group in form.
- Optionally indicate a Description.
- Click Save or Save and Next.
The Safety Data Type, Form, and Each Entry In settings will be read only once initially saved. Additional configuration at the Item Configurations and Inclusion Criteria tabs rely on these settings. To change any of these settings, the form configuration must be deleted and created again.
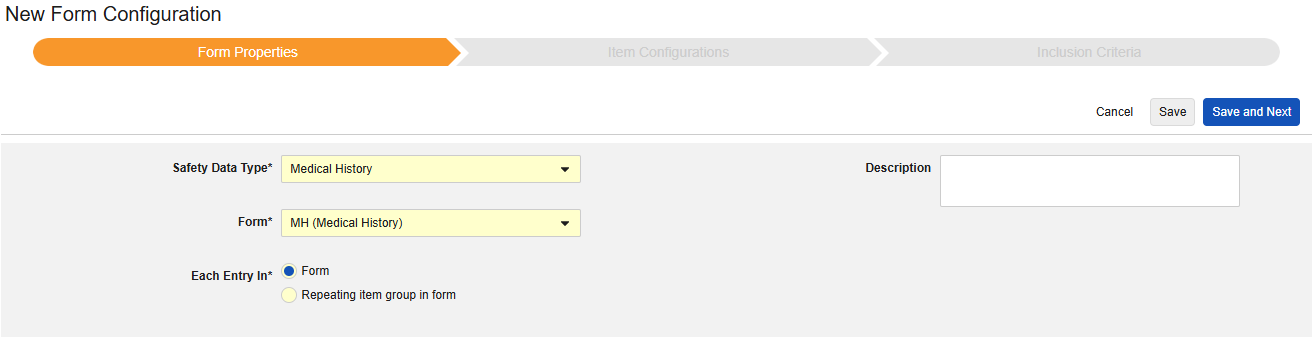
Medical History
This type of safety configuration is applied to medical history forms of the study. The information will flow to the E2B D.7 section of a safety case. Multiple forms can be used with the type.
To create a new safety form configuration for this type:
- Navigate to your Study in Studio > Form Configurations.
- Click the New Form Configuration button.
- Choose Medical History for Safety Data Type.
- Select the Form to apply this configuration type.
- Choose an appropriate selection for Each Entry In. This selection depends on the design of your form. See Each Entry In Design Considerations for more information and examples.
- Note: If the EDC form already mapped to the Safety Case Initiation Event has been selected, Each Entry In defaults to Repeating item group in form.
- Optionally indicate a Description.
- Click Save or Save and Next.
The Safety Data Type, Form, and Each Entry In settings will be read only once initially saved. Additional configuration at the Item Configurations and Inclusion Criteria tabs rely on these settings. To change any of these settings, the form configuration must be deleted and created again.
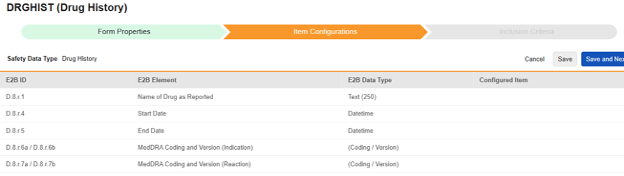
Drug History
This type of safety configuration is applied to drug history forms of the study. The information will flow to the E2B D.8 section of a safety case.
To create a new safety form configuration for this type:
- Navigate to your Study in Studio > Form Configurations.
- Click the New Form Configuration button.
- Choose Drug History for Safety Data Type.
- Select the Form to apply this configuration type.
- Choose an appropriate selection for Each Entry In. This selection depends on the design of your form. See Each Entry In Design Considerations for more information and examples.
- Note: If the EDC form already mapped to the Safety Case Initiating Event has been selected, Each Entry In defaults to Repeating item group in form.
- Optionally indicate a Description.
- Click Save or Save and Next.
The Safety Data Type, Form, and Each Entry In settings will be read only once initially saved. Additional configuration at the Item Configurations and Inclusion Criteria tabs rely on these settings. To change any of these settings, the form configuration must be deleted and created again.
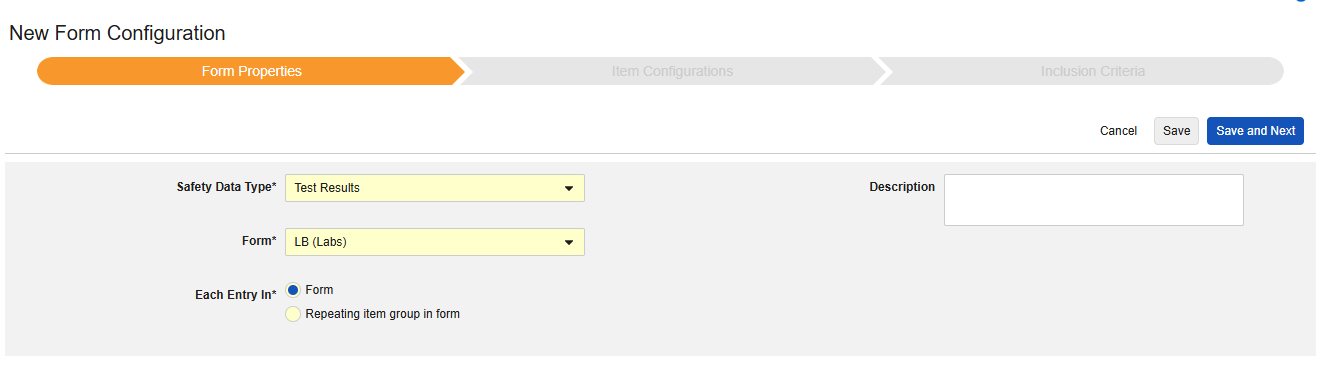
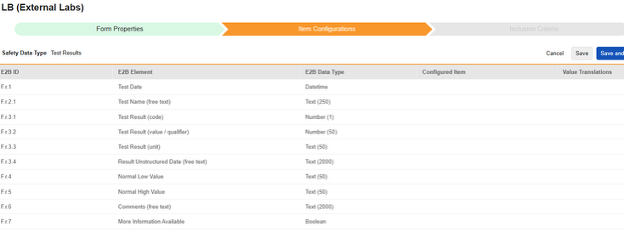
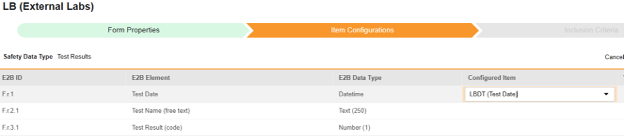
Test Results
This type of safety configuration is applied to lab / test result forms of the study. The information will flow to the E2B F.* section of a safety case. Multiple forms can be used with the type.
Currently, the system does not support mapping to local lab module forms (lab panels) for E2B studies.
To create a new safety form configuration for this type:
1.Navigate to your Study in Studio > Form Configurations.
- Click the New Form Configuration button.
- Choose Test Results for Safety Data Type.
- Select the Form to apply this configuration type.
- Choose an appropriate selection for Each Entry In. This selection depends on the design of your form. See Each Entry In Design Considerations for more information and examples.
- Note: If the EDC form already mapped to the Safety Case Initiation Event has been selected, Each Entry In defaults to Repeating item group in form.
- Optionally indicate a Description.
- Click Save or Save and Next.
The Safety Data Type, Form, and Each Entry In settings will be read only once initially saved. Additional configuration at the Item Configurations and Inclusion Criteria tabs rely on these settings. To change any of these settings, the form configuration must be deleted and created again.
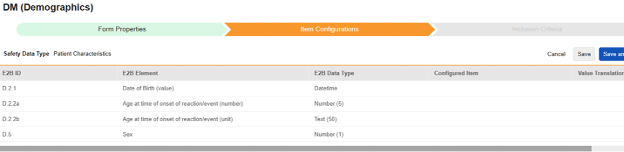
Patient Characteristics
This type of safety configuration is applied to general information about the subject. Only items from non repeating item groups can be mapped for this type. Further, these values are once per safety case, so should never occur more than once across the subject’s casebook. Multiple forms can be used with the type, e.g. Sex on one form, Date of Birth on another.
To create a new safety form configuration for this type:
1.Navigate to your Study in Studio > Form Configurations.
- Click the New Form Configuration button.
- Choose Patient Characteristics for Safety Data Type.
- Select the Form to apply this configuration type.
- Optionally indicate a Description.
- Click Save or Save and Next.
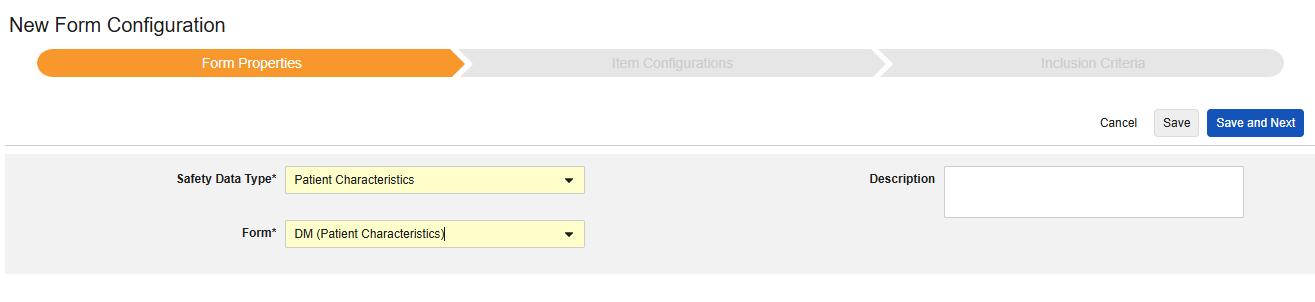
The Safety Data Type and Form will be read only once initially saved. Additional configuration at the Item Configurations and Inclusion Criteria tabs rely on these settings. To change these settings, the form configuration must be deleted and created again. Each Entry In is not an option for this type.
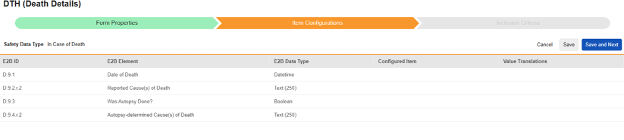
In Case of Death
This type of safety configuration is applied to forms involving death details about the subject. Some fields for this type must be non-repeating (e.g. Date of Death), others can be repeating or non-repeating (causes of death). Multiple forms can be used with the type, e.g. Date of Death on one form, causes of death on another.
To create a new safety form configuration for this type:
1.Navigate to your Study in Studio > Form Configurations.
- Click the New Form Configuration button.
- Choose In Case of Death for Safety Data Type.
- Select the Form to apply this configuration type.
- Note: If the EDC form already mapped to the Safety Case Initiation Event has been selected, Each Entry In defaults to Form.
- Optionally indicate a Description.
- Click Save or Save and Next.
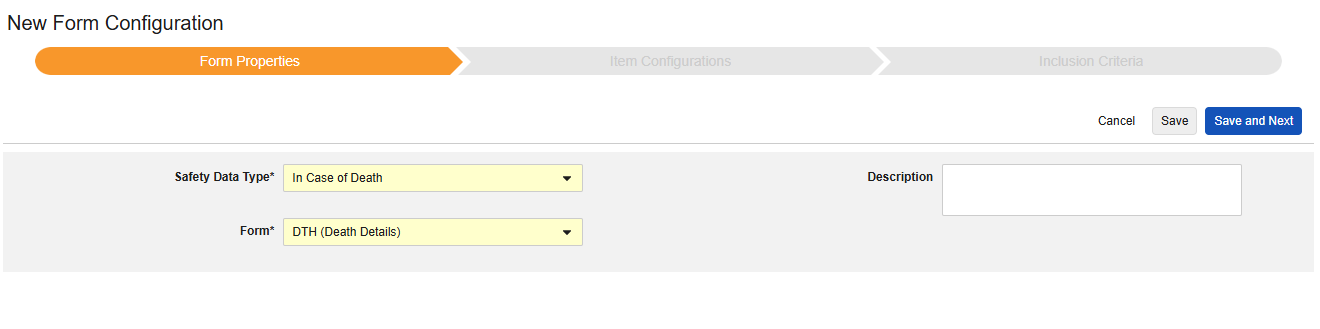
The Safety Data Type and Form will be read only once initially saved. Additional configuration at the Item Configurations and Inclusion Criteria tabs rely on these settings. To change these settings, the form configuration must be deleted and created again. Each Entry In is not an option for this type.
Reporter / Sender Comments by System
This type of safety configuration can be applied to any form in the casebook. The Reporter / Sender Comments by System functionality is specifically designed for transfer of data that doesn’t fit anywhere in the E2B format.
To create a new safety form configuration for this type:
- Navigate to your Study in Studio > Form Configurations.
- Click the New Form Configuration button.
- Choose Reporter / Sender Comments by System for Safety Data Type.
- Select the Form to apply this configuration type.
- Optionally indicate a Description.
- Choose a Destination for Comments. The choice Reporter Comments will transmit the information to the E2B H.2 location. Sender Comments will transmit the information to the E2B H.4 location. H.2 and H.4 can also be configured to an item on the Safety Case Initiation Event form, in which case the site entered information will precede the system generated information, and can be clearly distinguished
. - Click Save or Save and Next.
The Safety Data Type and Form will be read only once initially saved. Additional configuration at the Item Configurations and Inclusion Criteria tabs rely on these settings. To change these settings, the form configuration must be deleted and created again. Each Entry In is not an option for this type.
Item Configurations
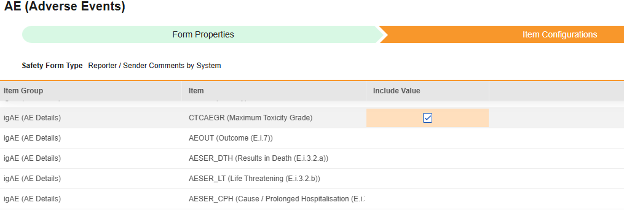
The second step in a safety form configuration is the Item Configurations tab. As an example, this AE (Adverse Events) form design has been classified the Safety Case Initiation Event type:
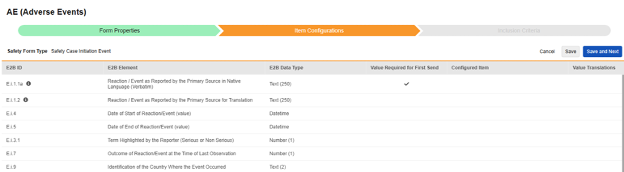
The purpose of this grid is to assign answers from the form design (Item Definitions) to the appropriate location of the E2B format.
Summary of the columns in the grid:
| Column | Notes |
|---|---|
| E2B ID | Location in the E2B(R3) format |
| E2B Element | The E2B location label |
| E2B Item Type | The data type at that E2B location.
|
| Value Required for First Send |
|
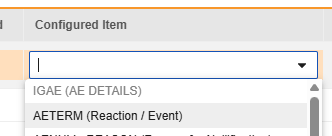
| Configured Item |
When using the Repeating item group on form, ensure all item definitions that comprise an entry (e.g. Medical History, Lab, etc.) are in the same repeating item group. Some E2B locations can be outside that same repeating item group, but it is the rare exception. See the type by type details after this section for those outliers. |
| Value Translations |
|
Value Translations
Whenever the Item Definition being mapped to an E2B location is of the codelist or boolean (checkbox) data types, and the E2B location requires very specific E2B values, Value Translations must be set up to ensure the transfer works correctly.
- Specify the Item Definition in the Configured Item column
-
Next to the Configured Item column click in the cell of the Value Translations column. If a value translation can be configured the cell will appear orange on hover over.

-
This opens the Translate Values for E2B XML dialog.
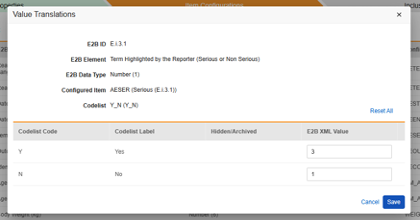
- For each codelist or boolean type Item, enter a valid E2B XML Value in the free text field.
- If the Codelist Code is already valid for the E2B location, there is no need to enter an E2B XML Value.
- If more Codelist entries are in the study design than available E2B options, several Codelist entries can be mapped to the same E2B XML Value.
- If an invalid Codelist Code is not translated to an E2B XML Value, the studio validation will show an error.
- When finished, click Save.
- Once value translations have been specified, the number of configured translations will be indicated in the cell.
The translation values are only temporarily saved after this action. Subsequent use of Save or Save and Next at the tab level will save the translations.
Repeat this action for all E2B locations that require specific values per its own standards. The Studio Validations job will indicate an error (preventing deployments) if any of these are missing or not valid for the target E2B locations. This is true where strict E2B values are known/required, with one exception - medication or test result units. Those often require special configuration in the destination safety system to allow values in, even when industry standard units. As such, the Studio Validation job will only report a warning (each run) for locations that are units.
By Safety Data Type
Safety Case Initiation Event
To save item configurations for this safety type:
The choices for item selection will usually depend on the Form Properties > Each Entry In setting previously saved. Some E2B locations have special rules that indicate they can be done in only repeating or non-repeating item groups, or sometimes either. Refer to the table at the end of these steps for those outliers, plus important notes regarding all E2B locations of this type.
- Navigate to your Study in Studio > Form Configurations
-
Navigate into the safety form configuration, then to the Item Configurations tab.

-
For each row where a mapping is intended, use the cell in the Configured Item column to select the appropriate Item Definition of the Form Definition. For example, choosing the AETERM item from the form for the E2B location E.i.1.1a.
-
For each item configured, indicate if Value Required for First Send. The E.i.1.1a is not editable (checked), as all safety systems require at least one event with a non-empty term/value. Other rows / E2B locations are not typically set with this property, their default is unchecked.

- Depending on the Item Definition type for the selected item and the E2B ID of the row, Value Translations could be needed. Refer to the general overview for setting up value translations here.
- Click Save (to remain on the page) or Save and Next (to advance to the next tab, Inclusion Criteria)
| E2B ID | E2B Label | E2B Type | Notes | ||||||||||||||
|---|---|---|---|---|---|---|---|---|---|---|---|---|---|---|---|---|---|
| E.i.1.1a | Reaction / Event as Reported by the Primary Source in Native Language (Verbatim) | Text (250) |
|
||||||||||||||
| (E.i.2.1a) | MedDRA Version for Reaction / Event |
|
|||||||||||||||
| (E.i.2.1b) | Reaction / Event (MedDRA code) |
|
|||||||||||||||
| E.i.1.2 | Reaction / Event as Reported by the Primary Source for Translation | Text (250) |
|
||||||||||||||
| E.i.4 | Date of Start of Reaction/Event (value) | Datetime |
|
||||||||||||||
| E.i.5 | Date of End of Reaction/Event (value) | Datetime |
|
||||||||||||||
| E.i.3.1 | Term Highlighted by the Reporter (Serious or Non Serious) | Number(1) |
|
||||||||||||||
| E.i.7 | Outcome of Reaction/Event at the Time of Last Observation | Number (1) |
|
||||||||||||||
| E.i.9 | Identification of the Country Where the Event Occurred | Text (2) |
|
||||||||||||||
| D.2.2a | Age at time of onset of reaction/event (number) | Number (5) |
|
||||||||||||||
| D.2.2b | Age at time of onset of reaction/event (unit) | Text (50) |
|
||||||||||||||
| D.3 | Body Weight (kg) | Number (6) |
|
||||||||||||||
| D.4 | Height (cm) | Number (3) |
|
||||||||||||||
| D.6 | Last Menstrual Period Date | Datetime |
|
||||||||||||||
| E.i.3.2a | Results in Death (Seriousness Criteria) | Boolean |
|
||||||||||||||
| E.i.3.2b | Life Threatening (Seriousness Criteria) | Boolean |
|
||||||||||||||
| E.i.3.2c | Caused / Prolonged Hospitalisation (Seriousness Criteria) | Boolean |
|
||||||||||||||
| E.i.3.2d | Disabling / Incapacitating (Seriousness Criteria) | Boolean |
|
||||||||||||||
| E.i.3.2e | Congenital Anomaly / Birth Defect (Seriousness Criteria) | Boolean |
|
||||||||||||||
| E.i.3.2f | Other Medically Important Condition (Seriousness Criteria) | Boolean |
|
||||||||||||||
| H.1 | Case Narrative Including Clinical Course, Therapeutic Measures, Outcome and Additional Relevant Information | Text (100000) |
|
||||||||||||||
| H.2 | Reporter's Comments | Text (20000) |
|
||||||||||||||
| H.4 | Sender's Comments | Text (20000) |
|
||||||||||||||
| C.1.11.2 | Reason for Nullification / Amendment | Text (2000) |
|
||||||||||||||
| E.i.6a | Duration of reaction/event (value) | Number (5) |
|
||||||||||||||
| E.i.6b | Duration of reaction/event (unit) | Text (50) |
|
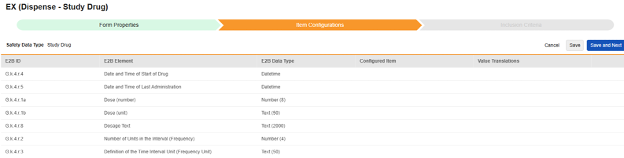
Study Drug
Currently, the name of a study drug (G.k.2.2) is configured in Studio at the Form Properties tab. An item configuration for drug name will be available in a future release. The important G.k.1 (Classification of Drug) is not an item mapped on the EDC form for this type. Instead, Suspect (E2B value 1) is set by the system when there is at least one dispense form on or before the event start date. If there are no dispenses, Not Administered (E2B value 4) is used by the system.
To save item configurations for this safety type:
- Navigate to your Study in Studio > Form Configurations
-
Navigate into the safety form configuration, then to the Item Configurations tab.
-
For each row where a mapping is intended, use the cell in the Configured Item column to select the appropriate Item Definition of the Form Definition. For example, choosing the DRG_STDT item from the form for the E2B location G.k.4.r.4.

- Depending on the Item Definition type for the selected item and the E2B ID of the row, Value Translations might be needed. Refer to the general overview for setting up value translations here.
- Click Save (to remain on the page) or Save and Next (to advance to the next tab, Inclusion Criteria)
The choices for item selection will usually depend on the Form Properties > Each Entry In setting previously saved. Some E2B locations have special rules that indicate they can be done in only repeating or non-repeating item groups, or sometimes either. Refer to the table at the end of these steps for these special cases and outliers, plus important notes regarding all E2B locations of this type.
This type has three important causality questions (G.k.8 / G.k.9.i.2.r.3 / G.k.9.i.4) about the Study Drug and how it relates to the safety case and the events of it. The choices for mapping these item definitions are sourced from the EDC form mapped to the Safety Case Initiation Event. This is the case because the answers to these questions differ from case to case, event to event, and must be answered on the event form.
| E2B ID | E2B Label | E2B Type | Notes | ||||||||||||||||||||||||
|---|---|---|---|---|---|---|---|---|---|---|---|---|---|---|---|---|---|---|---|---|---|---|---|---|---|---|---|
| G.k.4.r.4 | Date and Time of Start of Drug | Datetime |
|
||||||||||||||||||||||||
| G.k.4.r.5 | Date and Time of Last Administration | Datetime |
|
||||||||||||||||||||||||
| G.k.4.r.1a | Dose (number) | Number (8) |
|
||||||||||||||||||||||||
| G.k.4.r.1b | Dose (unit) | Text (50) |
|
||||||||||||||||||||||||
| G.k.4.r.8 | Dosage Text | Text (2000) |
|
||||||||||||||||||||||||
| G.k.4.r.2 | Number of Units in the Interval (Frequency) | Number (4) |
|
||||||||||||||||||||||||
| G.k.4.r.3 | Definition of the Time Interval Unit (Frequency Unit) | Text (50) |
|
||||||||||||||||||||||||
| G.k.2.4 | Identification of the Country Where the Drug Was Obtained | Text (2) |
|
||||||||||||||||||||||||
| G.k.4.r.10.1 | Route of Administration (free text) | Text (60) |
|
||||||||||||||||||||||||
| G.k.4.r.10.2a | Route of Administration TermID Version Date / Number | As per ISO IDMP | |||||||||||||||||||||||||
| G.k.4.r.10.2b | Route of Administration TermID | Number (3) |
|
||||||||||||||||||||||||
| G.k.8 | Action(s) Taken with Drug | Number (1) |
|
||||||||||||||||||||||||
| G.k.9.i.2.r.3 | Result of Assessment | Text (60) |
|
||||||||||||||||||||||||
| G.k.9.i.4 | Did Reaction Recur on Re-administration? | Number (1) |
|
||||||||||||||||||||||||
| G.k.10.r | Additional Information on Drug (coded) (repeat as necessary) | Number (2) |
|
||||||||||||||||||||||||
| G.k.11 | Additional Information on Drug (free text) | Text (2000) |
|
||||||||||||||||||||||||
| G.k.7.r.1 | Indication as Reported by the Primary Source | Text (250) |
|
||||||||||||||||||||||||
| G.k.2.3.r.3a | Strength (number) | Number (10) |
|
||||||||||||||||||||||||
| G.k.2.3.r.3b | Strength (unit) | Text (50) |
|
||||||||||||||||||||||||
| G.k.4.r.6a | Duration of Drug Administration (number) | Number (5) |
|
||||||||||||||||||||||||
| G.k.4.r.6b | Duration of Drug Administration (unit) | Text (50) |
|
||||||||||||||||||||||||
| G.k.4.r.7 | Batch / Lot Number | Text (35) | |||||||||||||||||||||||||
| G.k.4.r.9.2a | Pharmaceutical Dose Form TermID Version Date / Number | As per ISO IDMP | |||||||||||||||||||||||||
| G.k.4.r.9.2b | Pharmaceutical Dose Form TermID | As per ISO IDMP | |||||||||||||||||||||||||
| G.k.5a | Cumulative Dose to First Reaction (number) | Number (10) |
|
||||||||||||||||||||||||
| G.k.5b | Cumulative Dose to First Reaction (unit) | Text (50) |
|
||||||||||||||||||||||||
| G.k.6a | Gestation Period at Time of Exposure (number) | Number (3) | |||||||||||||||||||||||||
| G.k.6b | Gestation Period at Time of Exposure (unit) | Text (50) |
|
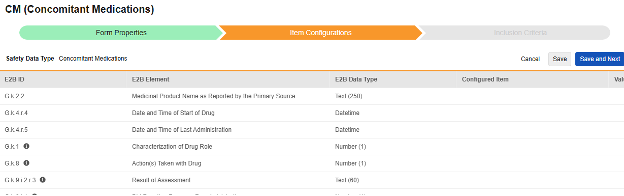
Concomitant Medications
To save item configurations for this safety type:
- Navigate to your Study in Studio > Form Configurations
-
Navigate into the safety form configuration, then to the Item Configurations tab.
-
For each row where a mapping is intended, use the cell in the Configured Item column to select the appropriate Item Definition of the Form Definition. For example, choosing the CMTRT item from the form for the E2B location G.k.2.2.

- Depending on the Item Definition type for the selected item and the E2B ID of the row, Value Translations might be needed. Refer to the general overview for setting up value translations here.
- Click Save (to remain on the page) or Save and Next (to advance to the next tab, Inclusion Criteria)
The choices for item selection will usually depend on the Form Properties > Each Entry In setting previously saved. Some E2B locations have special rules that indicate they can be done in only repeating or non-repeating item groups, or sometimes either.
Additionally, there are three important causality questions (G.k.1 / G.k.8 / G.k.9.i.2.r.3 / G.k.9.i.4) about Concomitant Medications and how they relate to the safety case and the events the case contains. The choices for the item definitions for mapping are sourced from the EDC form mapped to the Safety Case Initiation Event, and only those that reside in a repeating item group which contains an ‘Item to Form Link’ type Item Definition. This is the case because the answers to such questions can and will be different from case to case, event to event, as a site links to the relevant medications. Refer to the table at the end of these steps for these special cases and outliers, plus important notes regarding all E2B locations of this type.
| E2B ID | E2B Label | E2B Type | Notes | ||||||||||||||||||||||||
|---|---|---|---|---|---|---|---|---|---|---|---|---|---|---|---|---|---|---|---|---|---|---|---|---|---|---|---|
| G.k.2.2 | Medicinal Product Name as Reported by the Primary Source | Text (250) |
|
||||||||||||||||||||||||
| G.k.4.r.4 | Date and Time of Start of Drug | Datetime |
|
||||||||||||||||||||||||
| G.k.4.r.5 | Date and Time of Last Administration | Datetime |
|
||||||||||||||||||||||||
| G.k.1 | Characterization of Drug Role | Number (1) |
|
||||||||||||||||||||||||
| G.k.8 | Action(s) Taken with Drug | Number (1) |
|
||||||||||||||||||||||||
| G.k.9.i.2.r.3 | Result of Assessment | Text (60) |
|
||||||||||||||||||||||||
| G.k.9.i.4 | Did Reaction Recur on Re-administration? | Number (1) |
|
||||||||||||||||||||||||
| G.k.4.r.1a | Dose (number) | Number (8) |
|
||||||||||||||||||||||||
| G.k.4.r.1b | Dose (unit) | Text (50) |
|
||||||||||||||||||||||||
| G.k.4.r.8 | Dosage Text | Text (2000) |
|
||||||||||||||||||||||||
| G.k.4.r.2 | Number of Units in the Interval (Frequency) | Number (4) |
|
||||||||||||||||||||||||
| G.k.4.r.3 | Definition of the Time Interval Unit (Frequency Unit) | Text (50) |
|
||||||||||||||||||||||||
| G.k.2.4 | Identification of the Country Where the Drug Was Obtained | Text (2) |
|
||||||||||||||||||||||||
| G.k.4.r.10.1 | Route of Administration (free text) | Text (60) |
|
||||||||||||||||||||||||
| G.k.4.r.10.2a | Route of Administration TermID Version Date / Number | As per ISO IDMP | |||||||||||||||||||||||||
| G.k.4.r.10.2b | Route of Administration TermID | Number (3) |
|
||||||||||||||||||||||||
| G.k.10.r | Additional Information on Drug (coded) (repeat as necessary) | Number (2) |
|
||||||||||||||||||||||||
| G.k.11 | Additional Information on Drug (free text) | Text (2000) |
|
||||||||||||||||||||||||
| G.k.7.r.1 | Indication as Reported by the Primary Source | Text (250) | |||||||||||||||||||||||||
| G.k.2.3.r.3a | Strength (number) | Number (10) |
|
||||||||||||||||||||||||
| G.k.2.3.r.3b | Strength (unit) | Text (50) |
|
||||||||||||||||||||||||
| G.k.4.r.6a | Duration of Drug Administration (number) | Number (5) |
|
||||||||||||||||||||||||
| G.k.4.r.6b | Duration of Drug Administration (unit) | Text (50) |
|
||||||||||||||||||||||||
| G.k.4.r.7 | Batch / Lot Number | Text (35) | |||||||||||||||||||||||||
| G.k.4.r.9.1 | Pharmaceutical Dose Form (free text) | Text (60) | |||||||||||||||||||||||||
| G.k.5a | Cumulative Dose to First Reaction (number) | Number (10) |
|
||||||||||||||||||||||||
| G.k.5b | Cumulative Dose to First Reaction (unit) | Text (50) |
|
||||||||||||||||||||||||
| G.k.6a | Gestation Period at Time of Exposure (number) | Number (3) | |||||||||||||||||||||||||
| G.k.6b | Gestation Period at Time of Exposure (unit) | Text (50) |
|
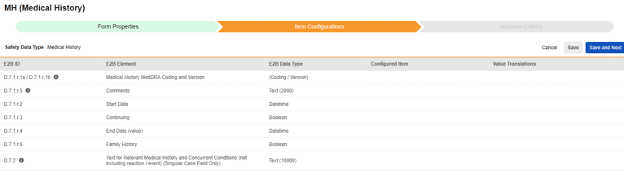
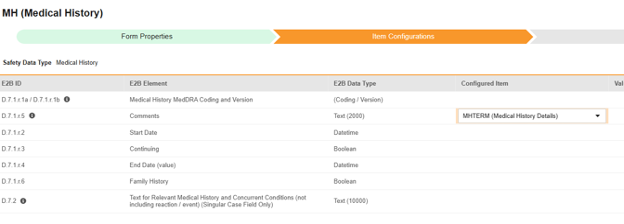
Medical History
To save item configurations for this safety type:
- Navigate to your Study in Studio > Form Configurations
-
Navigate into the safety form configuration, then to the Item Configurations tab.
-
For each row where a mapping is intended, use the cell in the Configured Item column to select the appropriate Item Definition of the Form Definition. For example, choosing the MHTERM item from the form for the E2B location D.7.r.1.5.
- Depending on the Item Definition type for the selected item and the E2B ID of the row, Value Translations might be needed. Refer to the general overview of setting up these value translations.
- Click Save (to remain on the page) or Save and Next (to advance to the next tab, Inclusion Criteria).
The choices for item selection will usually depend on the Form Properties > Each Entry In setting previously saved. Some E2B locations have special rules that indicate they can be done in only repeating or non-repeating item groups, or sometimes either. Refer to the table at the end of these steps for those outliers, plus important notes regarding all E2B locations of this type.
| E2B ID | E2B Label | E2B Type | Notes | ||||||||||||
|---|---|---|---|---|---|---|---|---|---|---|---|---|---|---|---|
| D.7.1.r.1a / D.7.1.r.1b | Medical History MedDRA Coding and Version | (Coding / Version) |
|
||||||||||||
| D.7.1.r.5 | Comments | Text (2000) |
|
||||||||||||
| D.7.1.r.2 | Start Date | Datetime |
|
||||||||||||
| D.7.1.r.3 | Continuing | Boolean (or NullFlavor) |
|
||||||||||||
| D.7.1.r.4 | End Date (value) | Datetime |
|
||||||||||||
| D.7.1.r.6 | Family History | Boolean | |||||||||||||
| D.7.2 | Text for Relevant Medical History and Concurrent Conditions (not including reaction / event) (Singular Case Field Only) | Text (10000) |
|
Drug History
To save item configurations for this safety type:
- Navigate to your Study in Studio > Form Configurations
-
Navigate into the safety form configuration, then to the Item Configurations tab.
-
For each row where a mapping is intended, use the cell in the Configured Item column to select the appropriate Item Definition of the Form Definition. For example, choosing the HIST_DRG_NAME item from the form for the E2B location D.8.r.1.

- Depending on the Item Definition type for the selected item and the E2B ID of the row, Value Translations might be needed. Refer to the general overview of setting up these value translations.
- Click Save (to remain on the page) or Save and Next (to advance to the next tab, Inclusion Criteria)
The choices for item selection will usually depend on the Form Properties > Each Entry In setting previously saved. Some E2B locations have special rules that indicate they can be done in only repeating or non-repeating item groups, or sometimes either. Refer to the table at the end of these steps for those outliers, plus important notes regarding all E2B locations of this type.
| E2B ID | E2B Label | E2B Type | Notes |
|---|---|---|---|
| D.8.r.1 | Name of Drug as Reported | Text (250) |
|
| D.8.r.4 | Start Date | Datetime |
|
| D.8.r.5 | End Date | Datetime |
|
| D.8.r.6a / D.8.r.6b | MedDRA Coding and Version (Indication) | (Coding / Version) |
|
| D.8.r.7a / D.8.r.7b | MedDRA Coding and Version (Reaction) | (Coding / Version) |
|
Test Results
To save item configurations for this safety type:
- Navigate to your Study in Studio > Form Configurations
-
Navigate into the safety form configuration, then to the Item Configurations tab.
-
For each row where a mapping is intended, use the cell in the Configured Item column to select the appropriate Item Definition of the Form Definition. For example, choosing the LBDT item from the form for the E2B location F.r.1.
- Depending on the Item Definition type for the selected item and the E2B ID of the row, Value Translations might be needed. Refer to the general overview of setting up these value translations.
- Click Save (to remain on the page) or Save and Next (to advance to the next tab, Inclusion Criteria).
The choices for item selection will usually depend on the Form Properties > Each Entry In setting previously saved. Some E2B locations have special rules that indicate they can be done in only repeating or non-repeating item groups, or sometimes either. Refer to the table at the end of these steps for those outliers, plus important notes regarding all E2B locations of this type.
| E2B ID | E2B Label | E2B Type | Notes | ||||||||||
|---|---|---|---|---|---|---|---|---|---|---|---|---|---|
| F.r.1 | Test Date | Datetime |
|
||||||||||
| F.r.2.1 | Test Name (free text) | Text (250) |
|
||||||||||
| (F.r.2.2a) | MedDRA Version for Test Name |
|
|||||||||||
| (F.r.2.2b) | Test Name (MedDRA code) |
|
|||||||||||
| F.r.3.1 | Test Result (code) | Number (1) |
|
||||||||||
| F.r.3.2 | Test Result (value / qualifier) | Number (50) |
|
||||||||||
| F.r.3.3 | Test Result (unit) | Text (50) |
|
||||||||||
| F.r.3.4 | Result Unstructured Data (free text) | Text (2000) |
|
||||||||||
| F.r.4 | Normal Low Value | Text (50) | |||||||||||
| F.r.5 | Normal High Value | Text (50) | |||||||||||
| F.r.6 | Comments (free text) | Text (2000) | |||||||||||
| F.r.7 | More Information Available | Boolean |
|
Patient Characteristics
Only items from non-repeating item groups are available for selection when using this type.
To save item configurations for this safety type:
- Navigate to your Study in Studio > Form Configurations
-
Navigate into the safety form configuration, then to the Item Configurations tab.
-
For each row where a mapping is intended, use the cell in the Configured Item column to select the appropriate Item Definition of the Form Definition. For example, choosing the DOB item from the form for the E2B location D.2.1.

- Depending on the Item Definition type for the selected item and the E2B ID of the row, Value Translations might be needed. Refer to the general overview of setting up these value translations.
- Click Save (to remain on the page) or Save and Next (to advance to the next tab, Inclusion Criteria)
| E2B ID | E2B Label | E2B Type | Notes | ||||||||||||||
|---|---|---|---|---|---|---|---|---|---|---|---|---|---|---|---|---|---|
| D.2.1 | Date of Birth (value) | Datetime |
|
||||||||||||||
| D.2.2a | Age at time of onset of reaction/event (number) | Number (5) |
|
||||||||||||||
| D.2.2b | Age at time of onset of reaction/event (unit) | Text (50) |
|
||||||||||||||
| D.5 | Sex | Number (1) (or NullFlavor) |
|
In Case of Death
Item selections for this type are specific to each E2B ID. Where the value can only be used once in a case, only items from non-repeating item groups are shown. The others, where multiple values are allowed, will show choices from either repeating or non-repeating locations.
To save item configurations for this safety type:
- Navigate to your Study in Studio > Form Configurations
-
Navigate into the safety form configuration, then to the Item Configurations tab.
-
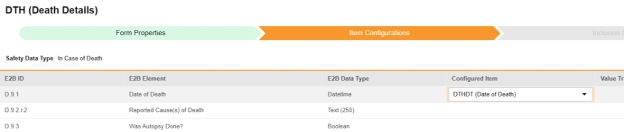
For each row where a mapping is intended, use the cell in the Configured Item column to select the appropriate Item Definition of the Form Definition. For example, choosing the DTHDT item from the form for the E2B location D.9.1.
- Depending on the Item Definition type for the selected item and the E2B ID of the row, Value Translations might be needed. Refer to the general overview of setting up these value translations.
- Click Save (to remain on the page) or Save and Next (to advance to the next tab, Inclusion Criteria).
| E2B ID | E2B Label | E2B Type | Notes | ||||||||||||
|---|---|---|---|---|---|---|---|---|---|---|---|---|---|---|---|
| D.9.1 | Date of Death | Datetime |
|
||||||||||||
| D.9.2.r.2 | Reported Cause(s) of Death | Text (250) |
|
||||||||||||
| (D.9.2.r.1a) | MedDRA Version for Reported Cause(s) of Death |
|
|||||||||||||
| (D.9.2.r.1b) | Reported Cause(s) of Death (MedDRA code) |
|
|||||||||||||
| D.9.3 | Was Autopsy Done? | Boolean (or NullFlavor) |
|
||||||||||||
| D.9.4.r.2 | Autopsy - determined Cause(s) of Death | Text (250) |
|
||||||||||||
| (D.9.4.r.1a) | MedDRA Version for Autopsy determined Cause(s) of Death |
|
|||||||||||||
| (D.9.4.r.1b) | Autopsy - determined Cause(s) of Death (MedDRA code) |
|
Reporter / Sender Comments by System
Reporter / Sender Comment by System supports the configuration of non-E2B link EDC item values to appear in the Reporter Comments (H.2) or Sender Comments (H.4) for transfer via the E2B XML. The mapped item values will be listed as standardized notes in the Comment fields, and the values will be appended to any actual Reporter or Sender Comment text.
To configure the standardized notes, one (or more) items from a form are selected to be listed and appended to either the Reporter Comments (H.2) or Sender Comments (H.4).
Also repeating item groups, forms or events can be selected for inclusion. When repeating information is prepared for transfer via the Reporter or Sender Comments, each list item will indicate the sequence numbers to allow the unique tracing of the transferred data.
Forms and items mapped to other Safety Data Types can additionally be mapped to either the Reporter or Sender Comment.
The following example, key lab values, cohort, toxicity grade, and changes in toxicity grade were selected for transfer.
Note that the additional bulleted information is appended to the actual Reporter Comments, which have been mapped to H.2.
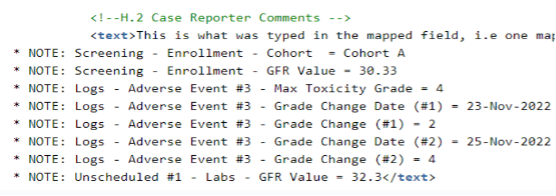
Note:
- Codelist labels are listed
- Date/Datetime is shown as entered by the site
- “no value” is listed if the item has not been entered
If the additionally selected items exceed the character limitation of the H.2 or H.4 field, the appended information will be truncated at a maximum of 19,975 characters.
Example 1:
An adverse event form often tracks data which are not compliant, and transferable, with the E2B format. This CTCAE Grade field appears on the on the adverse event form:
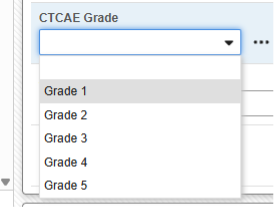
It can be included in either the Reporter or Sender Comment field using this type by simple selection:
Each inclusion will result in a formatted bullet to the Reporter (or Sender) Comments in the E2B file.
Example 2:
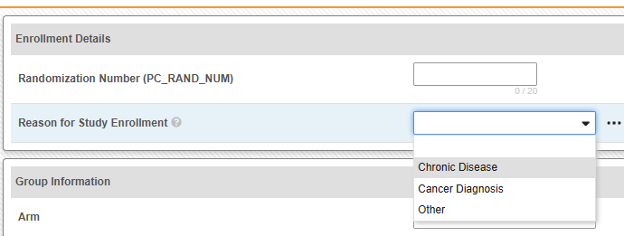
The form for including such fields can also be a form that is not in use by another type. Key enrollment details might be useful in the safety system. The Enrollment form might be selected to include the randomization number, reason for enrollment, cohort, etc. in either the Reporter or Sender Comment field:
Inclusion Criteria
Inclusion criteria are evaluated to determine the inclusion of the mapped item values into a safety case beyond the primary event initiating the safety case data transfer.
Notes / concepts:
- Inclusion criteria will only be evaluated, if both of the following conditions are met:
- On the Form Properties tab, all inclusion criteria evaluate to true, particularly the Key Safety Item
- On the Item Configuration tab, the required items have non-empty values on the EDC form
- The additional criteria can either include all forms of a type, be based on a site user action (linking) and/or date comparison based. These configurations can differ by type, specific form, and/or study.
- Conditions on the Inclusion Criteria tab are considered ‘OR’ as they evaluate. That is, if any one of a series of applicable criteria is true, then the evaluation is ‘In’, regardless of others evaluating as false.
- When a comparison with the safety case initiation event End Date for inclusion into a case is configured, but the date is NOT set on the data entry screen, the Events end date is used for evaluation as open ended. Once an end date is entered on the primary event (or related form), the system will re-evaluate the inclusion criteria, and send a corrective follow-up, if appropriate.
- Inclusion Criteria are applicable for all the related safety types:
- Safety Case Initiation Event
- Study Drug
- Concomitant Medications
- Medical History
- Drug History
- Test Results
- Reporter / Sender Comments by System
Option Summary by Safety Type
| Inclusion Criteria | Safety Data Types | ||||||||
|---|---|---|---|---|---|---|---|---|---|
| SCIE | Study Drug | Con Meds | Med Hist | Drug Hist | Test Res | Pat Chars | Death | Rep/Sen Comm | |
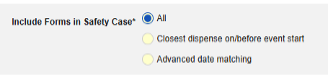
| All | |||||||||
| Linked by site user | |||||||||
| Start to end overlaps safety event start to end | |||||||||
| Start to end overlaps X days before safety event start | |||||||||
| Start to end overlaps X days after safety event start | |||||||||
| Start to end overlaps X days before safety event end | |||||||||
| Start to end overlaps X days after safety event end | |||||||||
| First dispense | |||||||||
| Closest on/before safety event start | |||||||||
| Closest on/after safety event start | |||||||||
| Closest on/before safety event (one only) | |||||||||
| Drug dispense start before safety event start | |||||||||
| Ended before safety event start | |||||||||
| Automatically, due to being part of a safety case initiation event form | |||||||||
| Filtered - in case already or linked by site user | |||||||||
| Always | * | * | |||||||
|
Indicates that this inclusion criterion is available for the safety data type * Indicates that this inclusion criteria can't be modified for the safety data type |
|||||||||
The table header abbreviates the safety data types:
- SCIE: Safety Case Initiation Event
- ConMeds: Concomitant Medications
- Med Hist: Medical History
- Drug Hist: Drug History
- Test Res: Test Results
- Pat Chars: Patient Characteristics
- Death: In Case of Death
- Rep/Sen Comm: Reporter / Sender Comments by System
Option Meaning / Examples
All criteria options are summarized below. With each date based option, a series of examples are included to illustrate its usage.
| Option | Notes / Studio Interface | ||||||||||||||||||||||||||||||||||||
|---|---|---|---|---|---|---|---|---|---|---|---|---|---|---|---|---|---|---|---|---|---|---|---|---|---|---|---|---|---|---|---|---|---|---|---|---|---|
| All |
|
||||||||||||||||||||||||||||||||||||
| Linked by site user |
|
||||||||||||||||||||||||||||||||||||
| Start to end overlaps safety event start to end |
|
||||||||||||||||||||||||||||||||||||
| Start to end overlaps X days before safety event start |
|
||||||||||||||||||||||||||||||||||||
| Start to end overlaps X days after safety event start |
|
||||||||||||||||||||||||||||||||||||
| Start to end overlaps X days before safety event end |
|
||||||||||||||||||||||||||||||||||||
| Start to end overlaps X days after safety event end |
|
||||||||||||||||||||||||||||||||||||
| First dispense |
|
||||||||||||||||||||||||||||||||||||
| Closest on/before safety event start |
|
||||||||||||||||||||||||||||||||||||
| Closest on/after safety event start |
|
||||||||||||||||||||||||||||||||||||
| Closest on/before safety event (one only) |
|
||||||||||||||||||||||||||||||||||||
| Drug dispense start before safety event start |
|
||||||||||||||||||||||||||||||||||||
| Ended before safety event start |
|
||||||||||||||||||||||||||||||||||||
| Automatically, due to being part of a safety case initiation event form |
|
||||||||||||||||||||||||||||||||||||
| Filtered - in case already or linked by site user |
|
||||||||||||||||||||||||||||||||||||
| Always |
|


By Safety Data Type
Safety Case Initiation Event
The Safety Case Initiation Event will be the primary event to begin the process of transferring a safety case. All other related events are then brought into the case per their configured criteria. Depending on preference and study design, the initiating event can include other data from the initiating form, or be related to other events/forms of the same type, which themselves, however, don’t constitute their own safety case (e.g. other non-serious events linked to the initiating serious event).
Common Practical Example:
- On Monday, the subject experiences a non-serious adverse event “Headaches” (AE form #1)
- On Wednesday, the subject experiences a serious adverse event “Dizziness” (AE form #2)
- The system sends a safety case for the Tuesday event (“Dizziness”) as the primary initiating event of the new safety case. The system also adds the data of the Monday event as a 2nd event in the same safety case based on inclusion criteria configured. This happens due to the use of Days On/Before = 2 (or more)
For more detail and examples on each inclusion criteria option, see Option Meanings / Examples above.
To save inclusion criteria for this safety type:
- Navigate to your Study in Studio > Form Configurations
-
Navigate into the safety form configuration, then to the Inclusion Criteria tab.
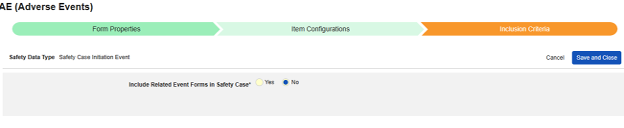
- Include Related Event Forms in Safety Case:
- If your study does not intend to bring other events into the safety case (secondary events), leave the default of No, and next use Save and Close to finish.
- If, on the other hand, your study does need to include other events (secondary) to the safety case based on criteria, select Yes.
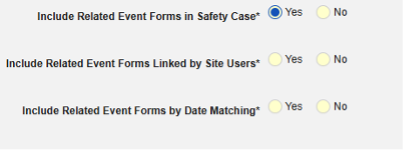
- Include Related Forms Linked by Site Users: Choose Yes if events linked by the site to the primary initiating event are to be included in the case. Warning: with Yes, the form must also have Form to Form or Item to Form linking configured.
-
Include Related Event Forms by Date Matching: Choose Yes if data from related events are to be evaluated for inclusion based on one or more date based criteria. For more detail and examples on each inclusion criteria option, see Option Meanings / Examples above.
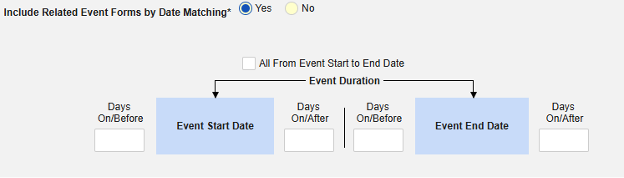
- Check an option, or set specific Days value(s). At least one of these options must be selected / set.
- Click Save and Close to finish.
Study Drug
This type of safety configuration is used to track dosing / dispensing information of a study drug in relation to the initiating events of the, i.e. those the clinical study is testing against subjects. The information will flow to the products / drugs section of a safety case. (G.* section of E2B).
Practical Example:
- On March 1st, the subject receives the first dispense of a study drug Active vs Placebo (blinded study drug)
- On March 3rd, the subject receives another dispense
- On March 5th, the subject receives another dispense
- On March 6th, the subject experiences a serious adverse event (“Dizziness”) and the site enters into the AE form
- The system creates and transfers a safety case using “Dizziness” as the primary event
- The study is configured to include in the safety case a subset of dispenses. As one configuration example, March 1st (first overall) and March 5th (closest on/before). Other dispenses are not included, per the criteria configured.
For more detail and examples on each inclusion criteria option, see Option Meanings / Examples above.
To save inclusion criteria for this safety type:
- Navigate to your Study in Studio > Form Configurations
-
Navigate into the safety form configuration, then to the Inclusion Criteria tab.
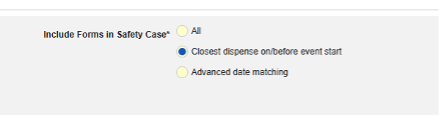
- Include Forms in Safety Case (For more detail and examples on each inclusion criteria option, see Option Meanings / Examples above):
- All: Include all current study drug dispenses into the case
- Closest dispense on/before event (default): Include the nearest single dose/dispense for the subject across all forms into the case. The study drug dispensed with the date closest before the start of the primary initiating event will be included.
- Advanced date matching: Display and configure advanced selections in relation to the primary initiating events start and end date. Check one or more options, or set specific Days value(s). At least one of these options must be selected / set.

- Click Save and Close to finish.
Concomitant Medications
This type of safety configuration is applied to concomitant medication forms of the study. The information will flow to the products / drugs section of a safety case. (G.* section of E2B) Multiple forms can be used with the type.
Practical Example:
- On March 1st, the subject starts Veeofen, taken once a day, but stops on March 3rd
- On March 3rd, the subject starts Natevba, taken once a day, and has no end date (still taking)
- On March 5th, the subject takes one dose of Deetoza (end date March 5th also)
- On March 7th, the subject experiences a serious adverse event (“Dizziness”) and the site enters into the AE form
- The system creates and transfers a safety case using “Dizziness” as the primary event
-
The study design prescribes to pull in concomitant medications using these two rules:
- “Anything ongoing at the SAE start”
- “Anything stopped, but stopped within 3 days of the SAE start”
- The result: March 3rd Natevba (ongoing) and March 5th Deetoza (ended, but only 2 days ago) are both in case. The other - March 1st Aspirin - is not the case (it ended more than 3 days ago)
For more detail and examples on each inclusion criteria option, see Option Meanings / Examples above.
To save inclusion criteria for this safety type:
- Navigate to your Study in Studio > Form Configurations
-
Navigate into the safety form configuration, then to the Inclusion Criteria tab.
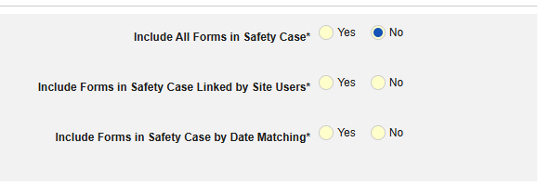
- Select from these options:
- Include All Forms in Safety Case (default: No): Select Yes, to include all current concomitant medications into the case, which will disable all other options.
- Include Related Forms Linked by Site Users. Choose Yes if concomitant medications linked by the site to the primary initiating event are to be included in the case. Warning: with Yes, the form must also have Form to Form or Item to Form linking configured.
- Include Forms in Safety Case Linked by Site Users: Choose Yes or No for Warning: with Yes, the form must also have Form to Form or Item to Form linking configured.
-
Choose Yes or No for Include Forms to Safety Case by Date Matching. With Yes, this means the system will use one or more criteria to compare the Start to End ranges of the safety case event (primary) and the related data (the form actively being configured, it’s start and end range).
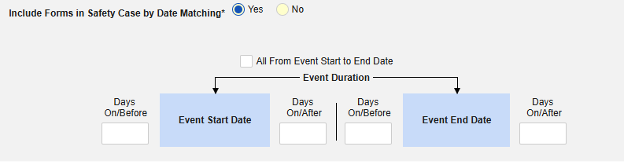
- Check an option, or set specific Days value(s). At least one of these options must be selected / set.
- Click Save and Close to finish.
For more detail and examples on each inclusion criteria option, see Option Meanings / Examples above.
Medical History
This type of safety configuration is applied to medical history forms of the study. The information will flow to the E2B D.7 section of a safety case. Multiple forms can be used with the type.
Practical Example:
- In January of 2024, the subject first started having “Minor Dizziness”. The medical history is deemed ongoing (no end date)
- A second medical history indicates “Back Pain”, with start April 2024 and end May 2024
- A third medical history indicates “Migraines” with start of June 2024 and end of Nov 2024
- On March 7th 2025, the subject experiences a serious adverse event (“Dizziness”) and the site enters into the AE form
- The system creates and transfers a safety case using “Dizziness” as the primary event
-
The study design prescribes to pull in medical history using these two rules:
- “Anything ongoing at the SAE start”
- “Anything stopped, but stopped within 182 days of the SAE start”
- The result: “Minor Dizziness” (ongoing) and “Migraines” (ended, but within a year) are both in case. The other - “Back Pain” - is not in case (it ended more than 180 days ago)
For more detail and examples on each inclusion criteria option, see Option Meanings / Examples above.
To save inclusion criteria for this safety type:
- Navigate to your Study in Studio > Form Configurations
-
Navigate into the safety form configuration, then to the Inclusion Criteria tab.

- Select from these options:
- Include All Forms in Safety Case (default: No): Select Yes, to include all current concomitant medications into the case, which will disable all other options.
- Include Related Forms Linked by Site Users. Choose Yes if concomitant medications linked by the site to the primary initiating event are to be included in the case. Warning: with Yes, the form must also have Form to Form or Item to Form linking configured.
- Include Forms in Safety Case Linked by Site Users: Choose Yes or No for Warning: with Yes, the form must also have Form to Form or Item to Form linking configured.
-
Choose Yes or No for Include Forms to Safety Case by Date Matching. With Yes, this means the system will use one or more criteria to compare the Start to End ranges of the safety case event (primary) and the related data (the form actively being configured, it’s start and end range).

- Check an option, or set specific Days value(s). At least one of these options must be selected / set.
- Click Save and Close to finish.
For more detail and examples on each inclusion criteria option, see Option Meanings / Examples above.
Drug History
This type of safety configuration is applied to drug history forms of the study. The information will flow to the E2B D.8 section of a safety case.
Practical Example:
- The study design collects drug history information - at the screening visit - that the investigator deems appropriate and/or is per protocol. These are specifically drugs/products taken (and ended) before the subject is in the trial.
- On March 7th 2025, the subject experiences a serious adverse event (“Dizziness”) and the site enters into the AE form.
- The system creates and transfers a safety case using “Dizziness” as the primary event
- Per the study configuration for this type of safety data, All are to be included in every safety case the subject experiences.
- Alternatively, date based and/or site linking options can be used.
For more detail and examples on each inclusion criteria option, see Option Meanings / Examples above.
To save inclusion criteria for this safety type:
- Navigate to your Study in Studio > Form Configurations
-
Navigate into the safety form configuration, then to the Inclusion Criteria tab.

- Select from these options:
- Include All Forms in Safety Case (default: No): Select Yes, to include all current concomitant medications into the case, which will disable all other options.
- Include Related Forms Linked by Site Users. Choose Yes if concomitant medications linked by the site to the primary initiating event are to be included in the case. Warning: with Yes, the form must also have Form to Form or Item to Form linking configured.
- Include Forms in Safety Case Linked by Site Users: Choose Yes or No for Warning: with Yes, the form must also have Form to Form or Item to Form linking configured.
-
Choose Yes or No for Include Forms to Safety Case by Date Matching. With Yes, this means the system will use one or more criteria to compare the Start to End ranges of the safety case event (primary) and the related data (the form actively being configured, it’s start and end range).

- Check an option, or set specific Days value(s). At least one of these options must be selected / set.
- Click Save and Close to finish.
For more detail and examples on each inclusion criteria option, see Option Meanings / Examples above.
Test Results
This type of safety configuration is applied to lab / test result forms of the study. The information will flow to the E2B F.* section of a safety case. Multiple forms can be used with the type.
Practical Example:
- The study design collects additional labs / test results on a log form, as needed by the investigator / site. That is, tests they deem relevant to a serious adverse event.
- On March 7th 2025, the subject experiences a serious adverse event (“Dizziness”) and the site enters into the AE form.
- Additionally, the site adds two out of range lab tests and performs a link to the AE form for each.
- The system creates and transfers a safety case using “Dizziness” as the primary event
- Since the study has safety configuration that indicates to include whatever the site links to the event, the two test results are included in the case.
- Additionally (or instead of), date based options can be used.
For more detail and examples on each inclusion criteria option, see Option Meanings / Examples above.
To save inclusion criteria for this safety type:
- Navigate to your Study in Studio > Form Configurations
-
Navigate into the safety form configuration, then to the Inclusion Criteria tab.

- Select from these options:
- Include All Forms in Safety Case (default: No): Select Yes, to include all current concomitant medications into the case, which will disable all other options.
- Include Related Forms Linked by Site Users. Choose Yes if concomitant medications linked by the site to the primary initiating event are to be included in the case. Warning: with Yes, the form must also have Form to Form or Item to Form linking configured.
- Include Forms in Safety Case Linked by Site Users: Choose Yes or No for Warning: with Yes, the form must also have Form to Form or Item to Form linking configured.
-
Choose Yes or No for Include Forms to Safety Case by Date Matching. With Yes, this means the system will use one or more criteria to compare the Start to End ranges of the safety case event (primary) and the related data (the form actively being configured, it’s start and end range).

- Check an option, or set specific Days value(s). At least one of these options must be selected / set.
- Click Save and Close to finish.
For more detail and examples on each inclusion criteria option, see Option Meanings / Examples above.
Patient Characteristics
This type of safety configuration is applied to general information about the patient. There are no criteria for this type. Instead, information classified to this type is included in all safety cases of a subject.
When arriving at the Inclusion Criteria tab from the Item Configurations tab click Save and Next, which returns you to the Form Configurations list.:
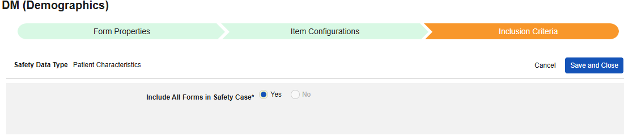
In Case of Death
This type of safety configuration is applied to forms involving death details about the subject. There are no criteria for this type. Instead, information classified to this type is included in all safety cases of a subject.
When arriving at the Inclusion Criteria tab from the Item Configurations tab click Save and Next, which returns you to the Form Configurations list:
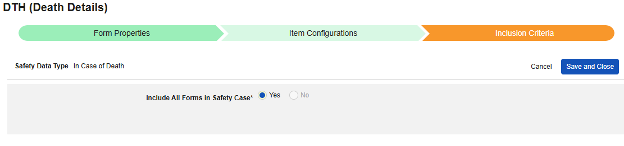
Currently, every case will receive this information, even those where no event in the case has an outcome Fatal.
Reporter / Sender Comments by System
This type of safety configuration is applied to forms from any location in the casebook. For data that doesn’t fit anywhere in the E2B structure, this type is used.
To save inclusion criteria for this safety type:
- Navigate to your Study in Studio > Form Configurations.
-
Navigate into the safety form configuration, then to the Inclusion Criteria tab.
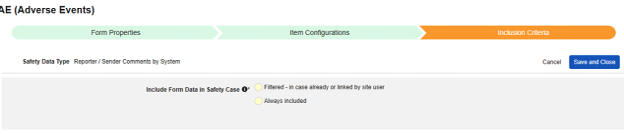
- Choose the appropriate of the two options listed in the table below.
- Click Save and Close.
| Option | Meaning / Notes |
|---|---|
| Filtered - in case already or linked by site user | The option has two possible meanings:
|
| Always included | Values from the form will be included as system generated bullets in Reporter (or Sender)
Comments for all forms in data entry using that form design. This option is most often used for
data collected once per subject. Examples:
|
Delete All Safety Configuration
Use great care when removing all safety configurations for a study design. This action will return the study to a state where no configuration exists, and you would need to start again.
To perform this action, there must be zero Safety Cases in the development study. If you have already created Safety Cases in your development environment, you can delete non-production test data.
Deleting Post Go-Live: If your downstream environments (Test, Training, Production) have safety configurations and safety cases, this operation should never be performed. Even though the development study could delete its safety cases, and then the safety configuration, a later deployment to Test/Training/Production would fail.
To remove all safety configuration for a study:
- Navigate to Studio > Safety Settings for your Study.
-
From the Actions menu, select Delete All Safety Configurations.

- In the confirmation dialog, type “DELETE” as instructed.
- Click Delete.
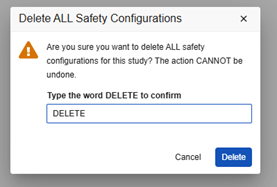
Download Specifications
You can download your safety configuration via the Study Design Specification or the All CRFs PDF export. Two additional tabs will be generated when you have configured for a safety integration: Safety Settings and Safety Form Configurations.
Deploying Safety Configuration
Once you finish your configuration in your study’s DEV environment, you can deploy it to TST for testing, then onward into your training and production environments.
Your safety integration configuration is automatically included in your study’s deployment package. When you deploy your study, Vault includes the current configuration in the package.
Because this configuration is managed as part of study deployments, you can only make changes in DEV type environment. To make changes, make them in the DEV environment and then deploy those changes to your other environments. This configuration is validated as part of casebook version publication. While validation is in progress, editing is disabled. A list of possible errors and warnings is available here.
Learn how to deploy a study.
E2B Elements Reference (System Generated)
The following table summarizes system-generated E2B elements that are additionally sent to the safety system in the Safety Case, together with the configured Item Configurations.
| E2B ID | E2B Element | Data Type | Source | Explanation |
|---|---|---|---|---|
| N.1.1 | Type of Messages in Batch | Number (2) | Static | This is always set to “1” for ICH ICSR. |
| N.1.2 | Batch Number | Number (100) | System Generated | This value is a concatenation of the Site for the Subject (ISO two letter code), the unique identifier for your EDC system (unique to all Studies in that vault), the vault’s ID, the object record’s ID, a dash (“-“), and the numeric value for the Nth message of the case (for example, “US-VAULTCDMS-110377V6800000000L003-1”). The EDC system identifier has “TEST” appended to it when in non-production environments. For the message number, “0” is the first send, “1” is the first follow up, and so on. |
| N.1.3 | Batch Sender Identifier | Text (60) | System Generated | This is the Batch Sender Identifier specified in the study’s Transmission Profile. This matches up with the sender profile configured in the safety system. |
| N.1.4 | Batch Receiver Identifier | Text (60) | System Generated | This is the Batch Receiver Identifier specified in the study’s Transmission Profile. This matches up with the receiver profile configured in the safety system. |
| N.1.5 | Date of Batch Transmission | Datetime | System Generated | The full date and time (in UTC) of when Vault creates the Safety Message and its XML file. |
| N.2.r.1 | Message Identifier | Text (100) | System Generated | This is the same as “N.1.2”. |
| N.2.r.2 | Message Sender Identifier | Text (60) | System Generated | This is the same as “N.1.3”. |
| N.2.r.3 | Message Receiver Identifier | Text (60) | System Generated | This is the same as “N.1.4”. |
| N.2.r.4 | Date of Message Creation | Datetime | System Generated | This is the same as “N.1.5”. |
| C.1.1 | Sender's (case) Safety Report Unique Identifier | Text (100) | System Generated | This value is a concatenation of the Site for the Subject (ISO two letter code), the unique identifier for your EDC system (unique to all Studies in that vault), the vault’s ID, and the object record’s ID (for example, “US-VAULTCDMS-110377V6800000000L003”). The EDC system identifier has “TEST” appended to it when in non-production environments. |
| C.1.2 | Date of Creation | Datetime | System Generated | Vault creates the Safety Message right before transmitting it. This field captures the date of creation to the second. It acts as a message identifier. |
| C.1.3 | Type of Report | Number (1) | Static | This is set to “2” for “Report from Study”. |
| C.1.4 | Date Report Was First Received from Source | Datetime | System Generated | This field captures the date and time when all required fields (Items) are captured for an SAE. |
| C.1.5 | Date of Most Recent Information for This Report | Datetime | System Generated | Indicates the first change made on a given date by a data entry user involving data in the safety case, after the last safety message was sent. For example, if on the same date a user first changes data on a Medical History form at 8 AM, then changes data on the SAE form at 10 AM, and finally links two Concomitant Medication forms at 11 AM, with all changes made to data in the same safety case, the C.1.5 value will be 8 AM on that date in the next scheduled transfer. |
| C.1.6.1 | Are Additional Documents Available? | Boolean | Static | This value is always false’ |
| C.1.7 | Does This Case Fulfill the Local Criteria for an Expedited Report? | Boolean | Static | This value is always ‘NI’ (“No Information”) |
| C.1.8.1 | Worldwide Unique Case Identification Number | Text (100) | System Generated | This is the same as “C.1.1”. |
| C.1.8.2 | First Sender of This Case | Number (1) | Static | This is always set to “2” for “Other”. |
| C.1.11.1 | Report Nullification / Amendment | Number (1) | System Generated | If the Message Type is “Amendment”, Vault sets this field to “2”. If the Message Type is “Nullification”, Vault sets this field to “1”. |
| C.2.r.1.2 | Reporter's Given Name | Text (60) | From Site | Depending on the study’s option for Reporter (Safety Settings) this will be from the site’s principal investigator. |
| C.2.r.1.4 | Reporter's Family Name | Text (60) | From Site | Depending on the study’s option for Reporter (Safety Settings) this will be from the site’s principal investigator. |
| C.2.r.3 | Reporter's Country Code | Text (2) | From Site | |
| C.2.r.5 | Primary Source for Regulatory Purposes | Number (1) | Static | This value is always a ‘1’ |
| C.3.2 | Sender's Organization | Text (100) | From Site | This is the Name of the study’s Organization (in EDC, the sender). |
| C.5.3 | Sponsor Study Number | Text (50) | Looked Up | This is the study’s name/label, if not set with a specific value in the Study Safety Settings section |
| E.i.9 | Identification of the Country Where the Reaction/Event Occurred | Text (2) | From Site or User | 2 character country code for the site’s Study Country. Or, can be mapped on the data entry form for the site to override. (e.g. event occurs when the subject is out of country) |
| D.7.1.r.1a | MedDRA Version for Medical History | Text (4) | Looked Up | “MedDRA” is removed from the string. This field is only sent once it is Coded or Autocoded, because there’s no place for the Medical History Term in the E2B, only the coded values. |
| D.7.1.r.1b | Medical History (disease / surgical / procedure / etc.) (MedDRA Code) | Number (8) | Looked Up |