Configuring Safety-EDC Connection Studies
The safety integration between Veeva EDC and Veeva Safety is based on the exchange of proprietary communication of the Veeva Vault platform. Appropriate integration configuration will send all required and complimentary safety-relevant EDC data to the safety system as safety cases. Examples which can result in the transfer include serious adverse events, adverse events of special interest as well as an unexpected pregnancy in a trial.
With the integration setup against a study design, any time a site creates an event that meets the criteria for a safety case initiation, Veeva EDC automatically generates a first-send and transmits the data to the safety system.
Related data can also be inserted into a safety case, by classifying those locations as one of these safety data types:
- Study Drug (product, or products under test in the clinical trial)
- Concomitant Medications
- Medical History
- Drug History
- Test Results
- Patient Characteristics
- In Case of Death
Any updates to the safety case initiating or related data will automatically generate a follow-up send to be transmitted to the safety system in the given time interval.
Study designers configure this integration by mapping EDC study design Items to the appropriate Veeva Safety location. The inclusion of the mapped casebook elements into the safety case is additionally dependent on the configured inclusion rules, which give the option to include the mapped Items on all casebook Forms of a subject, those linked by the site to the safety case initiating form or that fall into a selected date range in relation to the initiating event.
The safety case can be created due to a single event or can be composed of multiple events. This is configured using site linking and/or date base inclusion rules.
Safety integrations also support nullifications, which happens if the criteria that initiated the initial transfer are no longer true. Examples include form reset (mistaken entry), or downgrade of an event.
Key differentiators between Safety-EDC Connection and E2B Link:
- Safety-EDC Connection does not wait for an Acknowledgement file from the remote system on each send. Instead, an arrival in Vault Safety - its Inbox - is noted in Veeva EDC regardless of any further promotion to a case. Later, if promoted to a formal safety case through normal triage process, the case location will be noted in Veeva EDC.
- Additionally to the actual data transferred as part of the safety case, all safety-relevant data of a trial participant mapped to the standard Safety Data Types is sent to Veeva Safety, once the first safety event occurs. This data can be displayed as required for the safety case processing in Veeva Safety as Additional Subject Information. Changes to data in EDC will result in updates to both safety case data as well as additional subject information in Veeva Safety. While “in case” data changes will create a follow-up Inbox item, updates to additional subject information will be performed in the background without alterations to the case The Veeva Safety user has easy access to anything mapped to the standard Safety Data Types ‘not in case’ through the Additional Subject Information user interface in Veeva Safety and can select / de-select content as per any medical decision, without ever having to leave that system, which consequently will be honoured in the follow-up transfers by Veeva EDC.
- Actions in Veeva Safety are communicated back to Veeva EDC. Particularly the case status to show to sites and CRA as well the safety decisions taken in Veeva Safety. In Veeva Safety, additional subject information can be added to a safety case by simple selection. Similarly, subject information can also be removed from the case. In another scenario, a safety case can contain several events when sent from Veeva EDC, which can be split into individual cases on the Safety side, or individual safety cases can be merged into one. Veeva EDC is now aware of those decisions taken in Veeva Safety. While the EDC clinical data and site linking decisions remain unchanged, the decision taken in Veeva Safety about adding, removing, spitting or merging will be honored when compiling the next Follow-Up Send.
Safety administrators set the timing of the first-send and the frequency of any follow-ups, plus other operational settings for the integration. See Safety Settings in Managing Safety Integrations for details.
Prerequisites
A user with the Vault Owner security profile must create a connection between Veeva EDC and Veeva Safety.
Users with the standard CDMS Study Designer or CDMS Librarian study role can both view and edit safety configurations. If your organization uses user-defined Study Roles, your role must grant the following permissions:
| Type | Permission Label | Controls |
|---|---|---|
| Standard Tab | Studio Tab | Ability to access the Studio tab |
| Standard Tab | Library Tab | Ability to access the Library tab |
| Functional Permission | View Study Design | View-only access to Study Design |
| Functional Permission | Design Study | Ability to create study design definitions and a study schedule from Studio |
| Functional Permission | Manage Safety Configuration | Ability to design and configure for the safety integration of a Study. This includes determining which Forms are involved, which Items on those Forms are sent to the safety system, and what Inclusion Criteria dictate when to include or exclude form data in the Safety Case. |
| Functional Permission | View Library | Ability to view library Collections and their designs from Studio > Library |
| Functional Permission | Design Library | Ability to create study design definitions and a study schedule for a Collection from Studio > Library |
Learn more about Study Roles.
Safety Integration Type
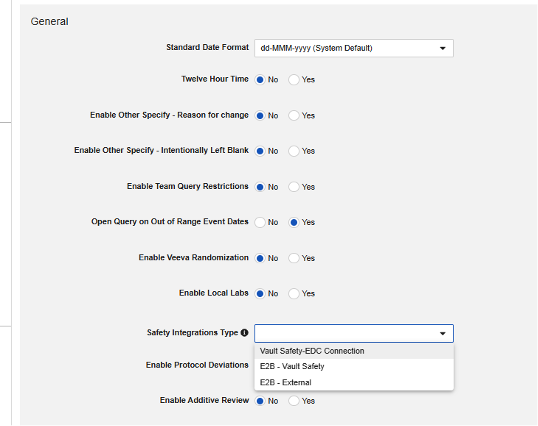
The first step in configuring safety integrations for Veeva EDC is the Safety Integration Type value in your study settings.
-
Navigate to your Study in Studio > Study Settings.

-
Click Edit in the middle (“General”) section:
-
Select Vault Safety-EDC Connection.

-
Click Save.
The Safety Integrations Type setting will be read only once it has a non-empty value. This is due to the nature of Safety-EDC Connection style integration versus the E2B Link. Should you need to toggle between the two, contact a Veeva representative for assistance and planning.
For more information on safety integrations using E2B, see Configuring E2B Studies.
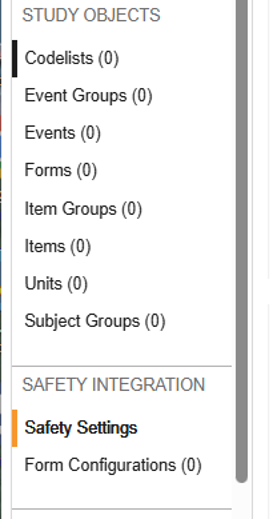
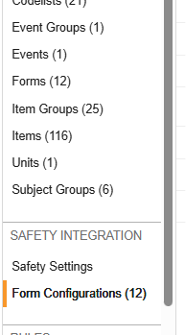
Once the overall integration type is saved, additional options will appear in the Studio navigation menu: Safety Settings and Form Configurations:
Safety Settings
Updating Settings
To set the main safety settings for the study design:
- Navigate to Studio > Safety Settings for your Study.
- Click Edit.
- Make your changes. The table below lists the available case settings.
- Click Save.
Available Settings
The following settings are available:
| Setting | Default Value | Description |
|---|---|---|
| Subject ID Location | Patient Name or Initials | Select the location in which the Veeva EDC Subject ID will be transferred for the current study:
|
| Subject ID Format | Subject Only | Select the format for the Subject ID from the following:
|
| Primary Source Qualification Value | Physician | The Classification is of the person assessing the study drug or treatment, as it relates to each Event of a Safety Case. You can select from the following classification types:
|
| Study Drug Classify when ConMed Suspect | Always Suspect | This setting is only applicable when the study is configured to allow the data entry user to link forms classified Concomitant Medications to the Safety Case Initiation Event and override the default classification of “Concomitant”.
|
| Study Name Value | Optional: You can define a Study Name to use in the transfer. When left blank, Vault sends the Study Label. |
|
| Sponsor Study Number Value | Optional: You can define a Sponsor Study Number to use in the transfer. When left blank, Vault sends the Study Label. |
|
| Study Type | Clinical trials | Select the Study Type of the Reaction (C.5.4) from the following options:
|
| Reporter | Full Site Information | This is the value for the Reporter field on the Safety Case. The reporter locations will populate based on the information defined for the Site in Veeva EDC. Select from the following options:
|
| NullFlavor for Coding | Select how to handle null values for coding (when there is no MedDRA coding value). This setting only applies to locations in your Veeva EDC study design where the form is enabled for coding and you have assigned a location for the safety transfer. Select from the following options:
Coding for the connection is located in each of the following locations, by safety data type:
Note: It isn’t necessary to map the tandem field for each of the above (each below the Safety Field List, and noted with “…(Coding LLT)”. Those mapping rows are only used in special cases. For more information, see the relevant Item Configurations section later in this reference. |
|
| Mute Coding Follow-ups | No | When set to Yes, this setting stops Vault from sending follow-ups when the only change is the assignment of a new or different code to a medical term coded in Veeva EDC (Events, Medical History, Death Causes). Any other change to the data that is part of the safety case will still initiate a follow-up send. When set to No, Veeva EDC sends follow-ups for safety cases for any change to data that is part of the safety case, including any changes to coding of medical terms. If you primarily perform coding in the safety system, it is recommended to set this option to Yes to prevent unnecessary follow-ups for changed coding assignments to the safety system. |
| Datetime Value Behavior | Use Screen / Entered Value | When configuring safety data against datetime fields on an EDC form, this option indicates which value to send. You can choose from Use Screen / Entered Value to use the value as entered by the site, or you can choose Use Normalized (UTC) Value to use the datetime normalized to UTC using the site time zone, offsetting the screen value. |
| Days Before SAE Start for Local Lab Test | This setting is only applicable when the study is using the Local Labs module (enabled in Studio’s study settings). Enter the number of days before the Start Date for the Safety Case Initiating Event to search for lab tests. When set, this implies that local lab tests (all forms) should be searched and the tests sent to the safety system for review. These tests don’t appear in any case upon transfer, instead, they are reviewed for medical decisions to include in specific cases. This field allows a number value (as days) from 0 to 21. |
|
| Days After SAE Start for Local Lab Tests | This setting is only applicable when the study is using the Local Labs module (enabled in Studio’s study settings). Enter the number of days after the Start Date for the Safety Case Initiating Event to search for lab tests. When set, this implies that local lab tests (all forms) should be searched and the tests sent to the safety system for review. These tests don’t appear in any case upon transfer, instead, they are reviewed for medical decisions to include in specific cases. This field allows a number value (as days) from 0 to 7. |
|
| Auto Set Medically Confirmed | No | This setting determines the inclusion of “Medical Confirmation by Healthcare Professionals” in the safety case, and for every case Veeva EDC transmits. Select Yes to include. If you select No, a value is omitted from the transfer. The most common use for this is Yes, since the safety cases are originating from a clinical site / investigator. |
| Include Secondary Event Site Links to Case | Yes | Using Yes for this setting will include related data linked to secondary events of the case, not just the primary safety case initiating event. |
Study Drug Identification
Clinical trials often require complex study drug administration regimens, including participant- or visit-specific drug application chosen by the Investigator, country-specific study drug administration or various sub-study requirements.
For the Study Drug safety data type, you can choose how the Study Drug is identified. You can either assign directly a Study Drug (managed in Studio > Safety Integrations > Study Drugs), or you can map a data collection item to the Study Drug Name field for data entry users to identify the study drug. This allows you to more easily have multiple forms for different study drug applications.
Create a Study Drug
- Navigate to Studio > Safety Integrations > Study Drugs.
-
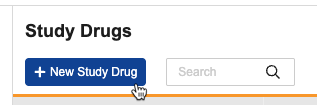
Click + New Study Drug.
-
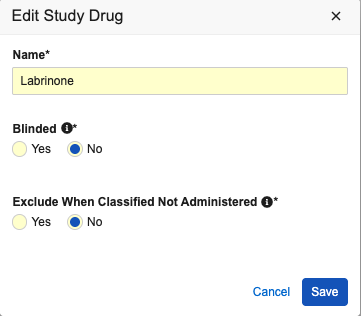
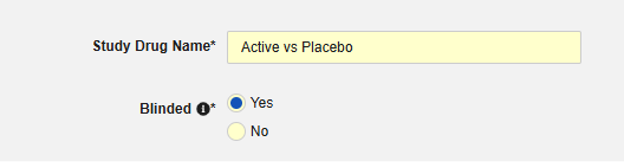
Enter a Name for your Study Drug.
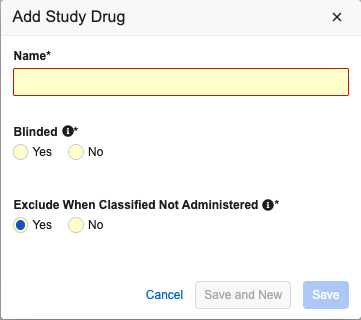
- Select Yes if the study drug is Blinded. Otherwise, select No.
- To exclude study drug information from the Safety Case when the drug isn’t administered (the Drug Role is set to “Drug Not Administered”), leave the Exclude When Classified Not Administered property set to Yes. Otherwise, select No.
- Click Save, or click Save and New to save and immediately create another Study Drug.
Edit a Study Drug
To edit a Study Drug:
- Navigate to Studio > Safety Integrations > Study Drugs.
- Locate the Study Drug you want to edit in the list.
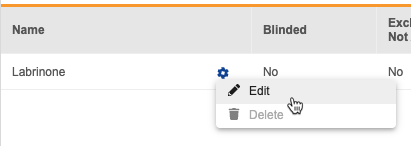
- Hover over the drug’s Name to show the Actions menu ().
-
From the Actions menu, select Edit.
-
Make your changes.
- When finished, click Save.
Delete a Study Drug
To delete a Study Drug:
- Navigate to Studio > Safety Integrations > Study Drugs.
- Locate the Study Drug you want to delete in the list.
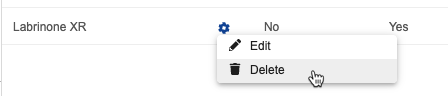
- Hover over the drug’s Name to show the Actions menu ().
-
From the Actions menu, select Delete.
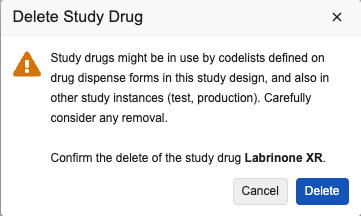
- In the Delete Study Drug confirmation dialog, click Delete.
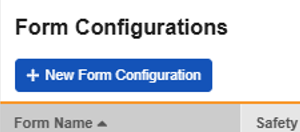
Form Configurations
After updating your main Safety Settings, the next step is to configure which forms from your study’s design will participate in the safety integration. These are set up in Studio > Form Configurations.
Note that the + New Form Configuration button will only become active after the configuration of the Safety Settings.
You must create a Form Configuration for your Serious Adverse Event (Safety Case Initiation Event) form and any other Form that you want to use to send data to the safety system. Create Form Configurations from Studio > Form Configurations.
An example of a study’s summary list of configured forms:

For each Form Configuration, there are three steps:
- Form Properties: Define the Form Properties, including the safety data type and the key item.
- Item Configurations: map safety fields to their corresponding Items.
- Inclusion Criteria: Define the inclusion criteria Vault will use to determine the form data included in the send to the safety system.
Safety Data Types
Each form configured for safety integration includes a Safety Data Type. These types represent the standard data model/type in any safety system.
The safety configuration types for Veeva EDC are summarized as follows. For those familiar with E2B format (R3), the relevant section is noted:
| EDC Type | Relevant E2B (R3) Location | Veeva Safety | Notes |
|---|---|---|---|
| Safety Case Initiation Event | E.* | Adverse Events | Forms of this type (formerly known as Serious Adverse Event) initiate the transfer of a Safety Case. Cases will receive a nullification if a previously sent case no longer satisfies the criteria for initial send. A Safety Case can include data only from the primary event or from several different event forms, even non-serious events, depending on the configured inclusion criteria. In a safety system and safety case, these are referred to as Events. |
| Study Drug | G.* | Products / Product Dosages | Use this type for each EDC form tracking the dispense of the study drug or product in your Study. In the safety system, these are referred to as Products, with one or more Dispenses/Dosages grouped within. Depending on the inclusion criteria for the Study Drug, EDC will include study drug dispenses in relation to the Events of the case. Site linking to important study drug dispenses is not supported, in order to allow a comprehensive transfer of relevant study drug dispense occurrences, independent of site user action. |
| Concomitant Medications | G.* | Products / Product Dosages | These forms track other medications or products given to a Subject that aren’t necessarily a part of the study’s protocol. In the safety system and case, these are also referred to as Products, with one or more Dispenses/Dosages grouped within. |
| Medical History | D.7.* | Medical History & Concurrent Conditions | These forms track historical conditions or procedures for a Subject, typically before entry into the Study. |
| Drug History | D.8.* | Drug History | These forms track historical medication use by a Subject, typically before entry into the Study. |
| Test Results | F.* | Test Results | These forms track specific lab and diagnostic results for the Subject that are deemed relevant to the events they are experiencing. |
| Patient Characteristics | D.1 through D.6 | Patient | This form tracks the general characteristics of the Subject, such as date of birth or sex. |
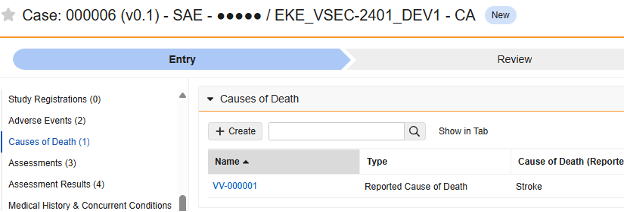
| In Case of Death | D.9.* | Patient or Causes of Death | In the event of the subject’s death, this form tracks information related, such as date of death or cause of death - reported. |
How to Create a Form Configuration
To create a new Form Configuration:
- Navigate to Studio > Form Configurations for your Study.
-
Click + New Form Configuration.
-
Proceed with the three steps (tabs) of configuration, clicking Save and Next to progress through the steps.
- When finished, click Save and Close.
Missing Button: If you have the required permissions, but you don’t see the + New Form Configuration button, ensure that your Safety Settings are saved first.
The options for Form Properties, Item Configurations, and Inclusion Criteria are described in detail in the later sections of this documentation by safety type.
At each step, the Save button will save that information without advancing to the next step. The Save and Next button will save the information and move forward to the next step.
Delete a Form Configuration
You can delete a single Form Configuration or delete all Form Configurations at once to start over. If you have Safety Cases associated with a Form Configuration, Vault disables the delete option.
To remove a single Form Configuration:
- Navigate to Studio > Form Configurations for your Study.
- Hover over the Form Configuration Name to show the Actions menu.
- Select Delete.
- In the confirmation dialog, click Delete.
Copy Form Configurations
In the current release, the only way to copy safety form configuration information is via Copy Forms. The other copying levels, Copy Event Groups and Copy Events, don’t support the copying of form level safety configuration.
If an Event Group or Event is copied (Forms within) from a source library/study, and those Forms contain safety form configuration information, simply use Copy Forms with the Use Existing / Update with Changes options as a subsequent action.
Copying safety form configurations while performing core copy of Forms is optional.
In the Include section, you must select Safety Configuration to copy previously configured configurations.
Scenarios to bring in existing safety configuration while copying:
-
Copy while copying new forms: Here, the AE form design does not yet exist in the target study:
-
Copy later: This is done when you have previously copied in Forms, perhaps through Copy Event Groups or Copy Events, or used Copy Forms without the safety configuration included initially. Update with Changes must be checked. This sequence will copy “what fits”, i.e. in cases of form adjustments. Here, the AE form already exists in the target study:

To copy safety configuration for a form:
- Navigate to Studio > Forms.
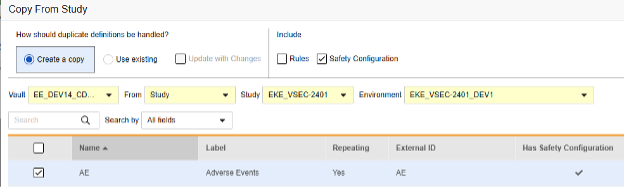
- Click Copy From Study.
- Select Create a copy or Use existing / Update with Changes as appropriate (see the examples above)
- Select the Safety Configuration checkbox to also copy any safety configuration associated with the form. Vault indicates which forms have safety configurations in the dialog’s Has Safety Configuration column. Note that this requires a Study Role with the Manage Safety Configuration permission. The Safety Configuration checkbox will be disabled if the source study and target study do not match regarding safety configuration. They must both have it set up, and be using the same Safety Integrations Type.
- Select a Vault.
- For Copy From Study, choose where you want to copy from (From Another Study or From Library.)
- Select a Study Environment to copy from.
- Search or scroll to locate the Form Definition(s) you want to copy.
- Select the Form(s) you want to copy.
- Click Copy Forms. Vault begins copying the Form Definition into your Study.
- Optional: In the Copy from Study dialog:
- Click View Summary to see a list of the copied forms and the status of the copy.
- If you copied 20 or fewer Forms, click View Log to see detailed status information for each object record copied.
- If you copied more than 20 Forms, Vault will send you an email notification with a link to download the log file when finished.
- When finished, click Close. Once you click Close, you can no longer access the summary or log file.
- Always visit the safety form configuration for copied forms after the copy. Adjustments to mappings / value translations might be necessary.
For more information on copy forms, see Copying Designs.
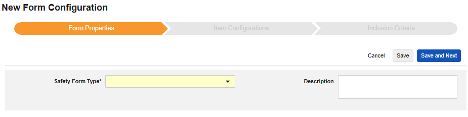
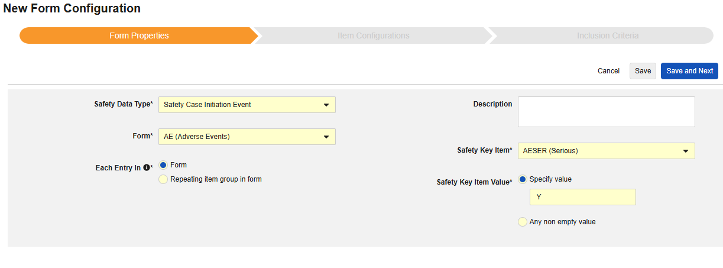
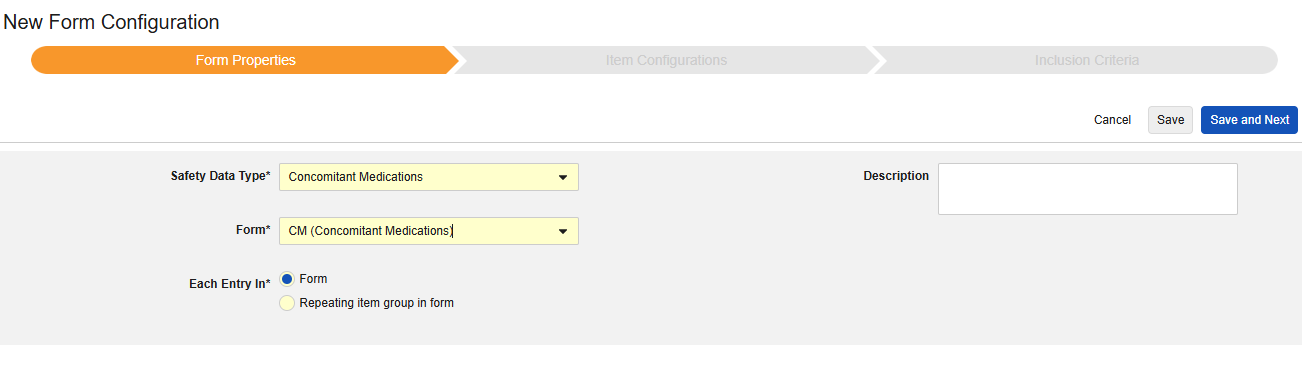
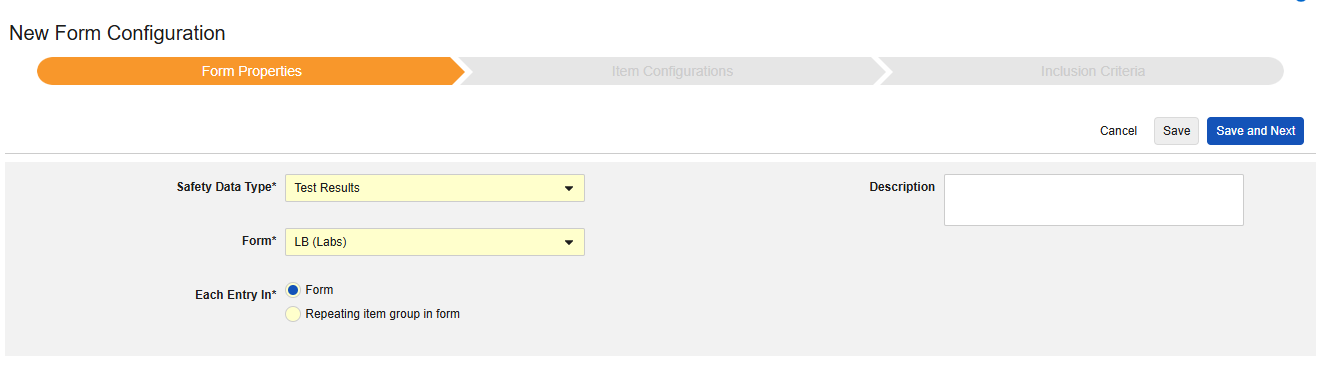
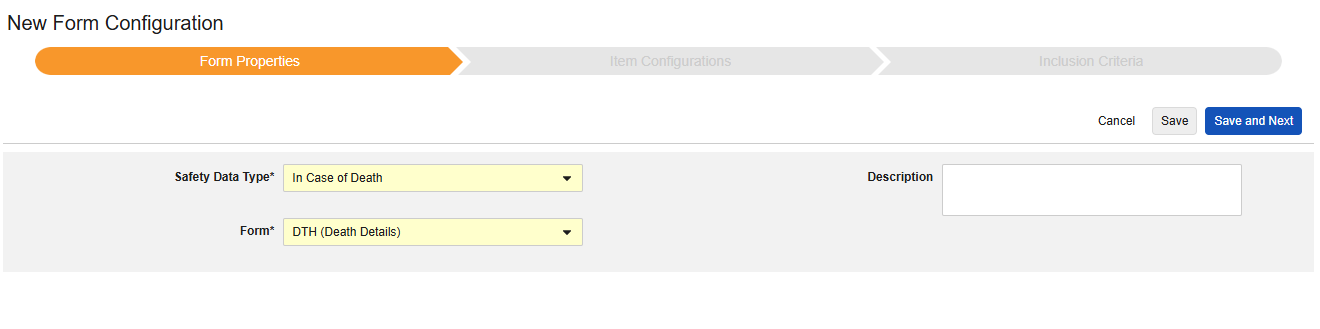
Form Properties
The first step in your Form Configuration is Form Properties. Once you select your Safety Type from the drop-down menu, general properties are available for configuration. These vary by safety data type.
| Safety Data Type | Properties | ||||
|---|---|---|---|---|---|
| Form | Safety Key Item | Each Entry In | Product Info | Description | |
| Safety Case Initiation Event | * | * | * | ||
| Study Drug | * | * | * | * | |
| Concomitant Medications | * | * | |||
| Medical History | * | * | |||
| Drug History | * | * | |||
| Test Results | * | * | |||
| Patient Characteristics | * | ||||
| In Case of Death | * | ||||
|
* Indicates that this property is present and required for the safety data type Indicates that this property is present and optional for the safety data type |
|||||
- Form requires the selection of the EDC form for mapping to the safety-relevant items.
- Safety Key Item is a special property that evaluates whether the form is considered for case initiation or inclusion before any other criteria. For the Safety Case Initiation Event type, it drives the initial send (or later nullification) of the overall case. For the Study Drug type, it’s the initial criteria for inclusion before other date based criteria are evaluated.
- Each Entry In is a setting to indicate how to group information into the various safety data types based on how the EDC form is designed. Examples and further details can be found in the next section. This is crucial to understand for proper safety configurations.
- Product Info is information about the known study drug of the trial, name, blinding (or not), indication, which study group it applies.
- Description is optional helpful text for the study designer.
Each Entry In - Design Considerations
The Each Entry In concept on the Form Properties of a safety form configuration is key to the configuration for the data transfer. It specifically tells Veeva EDC to either consider the data on a (repeating) form or the data on a repeating item group on a form. The option has two choices:
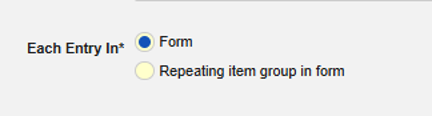
- Form: Data entered on a form in non-repeating item groups is considered for transfer. The form can be repeating to e.g. allow for multiple events in a study, however, the item groups on the form must not be repeating.
- Repeating item group in form: Data entered in a repeating item group on a form is considered for transfer. In this case, multiple events would be represented by each repeat of the item group rather than a form repeat.
Some item configurations on the form will have different available choices, from the from Each Entry In form property. Most item configurations of the type are meant as a ‘single entry’, but some outliers are required to be non-repeating only, or, no restriction (repeating or non-repeating items). Refer to the sub-sections by type, later in this page, for detailed information on the outliers.
Each Entry In: Form
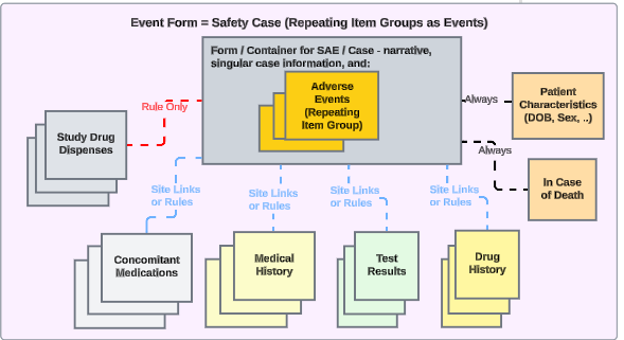
Veeva best practice for study design with a safety integration recommends using repeating forms throughout the different safety types:
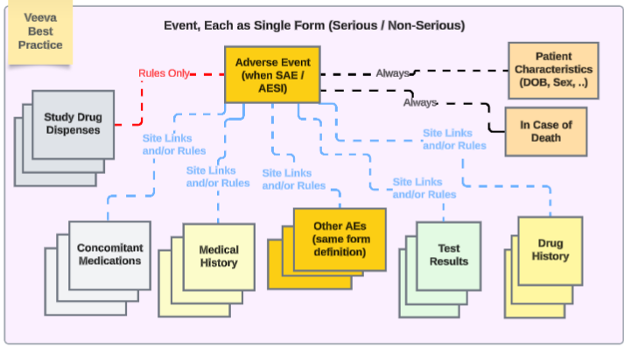
In the example:
- Adverse Event form - whether non-serious or serious - uses the same form design. This avoids the upgrade / downgrade issue for site users, having to move it from one location (non serious AE form) to another (serious, SAE form), and vice versa.
- If multiple event safety cases are to be managed by EDC users, use inclusion of other serious or non-serious events to a primary event via date rule and/or specific site linking.
- The other safety data types are each repeating forms, except for singular answer information (Patient Characteristics and In Case of Death). Note that ‘repeating forms’ in this sense is either:
- The form is defined as repeating (e.g. a log form)
- Or, its a non-repeating form that occurs across the study visit schedule (e.g. Study Drug in Visit 1, then Visit 2, and so on)
- Depending on the study need, site opinion (linking) and/or date based inclusion rules can include the appropriate related data across the different types.
An example study using this configuration, and the safety data types applied to forms of the study design:
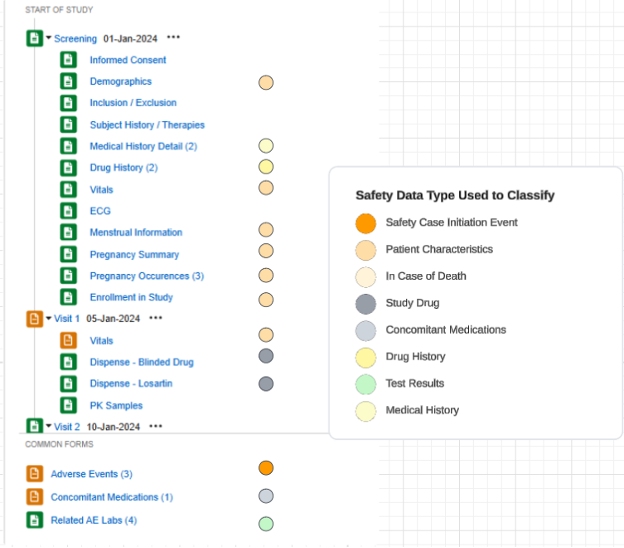
Custom Fields: With the Safety-EDC Connection, custom / configured fields in Veeva Safety can be used to extend the possible forms / data for transfer.
Each Entry In: Repeating Item Group vs. Form
Consider this study as example of using both options for Each Entry In:
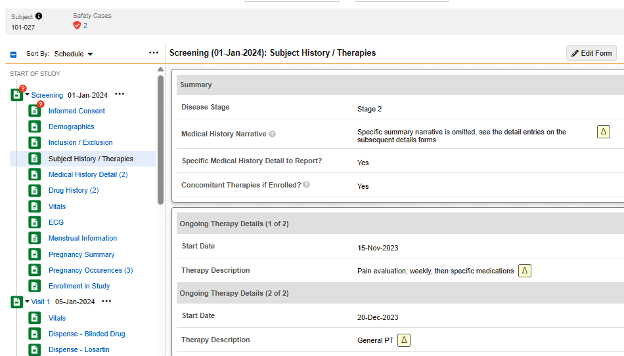
- The form Subject History / Therapies asks a few non-repeating questions in the first item group:
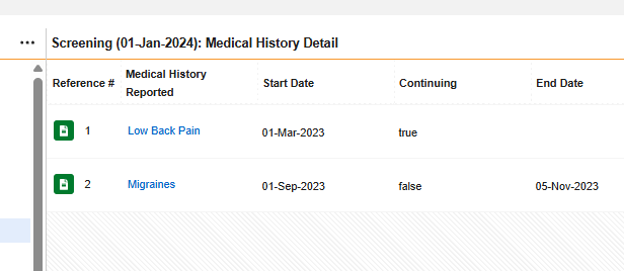
- When answering Yes to Specific Medical History Detail to Report?, a dynamic rule (on form submit) opens up the next form in the schedule - Medical History Details. Forms entered there comprise a medical history entry, per form.
- When answering Yes to Concomitant Therapies if Enrolled?, progressive display is used to show a repeating item group on the same form. Entries for medical history are entered as - each - a repeating item group in that same form, as necessary.
- The form Medical History Details repeats, but has all non-repeating item groups / questions contained in its design, thus Each Entry In = Form
- In the pictured example above, the safety configuration that would consider there to be four (4) medical histories for the safety case is:
- Form CTHERAPY (Subject History / Therapies):
- Type = Medical History
- Each Entry In = Repeating item group in form
- Form MH (Medical History Details):
- Type = Medical History
- Each Entry In = Form
- Form CTHERAPY (Subject History / Therapies):
Each Entry In: Repeating Item Groups for Events
For studies that will track multiple events in a safety case in one EDC form design, the approach looks like this:
- The safety case would initiate per just the existence of the form with the events.
- This study design will require Each Entry In to be set to Repeating item group in form.
Safety Key Item / Value
The Form Properties settings Safety Key Item and Safety Key Item Value evaluate the initiation of a case or the form inclusion into a case. They apply to these safety types:
- Safety Case Initiation Event - when the system evaluation is true, the first transfer to a safety system is being initiated. Conversely, when the system deems the evaluation false and a previous safety case was transmitted, a nullification will be sent to the safety system
- Study Drug - when the system evaluation is true, the dispense information on the form is deemed eligible for inclusion into the case. Further evaluation of the study drug inclusion criteria will finally determine the data transfer with the safety case.
Note that for the reference of the Safety Key Item Value to a Codelist will require the specification of the codelist code, not codelist label.
Here are several common examples for the Safety Case Initiation Event type:
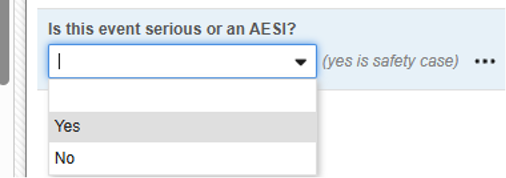
Example 1
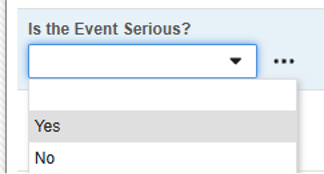
The Safety Key Item refers to the codelist-type Item “AESER” and expects the Codelist Code “Y” to initiate the safety case:
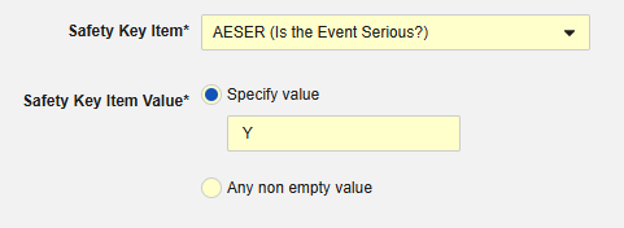
The Safety Key Item refers to the following item on the AE form. Note that the Safety Key Item Value requires the Codelist Code whereas the site user will choose from the Codelist Labels:
- The first submit of such a form with this prescribed answer will make the form eligible for a safety transfer of the form, plus any related data.
- The transfer will happen at the timing configured. See Safety Settings in Managing Safety Integrations for details.
- Additionally, for the transfer to proceed, the safety field Event Reported must also have a non-empty value on the form.
- This example uses the serious question on the adverse event form to drive sending a safety case (or not). This field - in any study/form design - is also usually mapped to the safety field Serious
At some time after the first send to safety, either of these conditions could no longer be fulfilled. (e.g. Serious = No, or lack of Event Reported value). If so, the system will automatically send a Nullification follow-up to the safety system indicating it is no longer qualified as a safety case. No specific site action is necessary, regarding the safety integration, once the site user modifies the form data.
Example 2
Example 1 used the serious question as the Safety Key Item. However, any field can be used for the purpose, even one not used to map to a safety transfer location.
In this example, we instead use a more general more general question from the AE form:
While this is not the main serious question on the form, it allows to initiate a safety case for both a serious adverse event as well as an ‘Adverse Events of Special Interest’ (AESI), which might be non-serious, but still require data to be sent to the safety system.
Example 3
In the following example, the safety case initiation, and nullification, is more transparent for the site user, while still using one Safety Key Item value:
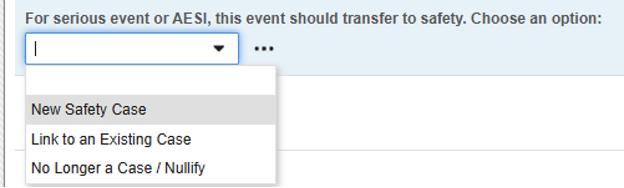
The following options are available in the codelist item:
- New Safety Case (its codelist code): This is used for the Safety Key Item. Consequently, only this selection will initiate a safety case.
- Link to an Existing Case: When answered, this code will evaluate the Safety Key Item Value to false. Thus, the form won’t initiate a standalone / additional case. Instead design rules would be used to ensure the site user links the current form to another event that initiated a safety case.
- No Longer..: This would be used for an event that did qualify previously for a safety case and was transferred. While the site user indicates a downgrade or nullification, the EDC system will evaluate the codelist code of this selection to false. This will result in a nullification follow-up for the previously initiated safety case.
Nullifications
Follow-ups are sent by Veeva EDC whenever data changes happen that reside in a safety case. Nullification is a special kind of follow-up that has these properties:
- It happens when either of these is the case:
- The Safety Key Item and Safety Key Item Value evaluation becomes false
- Or, the value of the item on the EDC form for Event Reported safety field location becomes empty
- It will be noted as a nullification type in the next message to Veeva Safety
- It is the last send for a safety case to the safety system
- Note: The first send for the case occurred previously. Veeva EDC will re-evaluate the two conditions above at first send (i.e. after the initial send timer) and do an immediate nullification of the safety case without a send to the safety system. This will happen most commonly when the site user makes a mistake, resets the form, etc before the timer for the first send ends.
- Safety reporting generally requires a nullification reason on such a transfer. The study can be configured to ask the site user. If it is not configured for site answer or the site fails to answer, the system will use a default reason: “The case no longer satisfies conditions from when it was initially sent. This can include events now downgraded to non serious, or user action removing all events.”
Common examples of nullification:
- Reset of EDC form
- Intentionally Left Blank on the EDC form after previous form submission
- “Downgrade”, e.g. what used to satisfy a safety case via Safety Key Item/Value, is no longer the situation, but the event still persists
Once a nullification occurs for a safety case in Veeva EDC, it will not revert back to an active safety case. Should that same form be changed to make the Safety Key Item / Value true and Event Reporter safety field non-empty in value once more, a new safety case is created and sent. The original safety case does not resume.
By Safety Data Type
These sections describe the Form Configuration step for each Safety Data Type.
Safety Case Initiation Event
The form configuration of this safety data type is critical to initiate the process of transferring a safety case. All other safety data types are then brought into the case per their configured rules. Events will appear in this section in Veeva Safety:
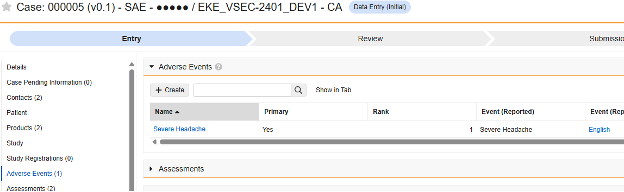
The Veeva Safety EDC Connection allows you to have multiple Forms configured as Safety Case Initiation Events. This allows for increased flexibility in the design of your adverse event forms. With this feature, you can have separate forms for a Serious Adverse Event and other circumstances that must be reported to the safety system, such as a pregnancy.
To configure your Safety Case Initiation Event form:
- Navigate to Studio > Form Configurations for your Study.
- Click + New Form Configuration.
- Select Safety Case Initiation Event for Safety Data Type.
- Select the Form.
- For Each Entry In, select which method to determine individual cases:
- Form: Select this option to treat each instance of the Form as its own case.
- Repeating item group in form: Select this option to treat each instance of the repeating Item Group as its own case.
- Optional: Enter a Description.
-
Select the Safety Key Item. This is typically the Item that indicates seriousness.
- Define the Safety Key Item Value. Select from one of the following:
- Specify value: With this option, you must enter a specific value to match on. Note that for codelist-type Items, you must provide the Code for the codelist item, not the Label.
- Any non empty value: This option considers any non-empty value a match.
- Click Save or Save and Next to proceed to the Item Configuration step.
The Safety Data Type, Form, and Each Entry In settings will be read only once initially saved. Additional configuration at the Item Configurations and Inclusion Criteria tabs rely on these settings. To change any of these settings, the form configuration must be deleted and created again.
Study Drug
This safety data type is used to track dosing / dispensing information of a study drug, i.e. those the clinical study is testing against subjects. The information will flow to the Products / Product Dosages section of Veeva Safety. The example below shows two drugs.
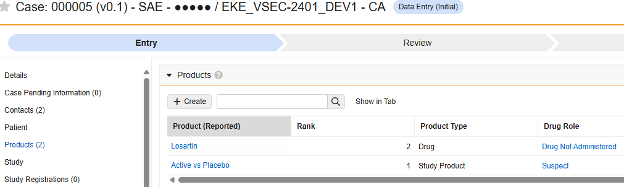
Multiple Forms: You can configure multiple Form Definitions with the Study Drug safety data type.
To include data from a Study Drug form (formerly labeled Treatment):
- Navigate to Studio > Form Configurations for your Study.
- Click + New Form Configuration.
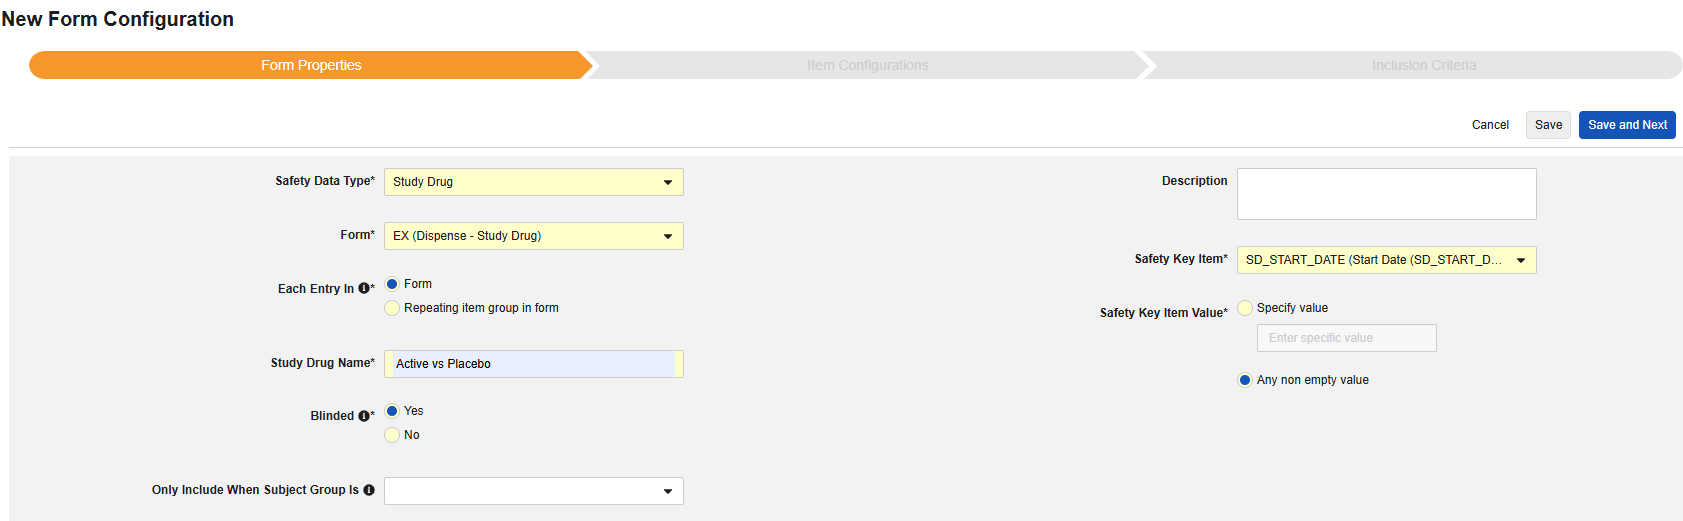
- Select Study Drug for Safety Data Type.
- Select the Form.
- For Each Entry In, select which method to determine individual study drugs:
- Form: Select this option to treat each instance of the Form as its own study drug.
- Repeating item group in form: Select this option to treat each instance of the repeating Item Group as its own study drug.
- Make a selection for Study Drug Defined From:
- Item values in data entry: When you select this option, a site user can select the Study Drug as they enter data. The Item used will be mapped to the Study Drug Name field.
- Specific drug from study design: When you select this option, you select a Study Drug (created from Studio > Safety Integrations > Study Drugs). This removes the Study Drug Name field from mapping availability in the Item Configurations step, as the Study Drug Name comes from the Study Drug record. If the desired Study Drug isn’t present, click + New Study Drug to add it.
- Enter the Study Drug Name. This value should be a match to how the drug is named in Veeva Safety. Mismatches will not stop the transfer / flow, but synchronization will eventually be necessary
-
Select Yes or No for Blinding. Indicate whether the study drug is considered Blinded (or not) in the trial. This property is only an indication and used for reporting purposes only. All data is transferred unblinded to the safety system, even if a restriction applied to the data in EDC.
-
Optional: You can choose to only include this form in the case when the Subject is in a certain Subject Group. Select a Group for Only Include When Subject Group Is to do so. Any subject not in the selected group will not have the study drug form in their transfer. When this field is blank, Vault includes the form for all subjects when the inclusion criteria are met.

- Optional: Enter a Description.
- Select the Safety Key Item. This is typically the Item indicating that the dispense was performed. For the study drug type, the evaluation is used to consider a form/dispense eligible for inclusion in the transfer. Any additional inclusion criteria are also evaluated to include the appropriate dispenses of the study drug in the safety case.
- Define the Safety Key Item Value. Select from one of the following:
- Specify value: With this option, you must enter a specific value to match on.
- Any non empty value: This option considers any non-empty value a match.
- Click Save or Save and Next to proceed to the Item Configuration step.
The Safety Data Type, Form, and Each Entry In settings will be read only once initially saved. Additional configuration at the Item Configurations and Inclusion Criteria tabs rely on these settings. To change any of these settings, the form configuration must be deleted and created again.
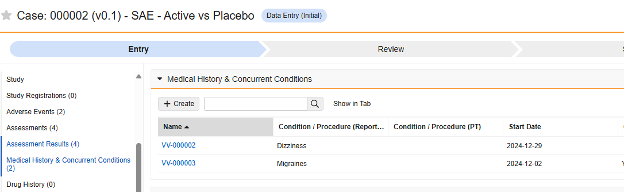
Concomitant Medications
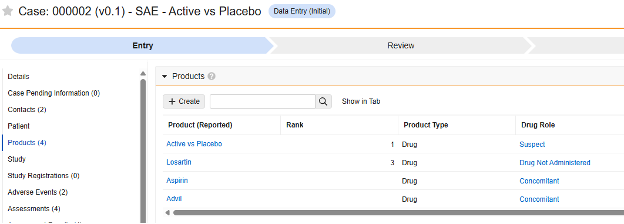
This type of safety configuration is applied to concomitant medication forms of the study. The information will flow to the Products / Product Dosages sections of Veeva Safety. The example below shows Aspirin and Advil.
Multiple Forms: You can configure multiple Form Definitions with the Concomitant Medications safety data type.
To include Concomitant Medications:
- Navigate to Studio > Form Configurations for your Study.
- Click + New Form Configuration.
- Select Concomitant Medications for Safety Data Type.
- For Each Entry In, select which method to determine individual ConMeds:
- Form: Select this option to treat each instance of the Form as its own ConMed.
- Repeating item group in form: Select this option to treat each instance of the repeating Item Group as its own ConMed.
- Optional: Enter a Description.
- Click Save or Save and Next to proceed to the Item Configuration step.
The Safety Data Type, Form, and Each Entry In settings will be read only once initially saved. Additional configuration at the Item Configurations and Inclusion Criteria tabs rely on these settings. To change any of these settings, the form configuration must be deleted and created again.
Medical History
This type of safety configuration is applied to medical history forms of the study. The information will flow to the Medical History & Concurrent Conditions section of Veeva Safety.
Multiple Forms: You can configure multiple Form Definitions with the Medical History safety data type.
To include Medical History:
- Navigate to Studio > Form Configurations for your Study.
- Click + New Form Configuration.
- Select Medical History for Safety Data Type.
- For Each Entry In, select which method to determine individual medical history events:
- Form: Select this option to treat each instance of the Form as its own history
- Repeating item group in form: Select this option to treat each instance of the repeating Item Group as its own history.
- Optional: Enter a Description.
- Click Save or Save and Next to proceed to the Item Configuration step.

The Safety Data Type, Form, and Each Entry In settings will be read only once initially saved. Additional configuration at the Item Configurations and Inclusion Criteria tabs rely on these settings. To change any of these settings, the form configuration must be deleted and created again.
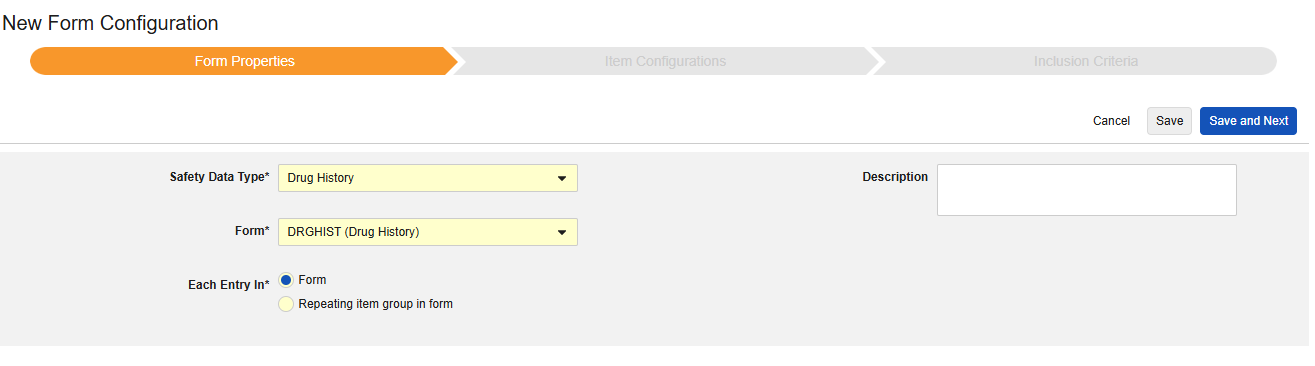
Drug History
This type of safety configuration is applied to drug history forms of the study. The information will flow to the Drug History section of Veeva Safety.
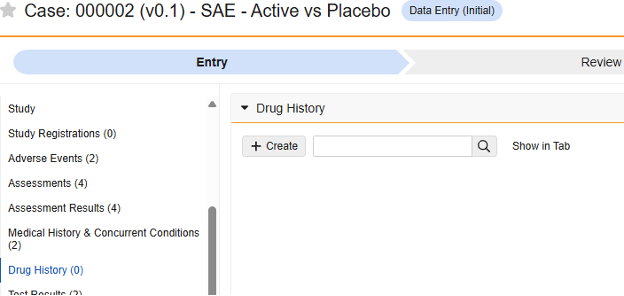
Multiple Forms: You can configure multiple Form Definitions with the Drug History safety data type.
To include data from a Drug History form:
- Navigate to Studio > Form Configurations for your Study.
- Click + New Form Configuration.
- Select Drug History for Safety Data Type.
- For Each Entry In, select which method to determine individual drug histories:
- Form: Select this option to treat each instance of the Form as its own drug history.
- Repeating item group in form: Select this option to treat each instance of the repeating Item Group as its own drug history.
- Optional: Enter a Description.
- Click Save or Save and Next to proceed to the Item Configuration step.
The Safety Data Type, Form, and Each Entry In settings will be read only once initially saved. Additional configuration at the Item Configurations and Inclusion Criteria tabs rely on these settings. To change any of these settings, the form configuration must be deleted and created again.
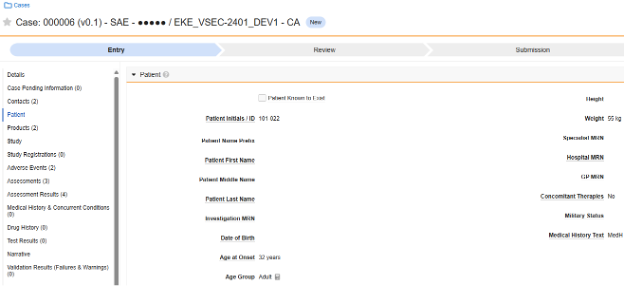
Test Results
This type of safety configuration is applied to lab / test result forms of the study. The information will flow to the Test Results section of Veeva Safety.

Multiple Forms: You can configure multiple Form Definitions with the Test Results safety data type.
When using the local lab module module (lab panels) in Veeva EDC, forms are not specifically set up with additional safety configuration. Instead, all tests where the lab date is near the safety case’s start are sent to Veeva Safety for review. There, Veeva Safety users can include specific tests into cases per medical review. The range of days around the case is configured in your study safety settings.
To include data from Test Results:
- Click Edit if you aren’t already in Edit mode.
- Click Test Results to expand that section.
- For Include Test Results, select Yes.
- Select the Test Results Form.
- Select the Item for each field that you include in your form. Note that the Item must have the correct data type. See the table below for a list of Items and their expected Data Type.
- Click Save or Save and Next to proceed to the Item Configuration step.
The Safety Data Type, Form, and Each Entry In settings will be read only once initially saved. Additional configuration at the Item Configurations and Inclusion Criteria tabs rely on these settings. To change any of these settings, the form configuration must be deleted and created again.
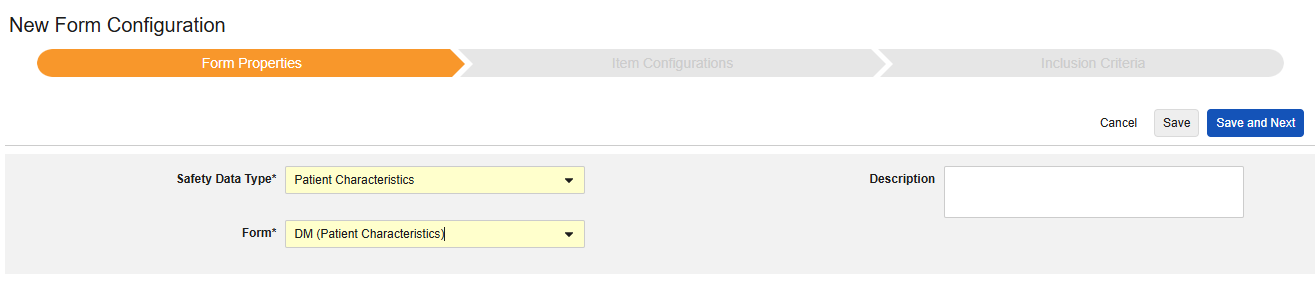
Patient Characteristics
This type of safety configuration is applied to general information about the subject. The information will flow to the Patient section of Veeva Safety.
Multiple Forms: You can configure multiple Form Definitions with the Patient Characteristics safety data type. For example, you may collect a Sex item on one form and a Date of Birth item on another.
To include Patient Characteristics:
- Navigate to Studio > Form Configurations for your Study.
- Click + New Form Configuration.
- Select Patient Characteristics for Safety Data Type.
- Optional: Enter a Description.
- Click Save or Save and Next to proceed to the Item Configuration step.
The Safety Data Type, Form, and Each Entry In settings will be read only once initially saved. Additional configuration at the Item Configurations and Inclusion Criteria tabs rely on these settings. To change any of these settings, the form configuration must be deleted and created again.
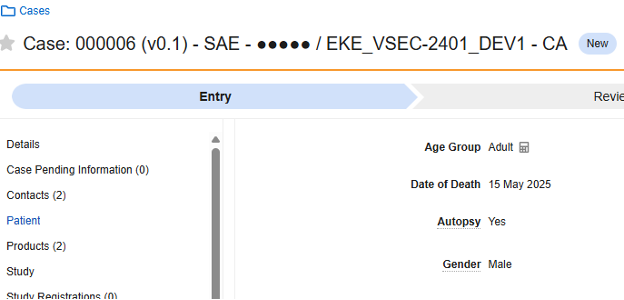
In Case of Death
This type of safety configuration is applied to forms involving death details about the subject. Some fields for this type must be non-repeating (e.g. Date of Death), others can be repeating or non-repeating (causes of death). Information will flow to two places in Veeva Safety, Patient or Causes of Death.
Multiple Forms: You can configure multiple Form Definitions with the In Case of Death safety data type.
To include data from an In Case of Death form:
- Navigate to Studio > Form Configurations for your Study.
- Click + New Form Configuration.
- Select In Case of Death for Safety Data Type.
- Optional: Enter a Description.
- Click Save or Save and Next to proceed to the Item Configuration step.
The Safety Data Type, Form, and Each Entry In settings will be read only once initially saved. Additional configuration at the Item Configurations and Inclusion Criteria tabs rely on these settings. To change any of these settings, the form configuration must be deleted and created again.
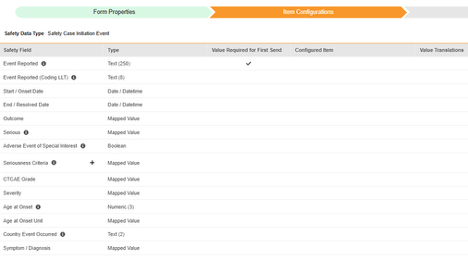
Item Configurations
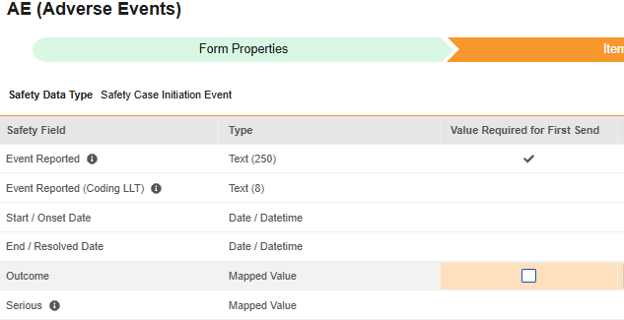
The second step in a safety form configuration is the Item Configurations tab. As an example, this AE (Adverse Events) form design has been classified as the Safety Case Initiation Event.
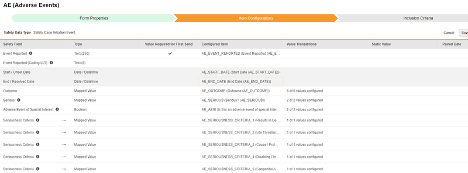
The purpose of this grid is to assign answers from the form design (Item Definitions) to the appropriate location of Veeva Safety.
This table summarizes the columns in the grid:
| Column | Notes |
|---|---|
| Safety Field | Label of the field. This generally matches the label of the destination field in Veeva Safety. |
| Type | The data type at that location. This column may also list a character limit in parentheses. |
| Value Required for First Send |
This column only applies to forms with the Safety Case Initiation Event safety data type. This column’s checkbox indicates whether a configured Item must have an entered value on the data entry form to start the initial transfer of the Safety Case If the checkbox is selected, the item is required. For the Event Reported row, the checkbox is automatically selected and isn’t editable. A Safety Case can’t begin the transfer or be tracked without this verbatim field having a non-empty value. |
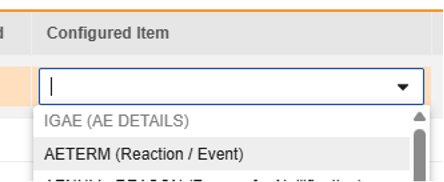
| Configured Item |
Select the Item (Item Definition) from the form design that you want to map to this Safety Field. The available options will generally depend on the selection for Each Entry In in the Form Properties step.
Some safety fields do allow for locations in both repeating and non-repeating item groups, no matter the value for Each Entry In. Those locations are identified in the detail section for each safety data type below. When using a repeating item group, ensure that all Item Definitions that comprise an entry (e.g. Medical History, Lab, etc.) are in the same repeating item group. Some safety fields may be outside that same repeating item group, but it is the rare exception. Those outliers are identified in the detail section for each safety data type below. |
| Value Translations | When the Item Definition data type is Codelist or Boolean (checkbox), configuration of the EDC value to the value expected by Veeva Safety is required. If you don’t set this for those data types, Studio validation will indicate an error, preventing deployment. |
| Static Value |
Many safety field locations allow for the inclusion of a static value in the transfer. This is indicated in the form data type / field by field sections. Allowing static values eliminates the need to include additional items on a form that otherwise are derived to static values, just to have the value in the safety transfer. |
| Paired Date |
Some safety field definitions will transfer every non-empty value across the Subject Casebook. Veeva Safety figures the closest on or before across those values for the value in the Safety Case. Examples include Weight, Height, and Last Menstrual Date. The date paired with the values is either a date-type item on the form, or an indication of the Event Date for the event the form resides in. For example, if the Weight safety field is mapped on the Vitals form, then the Event Date and the Vitals Date item from the Vitals form would be available for Paired Date. 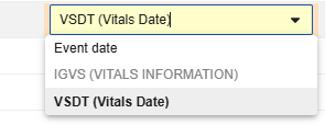
|
| Study Drug |
This column only applies to forms with the Safety Case Initiation Event safety data type. For any Item where answer value relates to the study drug instead of the event, an Item Definition can be paired with the specific Study Drug to which the answer applies. This applies to the following safety fields:
|
| Item to Form Link |
This column only applies to forms with the Safety Case Initiation Event safety data type. When the row is mapped to an Item Definition, the Item must reside in a repeating Item Group where an Item to Form Link item also resides. The selection is the specific Item to Form Link that the main item configuration pairs with. The intent of this field is to answer questions while one links to a remote form (each) from the Safety Case Initiation Event form. Currently, the only form with this behavior is Concomitant Medication Drug Role. |
Value Translations
Whenever the Item Definition being mapped to an E2B location is of the codelist or boolean (checkbox) data types, and the E2B location requires very specific E2B values, Value Translations must be set up to ensure the transfer works correctly.
- Select the Item Definition in the Configured Item column.
-
Click into the cell of the Value Translations column. If a value translation can be configured, the cell will appear orange on hover over. This opens the Value Translations dialog.
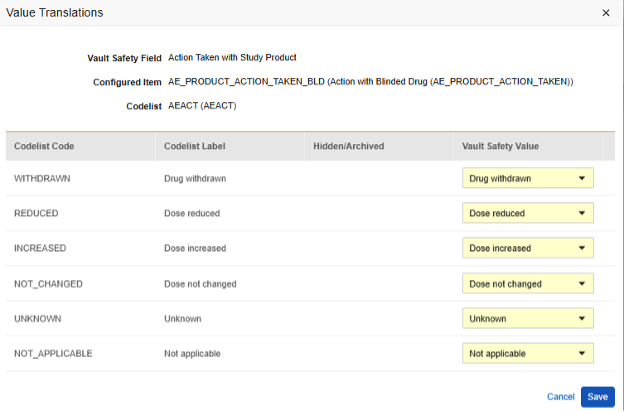
- For each codelist-type Item, select the appropriate value in Veeva Safety.
- Valid choices will be shown from that safety field/location.
- If more Codelist entries are in the study design than available options, several Codelist entries can be mapped to the same value.
- If any mapping is missing, the studio validations will show an error.
- When a choice/label at the Veeva Safety location has an exact match (including capitalization) with the EDC Codelist Label, that selection will be pre-selected.
-
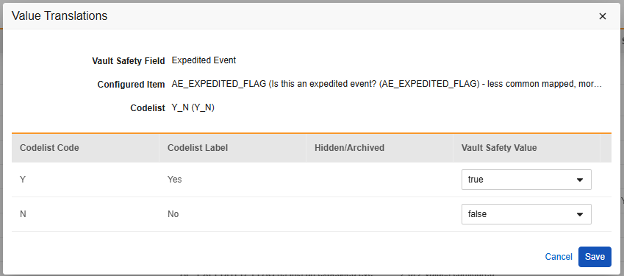
For a boolean safety location, the choices will be true / false, and at least one must be selected:
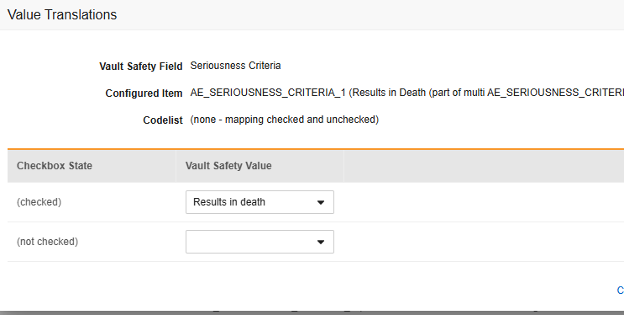
- For boolean-type Items, one of the (checked) or (not checked) is mapped. For example,
- The Seriousness Criteria location in safety is multi-value.
- On the EDC form, a series of checkboxes can be used with ‘check all that apply’.
- Below, if the ‘Results in Death’ checkbox is checked, this will be mapped to that value in Veeva Safety:
- When finished, click Save.
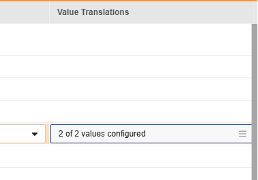
- Once value translations have been specified, the number of configured translations will be indicated in the cell.
- Repeat these steps for all locations that require specific values, per their own standards. The Studio validations job will indicate an error and prevent deployment if any of these are missing.
The translation values are only temporarily saved after this action. Subsequent use of Save or Save and Next at the tab level will save the translations.
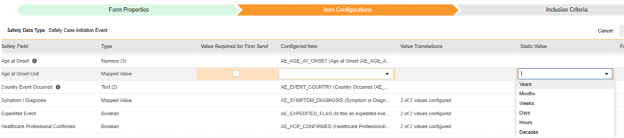
Static Value
Some safety fields allow for a static value, instead of using a specific Item Definition of the EDC Form Definition. Refer to the safety data type sections below for field by field details, specifically which fields allow for configuration of a static value.
Examples:
-
Method of Study Drug Assessment: (free text value)

-
Age Unit: (safety controlled vocabulary as choices)
Paired Date
Some safety fields allow for the transfer of a series of values to Veeva Safety. Each value is paired with a date of that value. As an example, weight might exist on a Vitals form across the EDC study design. The connection will transfer all of the values for reference. For the case creation, Veeva Safety will automatically determine the value closest on/before the beginning of the case. Other values will be made available as additional subject information and are reviewable in Veeva Safety. The date paired with such values can either be the Event Date or value from another date-type Item Definition on that same form.
Refer to the item configuration by safety data type for field by field detail, specifically which fields allow for configuration in this manner.
Examples:
-
Vitals form, Field WEIGHT, uses the Event Date of where the form resides for the paired value:

-
A different Vitals form, Field HEIGHT, uses a date value on that same form (VSDT):

Study Drug Association
Safety fields on the form classified as Safety Case Initiation Event that ask questions about Study Drug must also indicate the specific Study Drug the answer applies.
Refer to the item configuration by safety data type for field by field detail, specifically which fields must be answered ‘for each study drug’.
Example:
-
For a study that has two study drugs defined:

-
Answers to important event vs. study drug questions - Action Taken with Study Product, Result of Assessment to Study Drug, Did Reaction / Event Recur when Study Drug Resumed - are configured, answer for each of the study drugs:
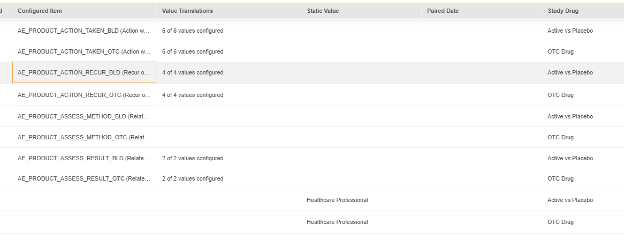
-
The static value above is also set for each (instead of an item on the form) for Source of Assessment to Study Drug.
Item to Form Link Association
Currently, just one Item Configuration involves the relationship between an Item to Form Link type of Item Definition and answer given ‘with the link’. Specifically, the field on the Safety Case Initiation Event data type, Concomitant Medication Drug Role:

The answer given on the EDC form involves site opinion on a concomitant medication. For a specific safety case / event, the site would link to it, but give a different opinion/answer (from concomitant), Interacting or Suspect. Above, the Item Definition AE_CM_LINK_DRUG_ROLE is that question, with value translations:
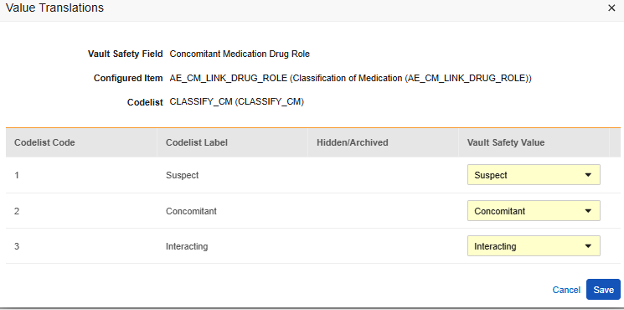
Because multiple Item to Form Links could be present on the Safety Case Initiation Event form design, the specific Item to Form link must be selected. In this example, an Item Definition named AE_TO_CM_LINK:

By Safety Data Type
Safety Case Initiation Event
The form configuration of this safety data type is critical to initiate the process of transferring a safety case. All other safety data types are then brought into the case per their configured rules. Events will appear in this section in Veeva Safety:
To perform the Item Configurations step for this safety data type:
- Navigate to your Study in Studio > Form Configurations.
-
Navigate into the safety form configuration, then to the Item Configurations tab.
-
For each row that you want to map, use the cell in the Configured Item column to select the appropriate Item Definition. For example, select the AETERM item from the form for the Event Reported in Veeva Safety field (pictured below). The choices for item selection will usually depend on the Form Properties > Each Entry In setting previously saved. Some safety locations have special rules that indicate they can be done in only repeating or non-repeating item groups, or sometimes either. Refer to the table at the end of these steps for those outliers, plus important notes regarding all safety locations of this type.
-
For each row that you want to map, select the Value Required for First Send checkbox to require this Item to have a value for first send. Otherwise, leave this checkbox clear.
- Depending on the data type of the Configured Item and the Safety Field, you may need to provide Value Translations. See the Value Translations section above for instructions.
- Depending on the Safety Field additional information may be required. Use the appropriate cell in the row to provide this information:
- Click Save (to remain on the page) or Save and Next (to advance to the next tab, Inclusion Criteria).
| EDC Safety Data Type | EDC Field Label | Field Data Type | Notes | Relevant E2B (R3) Locations | Inbox Item / Case Object & Field |
EDC Field Identifier |
|---|---|---|---|---|---|---|
| Safety Case Initiation Event | Event Reported | Text (250) |
|
E.i.1.1a, E.i.1.2 | case_adverse_event__v, event_reported__v | AE_EVENT_REPORTED |
| Safety Case Initiation Event | Event Reported (Coding LLT) | Text (8) |
|
E.i.2.1a, E.i.2.1b | case_adverse_event__v, event_meddra__v | AE_CODING_LLT |
| Safety Case Initiation Event | Start / Onset Date | Date/Datetime |
|
E.i.4 | case_adverse_event__v, onset_idate__v | AE_START_DATE |
| Safety Case Initiation Event | End / Resolved Date | Date |
|
E.i.5 | case_adverse_event__v, resolved_idate__v | AE_END_DATE |
| Safety Case Initiation Event | Outcome | Mapped Value |
|
E.i.7 | case_adverse_event__v, outcome__v | AE_OUTCOME |
| Safety Case Initiation Event | Serious | Mapped Value |
|
E.i.3.1 | case_adverse_event__v, highlighted_term__v | AE_SERIOUS |
| Safety Case Initiation Event | Adverse Event of Special Interest | Boolean |
|
case_adverse_event__v, edc_aesi_v | AE_AESI | |
| Safety Case Initiation Event | Seriousness Criteria | Mapped Value |
|
E.i.3.2a, E.i.3.2b, E.i.3.2c, E.i.3.2d, E.i.3.2e, E.i.3.2f | case_adverse_event__v, seriousness__v | AE_SERIOUSNESS_CRITERIA |
| Safety Case Initiation Event | CTCAE Grade | Mapped Value |
|
case_adverse_event__v, ctcae_grade__v | AE_CTCAE_GRADE | |
| Safety Case Initiation Event | Severity | Mapped Value |
|
case_adverse_event__v, severity__v | AE_SEVERITY | |
| Safety Case Initiation Event | Age at Onset | Numeric (3) |
|
D.2.2a | case_version__v, age_value__v (with age_calculation_status__v set to “Yes”) | AE_AGE_AT_ONSET |
| Safety Case Initiation Event | Age at Onset Unit | Mapped Value |
|
D.2.2b | case_version__v, age_unit__v | AE_AGE_AT_ONSET_UNIT |
| Safety Case Initiation Event | Country Event Occurred | Text (2) |
|
E.i.9 | case_adverse_event__v, event_country__v | AE_EVENT_COUNTRY |
| Safety Case Initiation Event | Symptom / Diagnosis | Mapped Value |
|
case_adverse_event__v, symptom_diagnosis__v | AE_SYMPTOM_DIAGNOSIS | |
| Safety Case Initiation Event | Expedited Event | Boolean |
|
case_adverse_event__v, expedited_flag__v | AE_EXPEDITED_FLAG | |
| Safety Case Initiation Event | Healthcare Professional Confirmed | Boolean |
|
E.i.8 | case_adverse_event__v, hcp_confirmed__v | AE_HCP_CONFIRMED |
| Safety Case Initiation Event | Hospital Admission Date | Date |
|
case_adverse_event__v, hospital_admission_date__v | AE_HOSPITAL_ADM_DATE | |
| Safety Case Initiation Event | Hospital Discharge Date | Date |
|
case_adverse_event__v, hospital_discharge_date__v | AE_HOSPITAL_DISCHARGE_DATE | |
| Safety Case Initiation Event | Days Hospitalized | Numeric (4) |
|
case_adverse_event__v, days_hospitalized__v | AE_DAYS_HOSPITALIZED | |
| Safety Case Initiation Event | Hospital Name | Text (200) |
|
case_adverse_event__v, hospital_name__v | AE_HOSPITAL_NAME | |
| Safety Case Initiation Event | Hospital City | Text (35) |
|
case_adverse_event__v, hospital_city__v | AE_HOSPITAL_CITY | |
| Safety Case Initiation Event | Hospital State | Text (40) |
|
case_adverse_event__v, hospital_state__v | AE_HOSPITAL_STATE | |
| Safety Case Initiation Event | Narrative | Text (30000) |
|
H.1 (as token from site narrative) | case_version__v, site_narrative__v | AE_NARRATIVE |
| Safety Case Initiation Event | Reporter Comments | Text (20000) |
|
H.2 | case_version__v, reporters_comments__v | AE_REPORTER_COMMENTS |
| Safety Case Initiation Event | Sender Comments | Text (20000) |
|
H.4 | case_version__v, sender_comments__v | AE_SENDER_COMMENTS |
| Safety Case Initiation Event | Nullification Reason | Text (200) |
|
C.1.11.2 | inbox_item__v, edc_reason__v (This only is available in the Inbox Item to indicate to the user that this is a nullification case and why. There’s no impact on Case data model.) | AE_NULLIFY_REASON |
| Safety Case Initiation Event | Reporter Qualification | Mapped Value |
|
C.2.r.4 | case_contact__v, qualificiation__v | AE_REPORTER_QUALIFICATION |
| Safety Case Initiation Event | Reported Language | Text (20) |
|
E.i.1.1b | case_adverse_event__v, event_reported_language__v | AE_REPORTER_LANGUAGE |
| Safety Case Initiation Event | Reporter Country | Text (2) |
|
C.2.r.3 | case_contact__v, country_value__v (if valid 2 char ISO country) | AE_REPORTER_COUNTRY |
| Safety Case Initiation Event | Reporter First Name | Text (50) |
|
C.2.r.1.2 | case_contact__v, firstname_value__v | AE_REPORTER_FIRST_NAME |
| Safety Case Initiation Event | Reporter Last Name | Text (50) |
|
C.2.r.1.4 | case_contact__v, lastname_value__v | AE_REPORTER_LAST_NAME |
| Safety Case Initiation Event | Reporter Organization | Text (100) |
|
C.2.r.2.1 | case_contact__v, organization_value__v | AE_REPORTER_ORGANIZATION |
| Safety Case Initiation Event | Reporter Email | Text (100) |
|
case_contact__v, email_address__v | AE_REPORTER_EMAIL | |
| Safety Case Initiation Event | Reporter Telephone | Text (33) |
|
C.2.r.2.7 | case_contact__v, telephone_value__v | AE_REPORTER_TELEPHONE |
| Safety Case Initiation Event | Reporter Street 1 | Text (100) |
|
C.2.r.2.3 | case_contact__v, street_value__v | AE_REPORTER_STREET |
| Safety Case Initiation Event | Reporter Street 2 | Text (100) |
|
C.2.r.2.3 | case_contact__v, street_line_2_value__v | AE_REPORTER_STREET_2 |
| Safety Case Initiation Event | Reporter City | Text (35) |
|
C.2.r.2.4 | case_contact__v, city_value__v | AE_REPORTER_CITY |
| Safety Case Initiation Event | Reporter State / Province | Text (40) |
|
C.2.r.2.5 | case_contact__v, state_province_value__v | AE_REPORTER_STATE_PROVINCE |
| Safety Case Initiation Event | Reporter Postal Code / Zip | Text (15) |
|
C.2.r.2.6 | case_contact__v, postalcode_value__v | AE_REPORTER_POSTAL_ZIP |
| Safety Case Initiation Event | Overall Action Taken | Mapped Value |
|
G.k.8 | , | AE_ACTION_TAKEN |
| Safety Case Initiation Event | Concomitant Medication Drug Role | Mapped Value |
|
G.k.1 | case_product__v, drug_role__v | AE_CM_LINK_DRUG_ROLE |
| Safety Case Initiation Event | Concomitant Medication Action Taken | Mapped Value |
|
G.k.8 | case_assessment_result__v, action_taken__v | AE_CM_LINK_ACTION_TAKEN |
| Safety Case Initiation Event | Concomitant Medication Recurrence Answer | Mapped Value |
|
G.k.9.i.4 | case_assessment__v, reaction_recurrence__v | AE_CM_LINK_ACTION_RECUR |
| Safety Case Initiation Event | Concomitant Medication Dechallenge Answer | Mapped Value |
|
case_assessment__v, dechallenge_override__v | AE_CM_LINK_ACTION_DECHALLENGE | |
| Safety Case Initiation Event | Concomitant Medication Assessment Method | Text (60) |
|
G.k.9.i.2.r.2 | case_assessment_result__v, method_of_assessment__v or method_text__v | AE_CM_LINK_ASSESS_METHOD |
| Safety Case Initiation Event | Concomitant Medication Assessment Result | Mapped Value |
|
G.k.9.i.2.r.3 | case_assessment_result__v, assessment_result__v or result_text__v | AE_CM_LINK_ASSESS_RESULT |
| Safety Case Initiation Event | Concomitant Medication Assessment Source | Text (60) |
|
G.k.9.i.2.r.1 | case_assessment_result__v, source_type__v or source_text__v | AE_CM_LINK_ASSESS_SOURCE |
| Safety Case Initiation Event | Action Taken with Study Product | Mapped Value |
|
G.k.8 | case_assessment_result__v, action_taken__v | AE_PRODUCT_ACTION_TAKEN |
| Safety Case Initiation Event | Did Reaction / Event Recur when Study Drug Resumed | Mapped Value |
|
G.k.9.i.4 | case_assessment__v, reaction_recurrence__v | AE_PRODUCT_ACTION_RECUR |
| Safety Case Initiation Event | Dechallenge Answer | Mapped Value |
|
case_assessment__v, dechallenge_override__v | AE_PRODUCT_ACTION_DECHALLENGE | |
| Safety Case Initiation Event | Method of Assessment to Study Drug | Text (60) |
|
G.k.9.i.2.r.2 | case_assessment_result__v, method_of_assessment__v or method_text__v | AE_PRODUCT_ASSESS_METHOD |
| Safety Case Initiation Event | Result of Assessment to Study Drug | Mapped Value |
|
G.k.9.i.2.r.3 | case_assessment_result__v, assessment_result__v or result_text__v | AE_PRODUCT_ASSESS_RESULT |
| Safety Case Initiation Event | Source of Assessment to Study Drug | Text (60) |
|
G.k.9.i.2.r.1 | case_assessment_result__v, source_type__v or source_text__v | AE_PRODUCT_ASSESS_SOURCE |
| Safety Case Initiation Event | Pregnancy Case | Boolean |
|
case_version__v, pregnancy__v | AE_PREG_CASE | |
| Safety Case Initiation Event | Pregnancy Occurrences | Numeric (2) |
|
case_version__v, gravida_gravidity__v | AE_PREG_INFO_GRAV | |
| Safety Case Initiation Event | Number Given Birth | Numeric (2) |
|
case_version__v, para_parity__v | AE_PREG_INFO_PARA | |
| Safety Case Initiation Event | Pregnant at Study Drug Exposure | Boolean |
|
case_version__v, pregnancy_at_vaccination__v | AE_PREG_INFO_AT_VX | |
| Safety Case Initiation Event | Last Menstrual Date (Pregnancy Case) | Date |
|
D.6 | case_version__v, last_menstrual_idate__v | AE_PREG_LAST_MENSTRUAL_DATE |
| Safety Case Initiation Event | Pregnancy Conception Date | Date |
|
case_version__v, pregnancy_conception_idate__v | AE_PREG_INFO_CONC_DT | |
| Safety Case Initiation Event | Pregnancy Due Date | Date |
|
case_version__v, pregnancy_due_idate__v | AE_PREG_INFO_DUE_DT | |
| Safety Case Initiation Event | Date of Pregnancy Outcome | Date |
|
case_version__v, idate_of_pregnancy_outcome__v | AE_PREG_INFO_OUTCOME_DT | |
| Safety Case Initiation Event | Pregnancy Outcome | Mapped Value |
|
case_version__v, pregnancy_outcome__v | AE_PREG_INFO_OUTCOME | |
| Safety Case Initiation Event | Delivery Method | Mapped Value |
|
case_version__v, delivery_method__v | AE_PREG_INFO_DELV_METH | |
| Safety Case Initiation Event | Cesarean Type | Mapped Value |
|
, | AE_PREG_INFO_CESAREAN_TYPE | |
| Safety Case Initiation Event | Fetal Infant Status | Mapped Value |
|
, | AE_PREG_INFO_FETAL_INFANT_STATUS | |
| Safety Case Initiation Event | Child Name or Initials | Text (60) |
|
, | AE_CHILD_NAME_OR_INITIALS | |
| Safety Case Initiation Event | Child First Name | Text (60) |
|
, | AE_CHILD_FIRST_NAME | |
| Safety Case Initiation Event | Child Last Name | Text (60) |
|
, | AE_CHILD_LAST_NAME | |
| Safety Case Initiation Event | Child Date of Birth | Date / Numeric / Text |
|
, | AE_CHILD_DOB | |
| Safety Case Initiation Event | Child Age | Numeric (3) |
|
, | AE_CHILD_AGE_VALUE | |
| Safety Case Initiation Event | Child Age Unit | Mapped Value |
|
, | AE_CHILD_AGE_UNIT | |
| Safety Case Initiation Event | Child Sex | Mapped Value |
|
, | AE_CHILD_GENDER | |
| Safety Case Initiation Event | Child Weight (kg) | Numeric with Precision (4,4) |
|
, | AE_CHILD_WEIGHT_KG | |
| Safety Case Initiation Event | Child Height (cm) | Numeric with Precision (4,3) |
|
, | AE_CHILD_HEIGHT_CM | |
| Safety Case Initiation Event | Child GP Medical Record Number | Text (20) |
|
, | AE_CHILD_GPRN | |
| Safety Case Initiation Event | Child Hospital Record Number | Text (20) |
|
, | AE_CHILD_HRN | |
| Safety Case Initiation Event | Child Gestation At Birth Number | Numeric with Precision (3,3) |
|
, | AE_CHILD_GESTATION | |
| Safety Case Initiation Event | Child Gestation At Birth Unit | Mapped Value |
|
, | AE_CHILD_GESTATION_UNIT | |
| Safety Case Initiation Event | Child Fetal Outcome | Mapped Value |
|
, | AE_CHILD_BIRTH_OUTCOME | |
| Safety Case Initiation Event | Child Fetal Infant Status | Mapped Value |
|
, | AE_CHILD_FETAL_INFANT_STATUS | |
| Safety Case Initiation Event | Child Birth Outcome | Text (2000) |
|
F.r.3.4 | case_test_result__v, result_text__v | AE_CHILD_TR_BIRTH_OUTCOME |
| Safety Case Initiation Event | Child Head Circumference | Numeric with Precision (14,3) |
|
F.r.3.2 | case_test_result__v, result_value__v | AE_CHILD_TR_HEAD_CIRCUMFERENCE |
| Safety Case Initiation Event | Child APGAR Score (1 minute) | Numeric with Precision (14,3) |
|
F.r.3.2 | case_test_result__v, result_value__v | AE_CHILD_TR_APGAR_SCR_1_MIN |
| Safety Case Initiation Event | Child APGAR Score (5 minutes) | Numeric with Precision (14,3) |
|
F.r.3.2 | case_test_result__v, result_value__v | AE_CHILD_TR_APGAR_SCR_5_MIN |
| Safety Case Initiation Event | Child APGAR Score (10 minutes) | Numeric with Precision (14,3) |
|
F.r.3.2 | case_test_result__v, result_value__v | AE_CHILD_TR_APGAR_SCR_10_MIN |
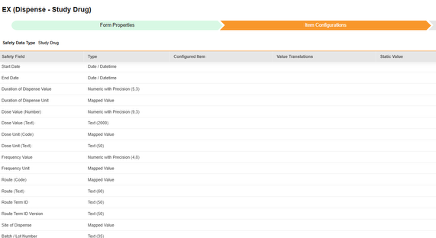
Study Drug
This safety data type is used to track dosing / dispensing information of a study drug, i.e. those the clinical study is testing against subjects. The information will flow to the Products / Product Dosages section of Veeva Safety. The example below shows two drugs.
Currently, the name of a study drug is configured in Studio at the Form Properties tab. An item configuration for drug name will be available in a future release.
The important “Classification of Drug” is not an item mapped on the EDC form for this type. Instead, “Suspect” is set by the system when there is at least one dispense form on or before the event start date. If there are no dispenses, “Not Administered” is used by the system.
To perform the Item Configurations step for this safety data type:
- Navigate to your Study in Studio > Form Configurations.
-
Navigate into the safety form configuration, then to the Item Configurations tab.
-
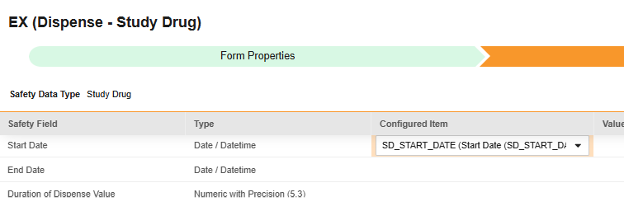
For each row that you want to map, use the cell in the Configured Item column to select the appropriate Item Definition. For example, select the SD_START_DATE item from the form for the location Start Date (pictured below). The choices for item selection will usually depend on the Form Properties > Each Entry In setting previously saved. Some safety locations have special rules that indicate they can be done in only repeating or non-repeating item groups, or sometimes either. Refer to the table at the end of these steps for those outliers, plus important notes regarding all safety locations of this type.
- Depending on the data type of the Configured Item and the Safety Field, you may need to provide Value Translations. See the Value Translations section above for instructions.
- Depending on the Safety Field additional information may be required. Use the appropriate cell in the row to provide this information:
- Click Save (to remain on the page) or Save and Next (to advance to the next tab, Inclusion Criteria).
| EDC Safety Data Type | EDC Field Label | Field Data Type | Notes | Relevant E2B (R3) Locations | Inbox Item / Case Object & Field |
EDC Field Identifier |
|---|---|---|---|---|---|---|
| Study Drug | Study Drug Name | Text (250) |
|
G.k.4.r.4 | case_product__v, product_reported__v | SD_REPORTED_NAME |
| Study Drug | Start Date | Date/Datetime |
|
G.k.4.r.4 | case_product_dosage__v, firstadmin_idate__v | SD_START_DATE |
| Study Drug | End Date | Date/Datetime |
|
G.k.4.r.5 | case_product_dosage__v, lastadmin_idate__v | SD_END_DATE |
| Study Drug | Duration of Dispense Value | Numeric with Precision (5,3) |
|
G.k.4.r.6a | case_product_dosage__v, duration_number__v | SD_DURATION_VALUE |
| Study Drug | Duration of Dispense Unit | Mapped Value |
|
G.k.4.r.6b | case_product_dosage__v, duration_unit__v | SD_DURATION_UNIT |
| Study Drug | Dose Value (Number) | Numeric with Precision (9,3) |
|
G.k.4.r.1a | case_product_dosage__v, dose_number__v | SD_DOSE_VALUE_NUMBER |
| Study Drug | Dose Value (Text) | Text (2000) |
|
G.k.4.r.8 | case_product_dosage__v, dose_text_long_text__v | SD_DOSE_VALUE_TEXT |
| Study Drug | Dose Unit (Code) | Mapped Value |
|
G.k.4.r.1b | case_product_dosage__v, dose_unit__v | SD_DOSE_UNIT_CODE |
| Study Drug | Dose Unit (Text) | Text (50) |
|
G.k.4.r.8 | case_product_dosage__v, dose_unit_text__v | SD_DOSE_UNIT_TEXT |
| Study Drug | Indication Reported | Text (250) |
|
case_product_indication__v, name_reported__v | SD_INDICATION | |
| Study Drug | Indication Reported (Coding LLT) | Text (8) |
|
case_product_indication__v, name_meddra__v | SD_INDICATION_MEDDRA | |
| Study Drug | Frequency Value | Numeric with Precision (4,8) |
|
G.k.4.r.2 | case_product_dosage__v, frequency_number__v | SD_FREQUENCY_VALUE |
| Study Drug | Frequency Unit | Mapped Value |
|
G.k.4.r.3 | case_product_dosage__v, frequency_unit__v | SD_FREQUENCY_UNIT |
| Study Drug | Route (Code) | Mapped Value |
|
G.k.4.r.10.2b | case_product_dosage__v, patient_adminroute__v | SD_ROUTE_CODE |
| Study Drug | Route (Text) | Text (60) |
|
G.k.4.r.10.1 | case_product_dosage__v, patient_adminroute_text__v | SD_ROUTE_TEXT |
| Study Drug | Route Term ID | Text (50) |
|
G.k.4.r.10.2b | case_product_dosage__v, patient_adminroute_termid__v | SD_ROUTE_TERM_ID |
| Study Drug | Route Term ID Version | Text (50) |
|
G.k.4.r.10.2a | case_product_dosage__v, patient_adminroute_termid_version__v | SD_ROUTE_TERM_ID_VERSION |
| Study Drug | Site of Dispense | Mapped Value |
|
case_product_dosage__v, anatomical_site__v | SD_SITE_OF_DISPENSE | |
| Study Drug | Batch / Lot Number | Text (35) |
|
G.k.4.r.7 | case_product_dosage__v, batchlot_number__v | SD_BATCH_LOT_NUMBER |
| Study Drug | Dose Form Term ID | Text (50) |
|
G.k.4.r.9.2b | case_product_dosage__v, dose_form_termid__v | SD_DOSE_FORM_TERM_ID |
| Study Drug | Dose Form Term ID Version | Text (50) |
|
G.k.4.r.9.2a | case_product_dosage__v, dose_form_termid_version__v | SD_DOSE_FORM_TERM_ID_VERSION |
| Study Drug | Dose Form Text | Text (128) |
|
G.k.4.r.9.1 | case_product_dosage__v, dose_form_text__v | SD_DOSE_FORM_TEXT |
| Study Drug | Additional Information Coded | Mapped Value |
|
G.k.10.r | case_product__v, additional_information_coded__v | SD_ADDITIONAL_INFO_CODED |
| Study Drug | Gestation Exposure Number | Numeric with Precision (3,3) |
|
G.k.6a | case_product_dosage__v, gestation_exposure_number__v | SD_GESTATION |
| Study Drug | Gestation Exposure Unit | Mapped Value |
|
G.k.6b | case_product_dosage__v, gestation_exposure_unit__v | SD_GESTATION_UNIT |
| Study Drug | Device Name | Text (1000) |
|
case_product_dosage__v, device_name_part__v | SD_DEVICE_NAME | |
| Study Drug | Device Evaluated | Mapped Value |
|
case_product_dosage__v, device_evaluated__v | SD_DEVICE_EVALUATED | |
| Study Drug | Device Usage Type | Mapped Value |
|
case_product_dosage__v, device_usage_type__v | SD_DEVICE_USAGE_TYPE | |
| Study Drug | Device Implanted Date | Date / Datetime |
|
case_product_dosage__v, date_implanted_idate__v | SD_IMPLANTED_DATE | |
| Study Drug | Device Explanted Date | Date / Datetime |
|
case_product_dosage__v, date_explanted_idate__v | SD_EXPLANTED_DATE | |
| Study Drug | Device Age | Numeric with Precision (5,4) |
|
case_product_dosage__v, date_age__v | SD_DEVICE_AGE | |
| Study Drug | Device Age Unit | Mapped Value |
|
case_product_dosage__v, device_age_unit__v | SD_DEVICE_AGE_UNIT | |
| Study Drug | Parent Route (Text) | Text (60) |
|
G.k.4.r.11.1 | case_product_dosage__v, parent_adminroute_text__v | SD_PARENT_ROUTE_TEXT |
| Study Drug | Parent Route (Code) | Mapped Value |
|
G.k.4.r.11.2b | case_product_dosage__v, parent_adminroute__v | SD_PARENT_ROUTE_CODE |
| Study Drug | Parent Route Term ID | Text (50) |
|
G.k.4.r.11.2b | case_product_dosage__v, parent_adminroute_termid__v | SD_PARENT_ROUTE_TERM_ID |
| Study Drug | Parent Route Term ID Version | Text (50) |
|
G.k.4.r.11.2a | case_product_dosage__v, parent_adminroute_termid_version__v | SD_PARENT_ROUTE_TERM_ID_VERSION |
Concomitant Medications
This type of safety configuration is applied to concomitant medication forms of the study. The information will flow to the Products / Product Dosages sections of Veeva Safety.
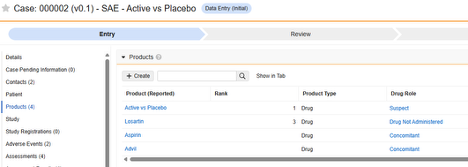
To perform the Item Configurations step for this safety data type:
- Navigate to your Study in Studio > Form Configurations.
-
Navigate into the safety form configuration, then to the Item Configurations tab.
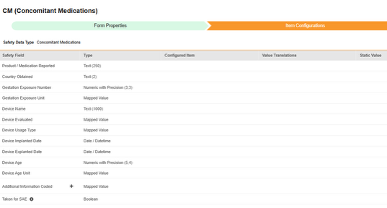
-
For each row that you want to map, use the cell in the Configured Item column to select the appropriate Item Definition. For example, select the CMTRT item from the form for the location Product / Medication Reported (pictured below). The choices for item selection will usually depend on the Form Properties > Each Entry In setting previously saved. Some safety locations have special rules that indicate they can be done in only repeating or non-repeating item groups, or sometimes either. Refer to the table at the end of these steps for those outliers, plus important notes regarding all safety locations of this type.
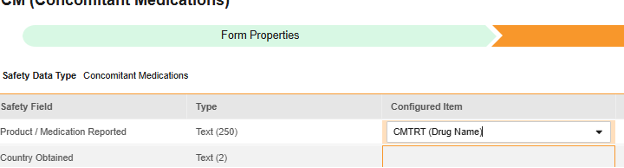
- Depending on the data type of the Configured Item and the Safety Field, you may need to provide Value Translations. See the Value Translations section above for instructions.
- Click Save (to remain on the page) or Save and Next (to advance to the next tab, Inclusion Criteria).
| EDC Safety Data Type | EDC Field Label | Field Data Type | Notes | Relevant E2B (R3) Locations | Inbox Item / Case Object & Field |
EDC Field Identifier |
|---|---|---|---|---|---|---|
| Concomitant Medication | Product / Medication Reported | Text (250) |
|
G.k.2.2 | case_product__v, product_reported__v | CM_REPORTED |
| Concomitant Medication | Country Obtained | Text (2) |
|
G.k.2.4 | case_product__v, country_obtained__v | CM_COUNTRY_OBTAINED |
| Concomitant Medication | Start Date | Date/Datetime |
|
G.k.4.r.4 | case_product_dosage__v, firstadmin_idate__v | CM_START_DATE |
| Concomitant Medication | End Date | Date/Datetime |
|
G.k.4.r.5 | case_product_dosage__v, lastadmin_idate__v | CM_END_DATE |
| Concomitant Medication | Duration of Dispense Value | Numeric with Precision (5,3) |
|
G.k.4.r.6a | case_product_dosage__v, duration_number__v | CM_DURATION_VALUE |
| Concomitant Medication | Duration of Dispense Unit | Mapped Value |
|
G.k.4.r.6b | case_product_dosage__v, duration_unit__v | CM_DURATION_UNIT |
| Concomitant Medication | Dose Value (Number) | Numeric with Precision (9,3) |
|
G.k.4.r.1a | case_product_dosage__v, dose_number__v | CM_DOSE_VALUE_NUMBER |
| Concomitant Medication | Dose Value (Text) | Text (2000) |
|
G.k.4.r.8 | case_product_dosage__v, dose_text__v | CM_DOSE_VALUE_TEXT |
| Concomitant Medication | Dose Unit (Code) | Mapped Value |
|
G.k.4.r.1b | case_product_dosage__v, dose_unit__v | CM_DOSE_UNIT_CODE |
| Concomitant Medication | Dose Unit (Text) | Text (50) |
|
G.k.4.r.8 | case_product_dosage__v, dose_unit_text__v | CM_DOSE_UNIT_TEXT |
| Concomitant Medication | Indication Reported | Text (250) |
|
case_product_indication__v, name_reported__v | CM_INDICATION | |
| Concomitant Medication | Indication Reported (Coding LLT) | Text (8) |
|
case_product_indication__v, name_meddra__v | CM_INDICATION_MEDDRA | |
| Concomitant Medication | Frequency Value | Numeric with Precision (4,8) |
|
G.k.4.r.2 | case_product_dosage__v, frequency_number__v | CM_FREQUENCY_VALUE |
| Concomitant Medication | Frequency Unit | Mapped Value |
|
G.k.4.r.3 | case_product_dosage__v, frequency_unit__v | CM_FREQUENCY_UNIT |
| Concomitant Medication | Route (Code) | Mapped Value |
|
G.k.4.r.10.2b | case_product_dosage__v, patient_adminroute__v | CM_ROUTE_CODE |
| Concomitant Medication | Route (Text) | Text (60) |
|
G.k.4.r.10.1 | case_product_dosage__v, patient_adminroute_text__v | CM_ROUTE_TEXT |
| Concomitant Medication | Route Term ID | Text (50) |
|
G.k.4.r.10.2b | case_product_dosage__v, patient_adminroute_termid__v | CM_ROUTE_TERM_ID |
| Concomitant Medication | Route Term ID Version | Text (50) |
|
G.k.4.r.10.2a | case_product_dosage__v, patient_adminroute_termid_version__v | CM_ROUTE_TERM_ID_VERSION |
| Concomitant Medication | Site of Dispense | Mapped Value |
|
case_product_dosage__v, anatomical_site__v | CM_SITE_OF_DISPENSE | |
| Concomitant Medication | Batch / Lot Number | Text (35) |
|
G.k.4.r.7 | case_product_dosage__v, batchlot_number__v | CM_BATCH_LOT_NUMBER |
| Concomitant Medication | Dose Form Term ID | Text (50) |
|
G.k.4.r.9.2a | case_product_dosage__v, dose_form_termid__v | CM_DOSE_FORM_TERM_ID |
| Concomitant Medication | Dose Form Term ID Version | Text (50) |
|
G.k.4.r.9.1 | case_product_dosage__v, dose_form_termid_version__v | CM_DOSE_FORM_TERM_ID_VERSION |
| Concomitant Medication | Dose Form (Text) | Text (50) |
|
G.k.4.r.9.2b | case_product_dosage__v, dose_form_text__v | CM_DOSE_FORM_TEXT |
| Concomitant Medication | Additional Information Coded | Mapped Value |
|
G.k.10.r | case_product__v, additional_information_coded__v | CM_ADDITIONAL_INFO_CODED |
| Concomitant Medication | Gestation Exposure Number | Numeric with Precision (3,3) |
|
G.k.6a | case_product__v, gestation_exposure_number__v | CM_GESTATION |
| Concomitant Medication | Gestation Exposure Unit | Mapped Value |
|
G.k.6b | case_product__v, gestation_exposure_unit__v | CM_GESTATION_UNIT |
| Concomitant Medication | Device Name | Text (1000) |
|
case_product__v, device_name_part__v | CM_DEVICE_NAME | |
| Concomitant Medication | Device Evaluated | Mapped Value |
|
case_product__v, device_evaluated__v | CM_DEVICE_EVALUATED | |
| Concomitant Medication | Device Usage Type | Mapped Value |
|
case_product__v, device_usage_type__v | CM_DEVICE_USAGE_TYPE | |
| Concomitant Medication | Device Implanted Date | Date/Datetime |
|
case_product__v, date_implanted_idate__v | CM_IMPLANTED_DATE | |
| Concomitant Medication | Device Explanted Date | Date/Datetime |
|
case_product__v, date_explanted_idate__v | CM_DEVICE_EXPLANTED_DATE | |
| Concomitant Medication | Device Age | Numeric with Precision (5,4) |
|
case_product__v, date_age__v | CM_DEVICE_AGE | |
| Concomitant Medication | Device Age Unit | Mapped Value |
|
case_product__v, device_age_unit__v | CM_DEVICE_AGE_UNIT | |
| Concomitant Medication | Parent Route (Text) | Text (60) |
|
G.k.4.r.11.1 | case_product_dosage__v, parent_adminroute_text__v | CM_PARENT_ROUTE_TEXT |
| Concomitant Medication | Parent Route (Code) | Mapped Value |
|
G.k.4.r.11.2b | case_product_dosage__v, parent_adminroute__v | CM_PARENT_ROUTE_CODE |
| Concomitant Medication | Parent Route Term ID | Text (50) |
|
G.k.4.r.11.2b | case_product_dosage__v, parent_adminroute_termid__v | CM_PARENT_ROUTE_TERM_ID |
| Concomitant Medication | Parent Route Term ID Version | Text (50) |
|
G.k.4.r.11.2a | case_product_dosage__v, parent_adminroute_termid_version__v | CM_PARENT_ROUTE_TERM_ID_VERSION |
Medical History
This type of safety configuration is applied to medical history forms of the study. The information will flow to the Medical History & Concurrent Conditions section of Veeva Safety.
To perform the Item Configurations step for this safety data type:
- Navigate to your Study in Studio > Form Configurations.
-
Navigate into the safety form configuration, then to the Item Configurations tab.
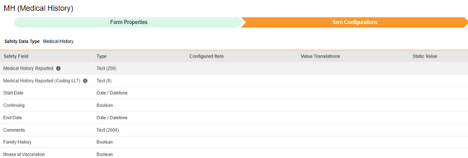
-
For each row that you want to map, use the cell in the Configured Item column to select the appropriate Item Definition. For example, select the MHTERM item from the form for the location Medical History Reported (pictured below). The choices for item selection will usually depend on the Form Properties > Each Entry In setting previously saved. Some safety locations have special rules that indicate they can be done in only repeating or non-repeating item groups, or sometimes either. Refer to the table at the end of these steps for those outliers, plus important notes regarding all safety locations of this type.
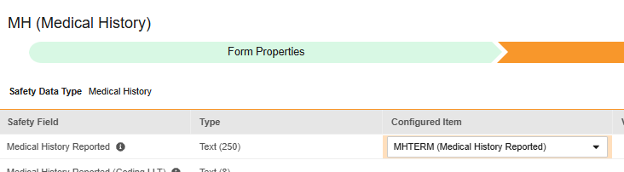
- Depending on the data type of the Configured Item and the Safety Field, you may need to provide Value Translations. See the Value Translations section above for instructions.
- Click Save (to remain on the page) or Save and Next (to advance to the next tab, Inclusion Criteria).
| EDC Safety Data Type | EDC Field Label | Field Data Type | Notes | Relevant E2B (R3) Locations | Inbox Item / Case Object & Field |
EDC Field Identifier |
|---|---|---|---|---|---|---|
| Medical History | Medical History Reported | Text (250) |
|
D.7.1.r.5 (term often reported from comments) | case_medical_history__v, name_reported__v | MH_REPORTED |
| Medical History | Medical History Reported (Coding LLT) | Text (8) |
|
D.7.1.r.1a / D.7.1.r.1b | case_medical_history__v, name_meddra__v | MH_REPORTED_LLT |
| Medical History | Start Date | Date/Datetime |
|
D.7.1.r.2 | case_medical_history__v, startdate_idate__v | MH_START_DATE |
| Medical History | Continuing | Boolean |
|
D.7.1.r.3 | case_medical_history__v, continuing_value__v | MH_CONTINUING |
| Medical History | End Date | Date/Datetime |
|
D.7.1.r.4 | case_medical_history__v, enddate_idate__v | MH_END_DATE |
| Medical History | Comments | Text (2000) |
|
D.7.1.r.5 | case_medical_history__v, comments__v | MH_COMMENTS |
| Medical History | Family History | Boolean |
|
D.7.1.r.6 | case_medical_history__v, family_history__v | MH_FAMILY_HISTORY |
| Medical History | Illness at Vaccination | Boolean |
|
case_medical_history__v, illness_at_vaccination__v | MH_ILLNESS_AT_VACCINATION |
Drug History
This type of safety configuration is applied to drug history forms of the study. The information will flow to the Drug History section of Veeva Safety.
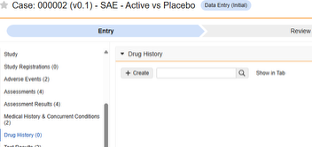
To perform the Item Configurations step for this safety data type:
- Navigate to your Study in Studio > Form Configurations.
-
Navigate into the safety form configuration, then to the Item Configurations tab.
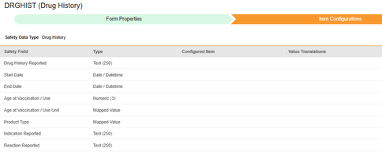
-
For each row that you want to map, use the cell in the Configured Item column to select the appropriate Item Definition. For example, select the DH_REPORTED item from the form for the location Drug History Reported (pictured below). The choices for item selection will usually depend on the Form Properties > Each Entry In setting previously saved. Some safety locations have special rules that indicate they can be done in only repeating or non-repeating item groups, or sometimes either. Refer to the table at the end of these steps for those outliers, plus important notes regarding all safety locations of this type.
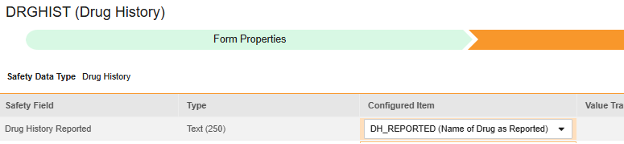
- Depending on the data type of the Configured Item and the Safety Field, you may need to provide Value Translations. See the Value Translations section above for instructions.
- Click Save (to remain on the page) or Save and Next (to advance to the next tab, Inclusion Criteria).
| EDC Safety Data Type | EDC Field Label | Field Data Type | Notes | Relevant E2B (R3) Locations | Inbox Item / Case Object & Field |
EDC Field Identifier |
|---|---|---|---|---|---|---|
| Drug History | Drug History Reported | Text (250) |
|
D.8.r.1 | case_drug_history__v, name_reported__v | DH_REPORTED |
| Drug History | Start Date | Date/Datetime |
|
D.8.r.4 | case_drug_history__v, startdate_idate__v | DH_START_DATE |
| Drug History | End Date | Date/Datetime |
|
D.8.r.5 | case_drug_history__v, enddate_idate__v | DH_END_DATE |
| Drug History | Age at Vaccination / Use | Numeric (3) |
|
case_drug_history__v, age_at_vaccination_number__v | DH_AGE_AT_USE | |
| Drug History | Age At Vaccination / Use Unit | Mapped Value |
|
case_drug_history__v, age_at_vaccination_unit__v | DH_AGE_AT_USE_UNIT | |
| Drug History | Product Type | Mapped Value |
|
case_drug_history__v, product_type__v | DH_PRODUCT_TYPE | |
| Drug History | Indication Reported | Text (250) |
|
D.8.r.6a, D.8.r.6b | case_drug_history__v, indication_reported__v | DH_INDICATION |
| Drug History | Reaction Reported | Text (250) |
|
D.8.r.7a, D.8.r.7b | case_drug_history__v, reaction_reported__v | DH_REACTION |
Test Results
This type of safety configuration is applied to lab / test result forms of the study. The information will flow to Test Results section of Veeva Safety.
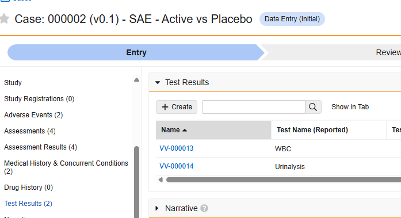
To perform the Item Configurations step for this safety data type:
- Navigate to your Study in Studio > Form Configurations.
-
Navigate into the safety form configuration, then to the Item Configurations tab.

-
For each row that you want to map, use the cell in the Configured Item column to select the appropriate Item Definition. For example, select the LBDT item from the form for the location Test Date (pictured below). The choices for item selection will usually depend on the Form Properties > Each Entry In setting previously saved. Some safety locations have special rules that indicate they can be done in only repeating or non-repeating item groups, or sometimes either. Refer to the table at the end of these steps for those outliers, plus important notes regarding all safety locations of this type.
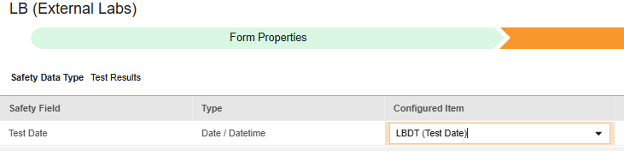
- Depending on the data type of the Configured Item and the Safety Field, you may need to provide Value Translations. See the Value Translations section above for instructions.
- Click Save (to remain on the page) or Save and Next (to advance to the next tab, Inclusion Criteria).
| EDC Safety Data Type | EDC Field Label | Field Data Type | Notes | Relevant E2B (R3) Locations | Inbox Item / Case Object & Field |
EDC Field Identifier |
|---|---|---|---|---|---|---|
| Test Results | Test Date | Date/Datetime |
|
F.r.1 | case_test_result__v, date_idate__v | LAB_DATE |
| Test Results | Test Name | Text (250) |
|
F.r.2.1 | case_test_result__v, name_reported__v | LAB_TEST_NAME |
| Test Results | Test Name (Coding LLT) | Text (8) |
|
F.r.2.2a, F.r.2.2b | case_test_result__v, name_meddra__v | LAB_TEST_NAME_MEDDRA |
| Test Results | Test Result (Numeric) | Numeric with Precision (14,3) |
|
F.r.3.2 | case_test_result__v, result_value__v | LAB_RESULT_NUMERIC |
| Test Results | Test Unit | Mapped Value |
|
F.r.3.3 | case_test_result__v, result_unit__v | LAB_RESULT_UNIT |
| Test Results | Test Result (Code) | Mapped Value |
|
F.r.3.1 | case_test_result__v, result_code__v | LAB_TEST_RESULT_CODE |
| Test Results | Test Result (Text) | Text (2000) |
|
F.r.3.4 | case_test_result__v, result_text__v | LAB_RESULT_TEXT |
| Test Results | Test Result (Qualifier) | Mapped Value |
|
F.r.3.2 | case_test_result__v, result_qualifier__v | LAB_RESULT_QUALIFIER |
| Test Results | Test Normal Low Value | Text (50) |
|
F.r.4 | case_test_result__v, normal_low_value__v | LAB_LOW_VALUE |
| Test Results | Test Normal High Value | Text (50) |
|
F.r.5 | case_test_result__v, normal_high_value__v | LAB_HIGH_VALUE |
| Test Results | Test Comments | Text (2000) |
|
F.r.6 | case_test_result__v, comments__v | LAB_COMMENTS |
| Test Results | More Information Available | Boolean |
|
F.r.7 | case_test_result__v, more_information_available__v | LAB_MORE_INFO_AVAILABLE |
Patient Characteristics
This type of safety configuration is applied to general information about the subject. The information will flow to the Patient section of Veeva Safety.
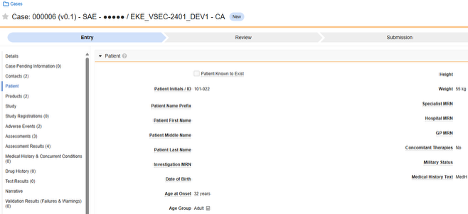
To perform the Item Configurations step for this safety data type:
- Navigate to your Study in Studio > Form Configurations.
-
Navigate into the safety form configuration, then to the Item Configurations tab.

-
For each row that you want to map, use the cell in the Configured Item column to select the appropriate Item Definition. For example, select the DOB item from the form for the location Date of Birth (pictured below). The choices for item selection will usually depend on the Form Properties > Each Entry In setting previously saved. Some safety locations have special rules that indicate they can be done in only repeating or non-repeating item groups, or sometimes either. Refer to the table at the end of these steps for those outliers, plus important notes regarding all safety locations of this type.
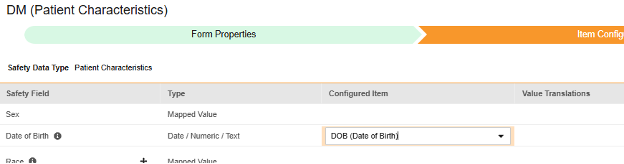
- Depending on the data type of the Configured Item and the Safety Field, you may need to provide Value Translations. See the Value Translations section above for instructions.
- Click Save (to remain on the page) or Save and Next (to advance to the next tab, Inclusion Criteria).
| EDC Safety Data Type | EDC Field Label | Field Data Type | Notes | Relevant E2B (R3) Locations | Inbox Item / Case Object & Field |
EDC Field Identifier |
|---|---|---|---|---|---|---|
| Patient Characteristics | Gender | Mapped Value |
|
D.5 | case_version__v, gender_value__v | |
| Patient Characteristics | Date of Birth | Date / Numeric / Text |
|
D.2.1 | case_version__v, dob_idate__v | PC_DOB |
| Patient Characteristics | Race | Mapped Value |
|
case_version__v, race__v | PC_RACE | |
| Patient Characteristics | Ethnicity | Mapped Value |
|
case_version__v, ethnicity__v | PC_ETHNICITY | |
| Patient Characteristics | Age Group | Mapped Value |
|
D.2.3 | case_version__v, age_group__v | PC_AGE_GROUP |
| Patient Characteristics | Age at SAE | Numeric (3) |
|
D.2.2a | case_version__v, age_value__v | PC_AGE_VALUE |
| Patient Characteristics | Age at SAE Unit | Mapped Value |
|
D.2.2b | case_version__v, age_unit__v | PC_AGE_UNIT |
| Patient Characteristics | Age at Vaccination | Numeric (3) |
|
case_version__v, age_at_vaccination_number__v | PC_AGE_AT_VX | |
| Patient Characteristics | Age Unit at Vaccination | Mapped Value |
|
case_version__v, age_at_vaccination_unit__v | PC_AGE_AT_VX_UNIT | |
| Patient Characteristics | Gestation Value | Numeric (3) |
|
D.2.2.1a | case_version__v, gestation_value__v | PC_GESTATION |
| Patient Characteristics | Gestation Unit | Mapped Value |
|
D.2.2.1b | case_version__v, gestation_unit__v | PC_GESTATION_UNIT |
| Patient Characteristics | Weight (kg) | Numeric with Precision (4,4) |
|
D.3 | case_version__v, weight_normalized__kg__v | PC_WEIGHT_KG |
| Patient Characteristics | Height (cm) | Numeric with Precision (4,3) |
|
D.4 | case_version__v, height_normalized__cm__v | PC_HEIGHT_CM |
| Patient Characteristics | Patient Name or Initials | Text (60) |
|
D.1 | case_version__v, patient_id_value__v | PC_NAME_OR_INITIALS |
| Patient Characteristics | GP Medical Record Number | Text (20) |
|
D.1.1.1 | case_version__v, mrn_gp_value__v | PC_GPRN |
| Patient Characteristics | Hospital Record Number | Text (20) |
|
D.1.1.3 | case_version__v, mrn_hospital_value__v | PC_HRN |
| Patient Characteristics | Investigational Record Number | Text (20) |
|
D.1.1.4 | case_version__v, mrn_investigation_value__v | PC_IRN |
| Patient Characteristics | Specialist Record Number | Text (20) |
|
D.1.1.2 | case_version__v, mrn_specialist__value | PC_SRN |
| Patient Characteristics | Randomization Number | Text (20) |
|
case_version__v, patient_randomization_number__v | PC_RAND_NUM | |
| Patient Characteristics | Last Menstrual Date | Date |
|
D.6 | case_version__v, last_menstrual_date | PC_LAST_MENSTRUAL_DATE |
| Patient Characteristics | Pregnancy Occurrences | Numeric (2) |
|
case_version__v, gravida_gravidity__v | ||
| Patient Characteristics | Number Given Birth | Numeric (2) |
|
case_version__v, para_parity__v | AE_PREG_INFO_PARA | |
| Patient Characteristics | Pregnant at SAE | Boolean |
|
case_version__v, pregnancy_case__v | PC_PREG_CASE | |
| Patient Characteristics | Pregnant at Vaccination | Boolean |
|
case_version__v, pregnant_at_vaccination__v | PC_PREG_AT_VX | |
| Patient Characteristics | Pregnancy Conception Date | Date |
|
case_version__v, pregnancy_conception_date__v | AE_PREG_INFO_CONC_DT | |
| Patient Characteristics | Pregnancy Due Date | Date |
|
case_version__v, pregnancy_due_date__v | AE_PREG_INFO_DUE_DT | |
| Patient Characteristics | Pregnancy Outcome | Mapped Value |
|
case_version__v, pregnancy_outcome__v | AE_PREG_INFO_OUTCOME | |
| Patient Characteristics | Delivery Method | Mapped Value |
|
case_version__v, delivery_method__v | AE_PREG_INFO_DELV_METH | |
| Patient Characteristics | Date of Pregnancy Outcome | Date |
|
case_version__v, date_of_pregnancy_outcome__v | AE_PREG_INFO_OUTCOME_DT | |
| Patient Characteristics | Parent Subject Number | Text (128) |
|
case_version__v, parent_subject_number__v | PC_PARENT_SUBNUM | |
| Patient Characteristics | General Medical History | Text (10000) |
|
D.7.2 | case_version__v, medical_history_text__v | PC_MH_TEXT |
| Patient Characteristics | Subject had Concomitant Therapies | Boolean |
|
, | PC_CON_THERAPY |
In Case of Death
This type of safety configuration is applied to forms involving death details about the subject. Some fields for this type must be non-repeating (e.g. Date of Death), others can be repeating or non-repeating (causes of death). Information will flow to two places in Veeva Safety, Patient or Causes of Death.
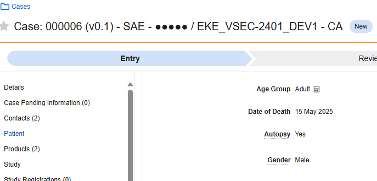
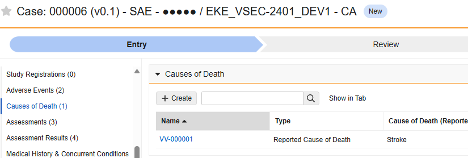
To perform the Item Configurations step for this safety data type:
- Navigate to your Study in Studio > Form Configurations.
-
Navigate into the safety form configuration, then to the Item Configurations tab.
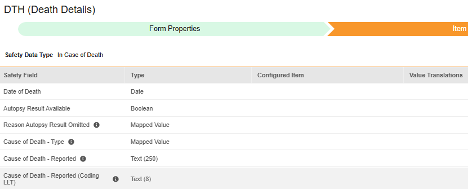
-
For each row that you want to map, use the cell in the Configured Item column to select the appropriate Item Definition. For example, select the DTHDT item from the form for the location Date of Death (pictured below). The choices for item selection will usually depend on the Form Properties > Each Entry In setting previously saved. Some safety locations have special rules that indicate they can be done in only repeating or non-repeating item groups, or sometimes either. Refer to the table at the end of these steps for those outliers, plus important notes regarding all safety locations of this type.
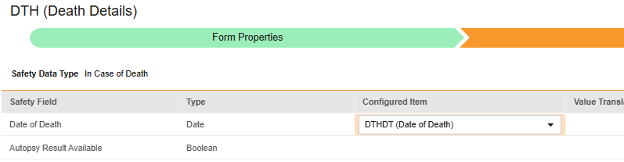
- Depending on the data type of the Configured Item and the Safety Field, you may need to provide Value Translations. See the Value Translations section above for instructions.
- When finished, click Save or click Save and Next to proceed to the Inclusion Criteria step.
| EDC Safety Data Type | EDC Field Label | Field Data Type | Notes | Relevant E2B (R3) Locations | Inbox Item / Case Object & Field |
EDC Field Identifier |
|---|---|---|---|---|---|---|
| In Case of Death | Date of Death | Date/Datetime |
|
D.9.1 | case_version__v, dod_idate__v | ICD_DEATH_DT |
| In Case of Death | Autopsy Result Available | Boolean |
|
D.9.3 | case_version__v, autopsy_value__v | ICD_AUTOPSY_RES |
| In Case of Death | Reason Autopsy Result Omitted | Mapped Value |
|
case_version__v, autopsy_reason_omitted__v | ICD_AUTOPSY_REAS_OMIT | |
| In Case of Death | Cause of Death - Type | Mapped Value |
|
D.9.2.r, D.9.4.r | case_cause_of_death__v, type__v | ICD_CASE_TYPE |
| In Case of Death | Cause of Death - Reported | Text (250) |
|
D.9.2.r, D.9.4.r | case_cause_of_death__v, name_reported__v | ICD_CAUSE_REPORTED |
| In Case of Death | Cause of Death - Reported (Coding LLT) | Text (8) |
|
D.9.2.r, D.9.4.r | case_cause_of_death__v, name_meddra__v | ICD_CAUSE_LLT |
| In Case of Death | Cause of Death - Classified as Reported | Text (250) |
|
D.9.2.r | case_cause_of_death__v, name_reported__v | ICD_CAUSE_CLASSIFIED_REPORTED |
| In Case of Death | Cause of Death - Classified as Reported (Coding LLT) | Text (8) |
|
D.9.2.r | case_cause_of_death__v, name_meddra__v | ICD_CAUSE_CLASSIFIED_REPORTED_LLT |
| In Case of Death | Cause of Death - Classified as Autopsy | Text (250) |
|
D.9.4.r | case_cause_of_death__v, name_reported__v | ICD_CAUSE_CLASSIFIED_AUTOPSY |
| In Case of Death | Cause of Death - Classified as Autopsy (Coding LLT) | Text (8) |
|
D.9.4.r | case_cause_of_death__v, name_meddra__v | ICD_CAUSE_CLASSIFIED_AUTOPSY_LLT |
Inclusion Criteria
Inclusion criteria are evaluated to determine the inclusion of the mapped item values into a safety case beyond the primary event initiating the safety case data transfer.
Notes / concepts:
- Inclusion criteria will only be evaluated, if
- On the Form Properties tab, all inclusion criteria evaluate to true, particularly the Key Safety Item
- (AND)
- On the Item Configurations tab, the required items have non-empty values on the EDC form
- On the Form Properties tab, all inclusion criteria evaluate to true, particularly the Key Safety Item
- The additional criteria can either include all forms of a type, be based on a site user action (linking) and/or date comparison based. These configurations can differ by type, specific form, and/or study.
- Conditions on the Inclusion Criteria tab are considered “OR” as they evaluate. That is, if any one of a series of applicable criteria is true, then the evaluation is “In”, regardless of others evaluating as false (“Out”).
- When a comparison with the safety case initiation event End Date for inclusion into a case is configured, but the date is not set on the data entry screen, the Events end date is used for evaluation as open ended. Once an end date is entered on the primary event (or related form), the system will re-evaluate the inclusion criteria, and send a corrective follow-up, if appropriate.
- Inclusion Criteria are applicable for all the related safety types:
- Safety Case Initiation Event
- Study Drug
- Concomitant Medications
- Medical History
- Drug History
- Test Results
Option Summary by Data Type
| Inclusion Criteria | Safety Data Types | ||||||||
|---|---|---|---|---|---|---|---|---|---|
| SCIE | Study Drug | Con Meds | Med Hist | Drug Hist | Test Res | Pat Chars | In Case of Death | ||
| All | |||||||||
| Linked by site user | |||||||||
| Start to end overlaps safety event start to end | |||||||||
| Start to end overlaps X days before safety event start | |||||||||
| Start to end overlaps X days after safety event start | |||||||||
| Start to end overlaps X days before safety event end | |||||||||
| Start to end overlaps X days after safety event end | |||||||||
| First dispense | |||||||||
| Closest on/before safety event start | |||||||||
| Closest on/after safety event start | |||||||||
| Closest on/before safety event (one only) | |||||||||
| Drug dispense start before safety event start | |||||||||
| Ended before safety event start | |||||||||
| Always | * | * | |||||||
|
Indicates that this inclusion criterion is available for the safety data type * Indicates that this inclusion criteria can't be modified for the safety data type |
|||||||||
The table header abbreviates the safety data types:
- SCIE: Safety Case Initiation Event
- ConMeds: Concomitant Medications
- Med Hist: Medical History
- Drug Hist: Drug History
- Test Res: Test Results
- Pat Chars: Patient Characteristics
Option Meaning / Examples
All criteria options are summarized below. With each date-based option, a series of examples are included to illustrate its usage.
| Option | Notes / Studio Interface | ||||||||||||||||||||||||||||||||||||
|---|---|---|---|---|---|---|---|---|---|---|---|---|---|---|---|---|---|---|---|---|---|---|---|---|---|---|---|---|---|---|---|---|---|---|---|---|---|
| All | Selecting this option disables all other options.
|
||||||||||||||||||||||||||||||||||||
| Linked by site user | When this option is used, Form-to-Form or Item-to-Form linking must be configured on the main form design
|
||||||||||||||||||||||||||||||||||||
| Start to end overlaps safety event start to end |
Select this option when the related event's start to end date range overlaps with the start to end date range of the safety case initiating event. This is commonly referred to as "ongoing at event start". That is, the related event has a start date on or before the end date of the initiating event, and the related event doesn't end before the start date of the initiating event. For Vault to compare the date and time of two events, both must collect the date and time for the comparison to evaluate the entire date and time. If one of the two is date only, then the comparison will only evaluate the dates. If unknown parts are allowed on either side, the comparison will compare as many known values are shared between the two dates. For example, if one side has an unknown month, the comparison will only compare the years from each date. If one side has an unknown day, the comparison will only compare the month and year from each date. Example: Include all concomitant medications being taken (ongoing) at SAE start
|
||||||||||||||||||||||||||||||||||||
| Start to end overlaps X days before safety event start |
Select this option when the related event start to end date range overlaps with the initiating event's start date or start date minus (before) the specified number of days. For Vault to compare the date and time of two events, both must collect the date and time for the comparison to evaluate the entire date and time. If one of the two is date only, then the comparison will only evaluate the dates. If unknown parts are allowed on either side, the comparison will compare as many known values are shared between the two dates. For example, if one side has an unknown month, the comparison will only compare the years from each date. If one side has an unknown day, the comparison will only compare the month and year from each date. For this option, Days On/Before will only accept whole numbers. Example: Include all concomitant medications who may have ended prior to the SAE start, but were taken within 7 days of the event.
|
||||||||||||||||||||||||||||||||||||
| Start to end overlaps X days after safety event start |
Select this option when the related form start to end range "touches" the primary event’s end date minus (before) a specific number of days. For Vault to compare the date and time of two events, both must collect the date and time for the comparison to evaluate the entire date and time. If one of the two is date only, then the comparison will only evaluate the dates. If unknown parts are allowed on either side, the comparison will compare as many known values are shared between the two dates. For example, if one side has an unknown month, the comparison will only compare the years from each date. If one side has an unknown day, the comparison will only compare the month and year from each date. For this option, Days On/After will only accept whole numbers. Example: Include concomitant medications started within 3 days of the start, even if the event has ended.
|
||||||||||||||||||||||||||||||||||||
| Start to end overlaps X days before safety event end |
Select this option when the related form start to end range "touches" the primary event’s end date minus (before) a specific number of days. This value can be redundant with the Days On/Before (start) value for events that start and end quickly. But, for longer duration primary events, bringing in those occurring during the duration, but strictly after the primary event start date. For Vault to compare the date and time of two events, both must collect the date and time for the comparison to evaluate the entire date and time. If one of the two is date only, then the comparison will only evaluate the dates. If unknown parts are allowed on either side, the comparison will compare as many known values are shared between the two dates. For example, if one side has an unknown month, the comparison will only compare the years from each date. If one side has an unknown day, the comparison will only compare the month and year from each date. For this option, Days On/Before will only accept whole numbers. Example: Include concomitant medications started within 3 days of the end, even if the event started before the medication started.
|
||||||||||||||||||||||||||||||||||||
| Start to end overlaps X days after safety event end |
Select this option when the related form start to end range "touches" the primary event’s end date plus (after) a specific number of days, for example, further events (serious or not) that occur after the initial serious event (created the safety case) has ended, but close in days. For Vault to compare the date and time of two events, both must collect the date and time for the comparison to evaluate the entire date and time. If one of the two is date only, then the comparison will only evaluate the dates. If unknown parts are allowed on either side, the comparison will compare as many known values are shared between the two dates. For example, if one side has an unknown month, the comparison will only compare the years from each date. If one side has an unknown day, the comparison will only compare the month and year from each date. For this option, Days On/After will only accept whole numbers. Example: Include concomitant medications started within 3 days after the end of the event.
|
||||||||||||||||||||||||||||||||||||
| First dispense |
*Applies only to the Study Drug safety form data type. Select the First Dispense checkbox to use the first dispense - chronological order - across all dispense forms. If the date and time are involved in the study drug start/end, the comparison for on/before will honor the full datetime. 
|
||||||||||||||||||||||||||||||||||||
| Closest on/before safety event start |
*Applies only to the Study Drug safety form data type. Select the Closest On/After checkbox to use the “restart” dispense, i.e. if the subject restarts the study drug on/after the event start, it will be included If the date and time are involved in the study drug start/end, the comparison for on/before will honor the full datetime. 
|
||||||||||||||||||||||||||||||||||||
| Closest on/after safety event start |
*Applies only to the Study Drug safety form data type. The ‘restart’ dispense, i.e. if the subject restarts the study drug on/after the event start, it will be included. If date and time are involved in a comparison (both sides, SCIE and Study Drug), then the comparison for on/before will honor the full date/time. If one of the two is ‘date only’, then the comparison is done ‘Date vs. Date’.</td>
<p markdown="span">If ‘Unknown Parts’ are allowed on either side, the comparison could be ‘year vs year’ (one side has an unknown month), or ‘month/year vs month/year’ (one side has an unknown day).
|
||||||||||||||||||||||||||||||||||||
| Closest on/before safety event (one only) |
*Applies only to the Study Drug safety form data type. This option works just like the Closest On/Before option, but once selected, no other option can be used. This option includes one dispense of the study drug, that which is closes to the event start date (on/before). See the examples above for Closest On/Before. The same holds true for this option. 
|
||||||||||||||||||||||||||||||||||||
| Drug dispense start before safety event start |
*Applies only to the Study Drug safety form data type. Select this option when the start date of the study drug form is strictly before the event starts. For Vault to compare the date and time of two events, both must collect the date and time for the comparison to evaluate the entire date and time. If one of the two is date only, then the comparison will only evaluate the dates. If unknown parts are allowed on either side, the comparison will compare as many known values are shared between the two dates. For example, if one side has an unknown month, the comparison will only compare the years from each date. If one side has an unknown day, the comparison will only compare the month and year from each date. 
|
||||||||||||||||||||||||||||||||||||
| Ended before safety event start |
*Applies only to the Study Drug safety form data type. Select this option when the end date of study drug dispensing is strictly before the primary event start date. For Vault to compare the date and time of two events, both must collect the date and time for the comparison to evaluate the entire date and time. If one of the two is date only, then the comparison will only evaluate the dates. If unknown parts are allowed on either side, the comparison will compare as many known values are shared between the two dates. For example, if one side has an unknown month, the comparison will only compare the years from each date. If one side has an unknown day, the comparison will only compare the month and year from each date. 
|
||||||||||||||||||||||||||||||||||||
| Always |
* Applies only to the Patient Characteristics or In Case of Death safety form data types. This option indicates that the data should always be included in the safety case from those classified EDC forms. It isn't editable. 
|
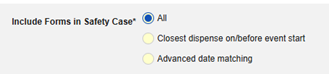


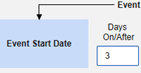
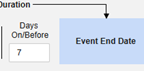


By Safety Data Type
Safety Case Initiation Event
The Safety Case Initiation Event will be the primary event to begin the process of transferring a safety case. All other related events are then brought into the case per their configured criteria. Depending on preference and study design, the initiating event can include other data from the initiating form, or be related to other events/forms of the same type, which themselves, however, don’t constitute their own safety case (e.g. other non-serious events linked to the initiating serious event).
Common practical example:
- On Monday, the subject experiences a non-serious adverse event “Headaches” (AE form #1)
- On Wednesday, the subject experiences a serious adverse event “Dizziness” (AE form #2)
- The system sends a safety case for the Tuesday event (“Dizziness”) as the primary initiating event of the new safety case. The system also adds the data of the Monday event as a 2nd event in the same safety case based on inclusion criteria configured. This happens due to the use of Days On/Before = 2 (or more)
To save inclusion criteria for this safety type:
- Navigate to your Study in Studio > Form Configurations
-
Navigate into the safety form configuration, then to the Inclusion Criteria tab:
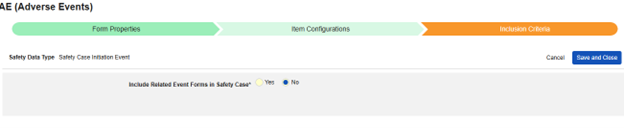
- Include Related Event Forms in Safety Case:
- If your study does not intend to bring other events into the safety case (secondary events), leave the default of No, and next use Save and Close to finish.
- If, on the other hand, your study does need to include other events (secondary) to the safety case based on criteria, select Yes:
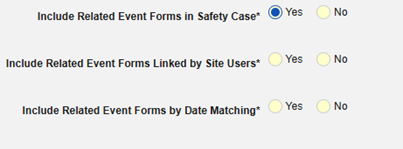
- Include Related Forms Linked by Site Users: Choose Yes if events linked by the site to the primary initiating event are to be included in the case. Warning: with Yes, the form must also have Form to Form or Item to Form linking configured.
-
Include Related Event Forms by Date Matching: Choose Yes if data from related events are to be evaluated for inclusion based on one or more date based criteria.
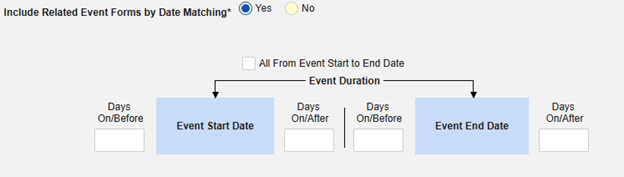
- Check an option, or set specific Days value(s). At least one of these options must be selected / set.
- Click Save and Close to finish.
For more detail and examples on each inclusion criteria option, see Option Meanings & Examples above.
Study Drug
This type of safety configuration is used to track dosing / dispensing information of a study drug in relation to the initiating event, i.e. those the clinical study is testing against subjects. The information will flow to the Products / Drugs section of a safety case.
Practical example:
- On March 1st, the subject receives the first dispense of a study drug Active vs Placebo (blinded study drug)
- On March 3rd, the subject receives another dispense
- On March 5th, the subject receives another dispense
- On March 6th, the subject experiences a serious adverse event (“Dizziness”) and the site enters into the AE form
- The system creates and transfers a safety case using “Dizziness” as the primary event
- The study is configured to include in the safety case a subset of dispenses. As one configuration example, March 1st (first overall) and March 5th (closest on/before). Other dispenses are not included, per the criteria configured.
To save inclusion criteria for this safety type:
- Navigate to your Study in Studio > Form Configurations
-
Navigate into the safety form configuration, then to the Inclusion Criteria tab:
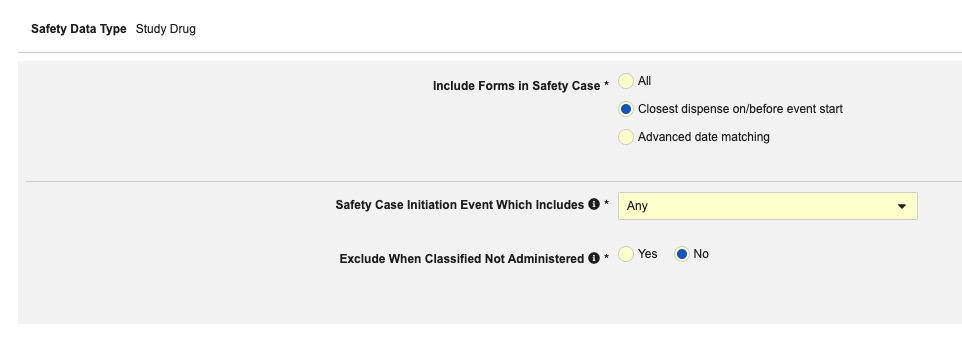
- Include Forms in Safety Case:
- All: Include all current study drug dispenses into the case
- Closest dispense on/before event (default): Include the nearest single dose/dispense for the subject across all forms into the case. The study drug dispensed with the date closest before the start of the primary initiating event will be included.
- Advanced date matching: Display and configure advanced selections in relation to the primary initiating event’s start and end date. Check one or more options, or set specific Days value(s). At least one of these options must be selected / set.

- Click Save and Close to finish.
For more detail and examples on each inclusion criteria option, see Option Meanings & Examples above.
Concomitant Medications
This type of safety configuration is applied to concomitant medication forms of the study. The information will flow to the Products / Drugs section of a safety case.
Multiple forms can be used with the type.
Practical example:
- On March 1st, the subject starts Veeofen, taken once a day, but stops on March 3rd
- On March 3rd, the subject starts Natevba, taken once a day, and has no end date (still taking)
- On March 5th, the subject takes one dose of Deetoza (end date March 5th also)
- On March 7th, the subject experiences a serious adverse event (“Dizziness”) and the site enters into the AE form
- The system creates and transfers a safety case using “Dizziness” as the primary event
- The study design prescribes to pull in concomitant medications using these two rules:
- “Anything ongoing at the SAE start”
- “Anything stopped, but stopped within 3 days of the SAE start”
- The result: March 3rd Natevba (ongoing) and March 5th Deetoza (ended, but only 2 days ago) are both in case. The other - March 1st Aspirin - is not the case (it ended more than 3 days ago)
To save inclusion criteria for this safety type:
- Navigate to your Study in Studio > Form Configurations
-
Navigate into the safety form configuration, then to the Inclusion Criteria tab:
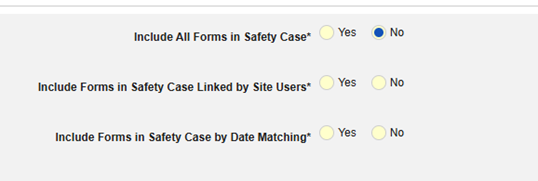
- Select from these options:
- Include All Forms in Safety Case (Defaults to No): Select Yes, to include all current concomitant medications into the case, which will disable all other options.
- Include Related Forms Linked by Site Users: Choose Yes if concomitant medications linked by the site to the primary initiating event are to be included in the case. Warning: with Yes, the form must also have Form to Form or Item to Form linking configured.
- Include Forms in Safety Case Linked by Site Users: Choose Yes or No for Warning: with Yes, the form must also have Form to Form or Item to Form linking configured.
-
Choose Yes or No for Include Forms to Safety Case by Date Matching. With Yes, this means the system will use one or more criteria to compare the Start to End ranges of the safety case event (primary) and the related data (the form actively being configured, it’s start and end end range):

- Check an option, or set specific Days value(s). At least one of these options must be selected / set.
- Click Save and Close to finish.
For more detail and examples on each inclusion criteria option, see Option Meanings & Examples above.
Medical History
This type of safety configuration is applied to medical history forms of the study.
Practical example:
- In January of 2024, the subject first started having “Minor Dizziness”. The medical history is deemed ongoing (no end date)
- A second medical history indicates “Back Pain”, with start April 2024 and end May 2024
- A third medical history indicates “Migraines” with start of June 2024 and end of Nov 2024
- On March 7th 2025, the subject experiences a serious adverse event (“Dizziness”) and the site enters into the AE form
- The system creates and transfers a safety case using “Dizziness” as the primary event
- The study design prescribes to pull in medical history using these two rules:
- “Anything ongoing at the SAE start”
- “Anything stopped, but stopped within 182 days of the SAE start”
- The result: “Minor Dizziness” (ongoing) and “Migraines” (ended, but within a year) are both in case. The other - “Back Pain” - is not in case (it ended more than 180 days ago)
To save inclusion criteria for this safety type:
- Navigate to your Study in Studio > Form Configurations
-
Navigate into the safety form configuration, then to the Inclusion Criteria tab:

- Select from these options:
- Include All Forms in Safety Case (Defaults to No): Select Yes, to include all current concomitant medications into the case, which will disable all other options.
- Include Related Forms Linked by Site Users: Choose Yes if concomitant medications linked by the site to the primary initiating event are to be included in the case. Warning: with Yes, the form must also have Form to Form or Item to Form linking configured.
- Include Forms in Safety Case Linked by Site Users: Choose Yes or No for Warning: with Yes, the form must also have Form to Form or Item to Form linking configured.
-
Choose Yes or No for Include Forms to Safety Case by Date Matching. With Yes, this means the system will use one or more criteria to compare the Start to End ranges of the safety case event (primary) and the related data (the form actively being configured, it’s start and end end range):
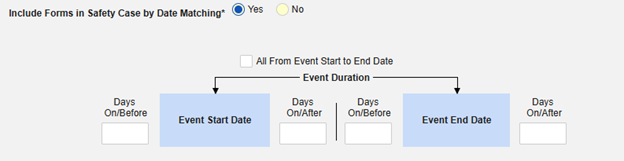
- Check an option, or set specific Days value(s). At least one of these options must be selected / set.
- Click Save and Close to finish.
For more detail and examples on each inclusion criteria option, see Option Meanings & Examples above.
Drug History
This type of safety configuration is applied to drug history forms of the study. The information will flow to the Drug History section of Veeva Safety.
Practical example:
- The study design collects drug history information - at the screening visit - that the investigator deems appropriate and/or is per protocol. These are specifically drugs/products taken (and ended) before the subject is in the trial.
- On March 7th 2025, the subject experiences a serious adverse event (“Dizziness”) and the site enters into the AE form.
- The system creates and transfers a safety case using “Dizziness” as the primary event
- Per the study configuration for this type of safety data, all are to be included in every safety case the subject experiences.
- Alternatively, date based and/or site linking options can be used.
To save inclusion criteria for this safety type:
- Navigate to your Study in Studio > Form Configurations
-
Navigate into the safety form configuration, then to the Inclusion Criteria tab:

- Select from these options:
- Include All Forms in Safety Case (Defaults to No): Select Yes, to include all current concomitant medications into the case, which will disable all other options.
- Include Related Forms Linked by Site Users: Choose Yes if concomitant medications linked by the site to the primary initiating event are to be included in the case. Warning: with Yes, the form must also have Form to Form or Item to Form linking configured.
- Include Forms in Safety Case Linked by Site Users: Choose Yes or No for Warning: with Yes, the form must also have Form to Form or Item to Form linking configured.
-
Choose Yes or No for Include Forms to Safety Case by Date Matching. With Yes, this means the system will use one or more criteria to compare the Start to End ranges of the safety case event (primary) and the related data (the form actively being configured, it’s start and end end range):

- Check an option, or set specific Days value(s). At least one of these options must be selected / set.
- Click Save and Close to finish.
For more detail and examples on each inclusion criteria option, see Option Meanings & Examples above.
Test Results
This type of safety configuration is applied to lab / test result forms of the study. The information will flow to the Test Results section of Veeva Safety.
Practical example:
- The study design collects additional labs / test results on a log form, as needed by the investigator / site. That is, tests they deem relevant to a serious adverse event.
- On March 7th 2025, the subject experiences a serious adverse event (“Dizziness”) and the site enters into the AE form.
- Additionally, the site adds two out of range lab tests and performs a link to the AE form for each.
- The system creates and transfers a safety case using “Dizziness” as the primary event
- Since the study has safety configuration that indicates to include whatever the site links to the event, the two test results are included in the case.
- Additionally (or instead of), date based options can be used.
To save inclusion criteria for this safety type:
- Navigate to your Study in Studio > Form Configurations
-
Navigate into the safety form configuration, then to the Inclusion Criteria tab:

- Select from these options:
- Include All Forms in Safety Case (Defaults to No): Select Yes, to include all current concomitant medications into the case, which will disable all other options.
- Include Related Forms Linked by Site Users: Choose Yes if concomitant medications linked by the site to the primary initiating event are to be included in the case. Warning: with Yes, the form must also have Form to Form or Item to Form linking configured.
- Include Forms in Safety Case Linked by Site Users: Choose Yes or No for Warning: with Yes, the form must also have Form to Form or Item to Form linking configured.
-
Choose Yes or No for Include Forms to Safety Case by Date Matching. With Yes, this means the system will use one or more criteria to compare the Start to End ranges of the safety case event (primary) and the related data (the form actively being configured, it’s start and end end range):

- Check an option, or set specific Days value(s). At least one of these options must be selected / set.
- Click Save and Close to finish.
For more detail and examples on each inclusion criteria option, see Option Meanings & Examples above.
Patient Characteristics
This type of safety configuration is applied to general information about the patient. There are no criteria for this type. Instead, information classified to this type is included in all safety cases of a subject.
When arriving at the Inclusion Criteria tab from the Item Configurations tab click Save and Next, which returns you to the Form Configurations list.
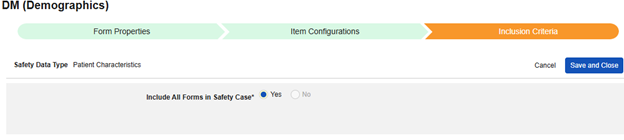
In Case of Death
This type of safety configuration is applied to forms involving death details about the subject. There are no criteria for this type. Instead, information classified to this type is included in all safety cases of a subject.
Currently, every case will receive this information, even those where no event in the case has an outcome Fatal.
When arriving at the Inclusion Criteria tab from the Item Configurations tab click Save and Next, which returns you to the Form Configurations list.
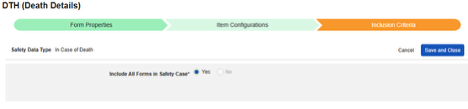
Delete All Safety Configuration
Use great care when removing all safety configurations for a study design. This action will return the study to a state where no configuration exists, and you would need to start again.
To perform this action, there must be zero Safety Cases in the development study. If you have already created Safety Cases in your development environment, you can delete non-production test data.
Deleting Post Go-Live: If your downstream environments (Test, Training, Production) have safety configurations and safety cases, this operation should never be performed. Even though the development study could delete its safety cases, and then the safety configuration, a later deployment to Test/Training/Production would fail.
To remove all safety configuration for a study:
- Navigate to Studio > Safety Settings for your Study.
-
From the Actions menu, select Delete All Safety Configurations.

- In the confirmation dialog, type “DELETE” as instructed.
- Click Delete.
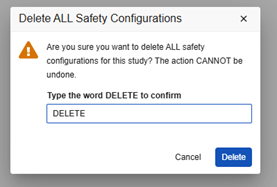
Download Specifications
You can download your safety configuration via the Study Design Specification or the All CRFs PDF export. Two additional tabs will be generated when you have configured for a safety integration: Safety Settings and Safety Form Configurations.
Deploying your Safety Configuration
Once you finish your configuration in your study’s DEV environment, you can deploy it to TST for testing, then onward into your training and production environments.
Your safety configuration, except for the Integration Setup and Connection, is automatically included in your study’s deployment package. When you deploy your study, Vault includes the current configuration in the package.
Because this configuration is managed as part of study deployments, you can only make changes in DEV type environments. To make changes, make them in the DEV environment and then deploy those changes to your other environments. This configuration is validated as part of casebook version publication. While validation is in progress, editing is disabled. A list of possible errors and warnings is available here.
Learn how to deploy a study.
Custom Safety Fields
The Safety-EDC Connection provides the most common safety-related fields, E2B and non-E2B, as Standard Safety Fields for mapping. Further flexibility of information transfer from EDC to Veeva Safety, additional Custom Safety Fields can be configured. The custom fields will appear alongside other standard fields on the Item Configurations menu of the safety data type that it applies.
- In Veeva Safety, a Safety Case has several subsections, including Adverse Event, Cause of Death, Assessments, etc. This structure is represented in a hierarchical object structure. The Case object is the parent to all relevant case section objects, representing the safety case subsections in the UI, including Case Adverse Event, Case Cause of Death, Case Assessments etc.
- The individual subsections of a Case can therefore be amended with Custom Safety Fields in Veeva Safety by adding entries into the respective Case child object. For more details, please refer to Veeva Safety Help.
- When amending a Case child object in Veeva Safety, the most critical information for the following configuration in Veeva EDC is:
- The child object (e.g. case_medical_history__v)
- The exact custom field name (e.g. for a new custom field Chronic Condition, the field name could be chronic_condition__c).
- To create a Custom Safety Field in Veeva EDC, a new Safety Connector Field Definitions entry must be created. To configure the correct location on one of the Safety Data Types for mapping, particularly the Grouping Property (i.e. which Safety Data Type to display the item on) and Display Order are relevant (details see below).
- The data transfer from Veeva EDC to Veeva Safety is based on JSON. To allow the correct transfer to Veeva Safety, additionally, the JSON structure must be understood and configured in the new Safety Connector Field Definition, where the JSON Node Name must be identical to the custom field name in Veeva Safety for data matching (details see below).
- Custom Safety Fields are configured on Vault level and will be available for mapping for both existing and new studies.
- While the new Custom Safety Field is not mapped for existing studies, existing cases will remain unaffected and the configuration will not result in any Follow-Up messages.
Example 1
-
The Adverse Event subsection of a Safety Case in Veeva Safety houses the events of a safety case The Case Adverse Events object (case_adverse_event__v) provides the fields displayed in this subsection. The data found in this subsection is mostly found on the AE/SAE form of an EDC study. The fields transferred from Veeva EDC to Veeva Safety correspond to the fields on the Safety Case Initiation Event data type. In the Safety user interface, these appear here:
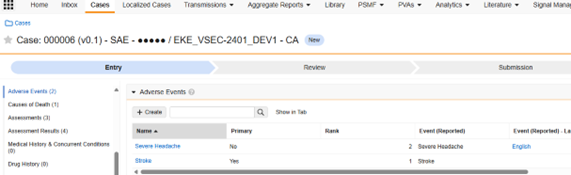
-
Below, we have added two additional Custom Safety Fields in the Veeva Safety object. Note that these fields have a trailing “__c”, Pain Score (pain_rating__c) and Occurrence per Day (occur_per_day__c):

-
Once the fields are set up on the corresponding Safety Data Type, the fields are then available alongside the Standard Safety Fields for mapping:
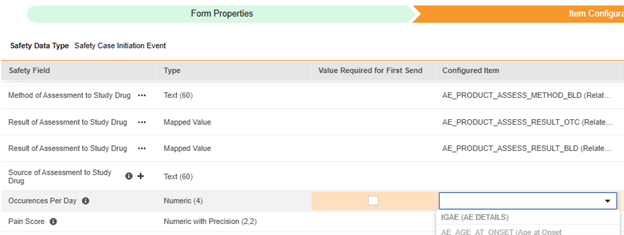
Example 2
- The Test Results subsection in Veeva Safety displays all fields configured for the test results of a safety case on the Case Test Results object (case_test_result__v). These records are usually configured in EDC lab results forms and are mapped to the Test Results data type.
-
In the Safety user interface, these appear here:
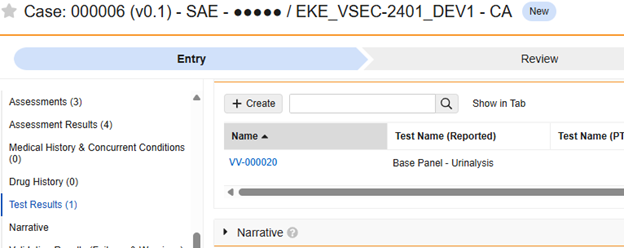
-
Below, we have added a custom field in the Veeva Safety object, Re-collection Date (recollection_date__c):
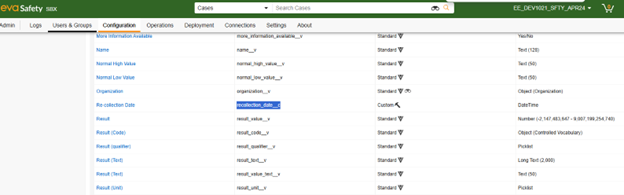
- Once accounted for on the EDC side, the fields are available alongside the Standard Safety Fields:
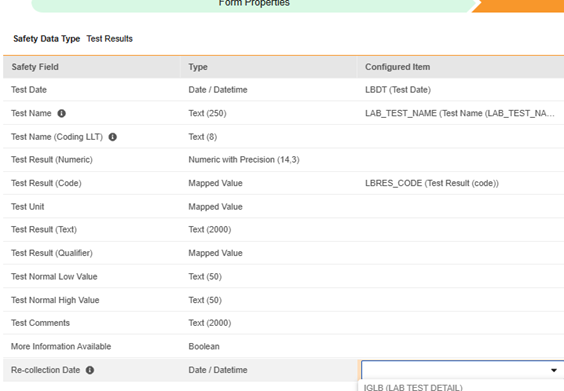
Add Custom Safety Field in EDC
The configuration of a Custom Safety Field in Veeva EDC is performed at the vault level. The new field will be available for mapping in all existing and new studies.
There are important considerations for custom safety fields:
- Consult a Veeva representative regarding the planning and steps necessary to successfully configure and best utilize this functionality.
- The creation or update of Custom Safety Fields requires careful coordination between the Veeva EDC and Veeva Safety configuration.
- Misconfiguration of a Custom Safety Field can lead to the corruption of the data transfer from Veeva EDC to Veeva Safety.
- Also consider program level decisions, involving EDC design teams, Safety users, even possibly members using other Veeva applications.
- The configuration of Custom Safety Fields in Veeva Safety is recommended to precede the configuration in Veeva EDC.
- An account with the Vault Owner security profile is required in both Veeva Safety and Veeva EDC for configuration.
- Configuration on the EDC side of the connection is performed once in the Development vault / ‘control center’. To move the configuration from Development vaults to Test, Production, or Training, use a vault-level deployment from System Tools, with safety option checked.
Vault Owner Required: A user with the Vault Owner security profile must configure custom safety fields.
To configure a Custom Safety Field corresponding with Veeva Safety in Veeva EDC:
-
Navigate to Business Admin > Objects > Safety Connector Field Definitions.
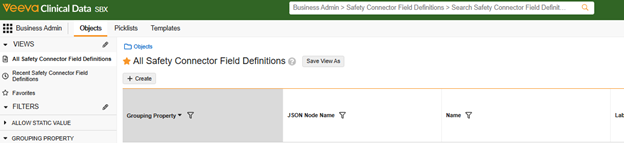
- Click Create to add a new record
- Fill out the new record with the following field level information guidelines below.
- Click Save.
| Vault Field | Value | Notes | |||||||||||||||||||||||||||
|---|---|---|---|---|---|---|---|---|---|---|---|---|---|---|---|---|---|---|---|---|---|---|---|---|---|---|---|---|---|
| Name | (text) | The naming is recommended to be consistent with other standard/field names, by safety data type, already in the list. For example MH_CHRONIC_CONDITION for a field collecting whether the medical history is ‘Chronic Condition’ or not. The ‘MH_’ text prepended mirrors other MH fields. | |||||||||||||||||||||||||||
| Cross Vault Unique ID | (::Name) | Must be prepended with two colons. Recommended is to use the same value as Name with a ‘::’ prepended. For example ::MH_CHRONIC_CONDITION | |||||||||||||||||||||||||||
| Grouping Property | (Picklist) | This field is the Safety Data Type (area) and is recommended to match the destination subsection of the safety case in Veeva Safety. For example, information for the Adverse Event section should be located on the Safety Case Initiation Event.
|
|||||||||||||||||||||||||||
| Display Order | (Integer value) | Typically this is a value greater than all other existing values already of that safety data type (grouping property). It will dictate the position, reading down, the row appears on the Item Configurations list for that safety data type. In case an existing value is chosen, the order of appearance in relation to the duplicated entry is not deterministic. | |||||||||||||||||||||||||||
| Label | (text) | The label displayed for the Custom Safety Field on the Safety Data Type in Studio for mapping (e.g. Re-collection Date) | |||||||||||||||||||||||||||
| Hover Text | (text) | Optionally indicate any text to appear in an ‘i’ hover icon, next to the label | |||||||||||||||||||||||||||
| JSON Parent | (text) | Note: Veeva Consultant support is recommended for the configuration of this field. If an invalid value is inserted, the data transfer from EDC to Safety will be corrupted. No system validation for a misconfiguration is in place.
The value corresponds to the JSON file exchanged between the two systems. Only use a value based on the location in safety and EDC safety data type of the field:
|
|||||||||||||||||||||||||||
| JSON Node Name | (text) | This value must match the exact field name in Veeva Safety. For example, if the field MH_CHRONIC_CONDITION is located in Veeva Safety case_medical_history__v.chronic_condition__c, then use chronic_condition__c. |
|||||||||||||||||||||||||||
| System Only Field | Always set No | Only No is supported | |||||||||||||||||||||||||||
| System Managed Record | Always set No | Only No is supported | |||||||||||||||||||||||||||
| Needs Value for Related Eligible | Always set No | Only No is supported | |||||||||||||||||||||||||||
| Allow Static Value | Yes or No | With Yes selected, the row in the Item Configurations UI will allow a static value in the flow to safety, instead of a value from an Item Configuration / field on the EDC Form in Data Entry. | |||||||||||||||||||||||||||
| Multiple Values with Date | Always set No | Only No is supported | |||||||||||||||||||||||||||
| Safety Field Data Type | See notes. | The type of field, e.g. Date, Numeric, Text. Depending on the type, additional configuration is required in other fields of the record:
|
|||||||||||||||||||||||||||
| Safety Max Length | Integer value | Indicate the value configured on the field in safety. Refer to Safety Field Data Type. | |||||||||||||||||||||||||||
| Safety Max Precision | Integer value | For fields that allow precision, indicate that value here. Refer to Safety Field Data Type. | |||||||||||||||||||||||||||
| Definition Status | Always leave blank | Only blank for this field means “Active”. The status Archived will make the field no longer visible in Studio. | |||||||||||||||||||||||||||
| Vocabulary Synch Type | See notes. | Value here only applies when the Safety Field Data Type is Mapped Value. Depending on the selection the next field - Vocabulary Synch Record Information - requires additional information. | |||||||||||||||||||||||||||
| Vocabulary Synch Record Information | See notes. | Based on the Vocabulary Synch Type selected, this field instructs EDC where to find those choices.
|
|||||||||||||||||||||||||||
| Common Field | Always set No | Only No is supported | |||||||||||||||||||||||||||
| Multi Picklist | Yes or No |
|
|||||||||||||||||||||||||||
| Answer for Each Study Drug | Always set No | Only No is supported | |||||||||||||||||||||||||||
| Paired to an Item to Form Link | Always set No | Only No is supported |
From Example 2 in the examples section previously, the Re-collection Date custom field properly configured appears as:
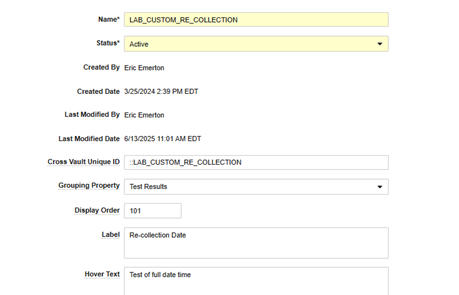
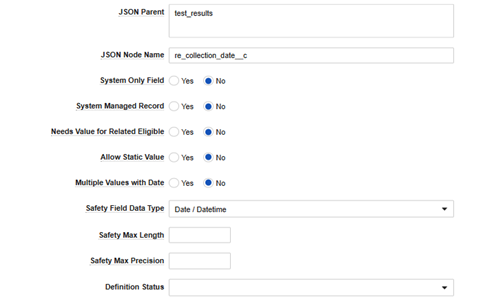

Deploying Custom Fields
- The configuration of Custom Safety Fields in Veeva EDC is performed once in the EDC vault containing your development environment (“control center”).
- To move the configuration from Development vaults to other vaults (Test/UAT, Production, Training), do not re-perform the steps in the downstream vaults.
-
Instead use the Vault Deployment option at Tools > System Tools, with Safety Connector Definitions checked:

- For more information on Vault level deployments in Veeva EDC, see Deploying Vault-level Configuration in System Tools.
Custom Safety Values for Standard & Custom Fields
In Veeva Safety, Vault Picklists or the records of a Controlled Vocabulary object are used to define the available values for specific Standard and Custom Safety Fields (e.g. the available options for Action Taken with drug). The available options can be configured with additional choices beyond the standard set (e.g. adding “Dose interrupted” to Action Taken with drug).
In Veeva EDC, if a field is mapped to a Standard or Custom Field with specified available options on the Veeva Safety side, it will require Value Translations in the Item configuration step.
A field on a Safety Data Type requiring Value Translations can be identified by its Safety Connector Field Definition having the Safety Field Data Type set to Mapped Value. To make newly configured or updated options available in Veeva EDC, the Connection Safety Scan job has to be re-executed. In EDC, Item Definitions of type Codelists or Boolean are usually mapped to these Safety Fields.
Safety Field value updates are configured on Vault level and will apply to both existing and new studies. Implications on existing studies have to be considered.
Example 1
The Action Taken with Study Drug safety field on the Safety Case Initiation Event is an important answer regarding a safety event and the study drugs of the study. Choices for that in Veeva Safety can be supplemented with an additional custom choice, Drug Temporarily Discontinued / Interrupted:
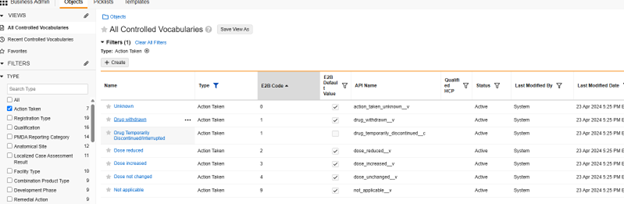
Once the EDC Vault is synchronized with Veeva Safety (next section) the additional choice will appear as a choice in Value Translations of the EDC Item Configurations of study design.
Example 2
The safety field Delivery Method available for Safety Case Initiation Event and Patient Characteristics has three standard choices. A fourth custom choice on that Picklist for Unknown would be configured in Veeva Safety as:
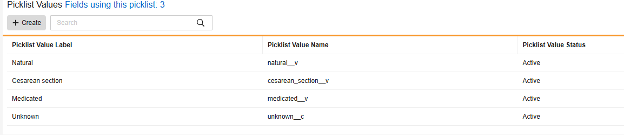
In the same way as example 1, once the EDC Vault is synchronized with Veeva Safety, the fourth choice appears for configuring Value Translations.
Synchronize Custom Safety Values to EDC
There are important considerations regarding custom values:
- Similar to Custom Safety Fields, consult a Veeva representative regarding the planning and steps necessary to successfully configure and best utilize this functionality.
- Implications to existing studies have to be considered.
- Missing synchronization Safety Field choices can lead to the corruption of the data transfer from Veeva EDC to Veeva Safety.
- Updating Custom Safety Field Values might result in validation errors for existing studies, if the values remain without Value Translation in EDC. Updated Value Translations in EDC might result in Follow-Up messages to existing cases.
- For the custom fields, carefully planning the addition or adjustment of Safety Field choices requires careful coordination between the Veeva EDC and Veeva Safety configuration. Also consider program level decisions, involving EDC design teams, Safety users, even possibly members using other Veeva Vault applications (RIM, CTMS, ..).
- The configuration of Custom Safety Fields in Veeva Safety is recommended to precede the configuration in Veeva EDC.
- In Veeva Safety, Vault Owner access is necessary to configure the choices.
- In Veeva EDC, choices are synchronized using a Vocabulary Scan Job at the System Tools > Connections > Safety location
- Configuration on the EDC side of the connection is performed once in the EDC vault containing your development-type environments (“control center”). To move the configuration from Development vaults to Test/UAT, Production, Training , use a vault-level deployment from System Tools, with safety option checked.
To synchronize newly created / updated choices from Veeva Safety to the Veeva EDC Studio screens:
- Navigate to your Connection in System Tools > Connections > Safety.
- Hover over the connection’s Name to show the Scan button.
-
Click Scan.
- In the Scan Vault Safety dialog, click Run Job.
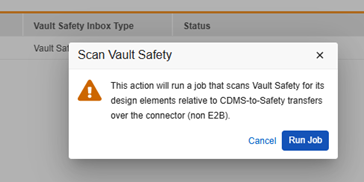
When Vault finishes the job, you will receive an email notification and the value translations choices of all safety fields in EDC study configuration will reflect those from the paired Veeva Safety.
Deploying Custom Values
- Configuration on the EDC side of the connection for custom values is performed once in the EDC vault containing your development environment (“control center”).
- To move the configuration from Development vaults to other vaults (Test/UAT, Production, Training), do not re-perform the steps in the downstream vaults.
-
Instead use the Vault Deployment option at Tools > System Tools, with Safety Connector Definitions checked:
- For more information on Vault level deployments in Veeva EDC, see Deploying Vault-level Configuration in System Tools.
Safety Field Reference (System Generated)
This page lists static and system-generated elements that are sent to Veeva Safety in the Safety Case.
| Safety Field | Data Type | Source | Explanation |
|---|---|---|---|
| Study Label | Text | Static | The Study Label in Veeva EDC. It can be specially overridden using a safety setting. |
| Study Number | Text | Static | The Study Label in Veeva EDC. It can be specially overridden using a safety setting. |
| Date Report Was First Received from Source | Datetime | System Generated | This field captures the date and time when all required fields (Items) are captured for an event. |
| Date of Most Recent Information for This Report | Datetime | System Generated | Indicates the first change made on a given date by a data entry user involving data in the safety case, after the last safety message was sent. For example, if on the same date a user first changes data on a Medical History form at 8 AM, then changes data on the SAE form at 10 AM, and finally links two Concomitant Medication forms at 11 AM, with all changes made to data in the same safety case, the value will be 8 AM on that date in the next scheduled transfer. |
| Reporter's Information | Text | From Site or User Entered | Depending on the study’s option for Reporter (Safety Settings) this will be from the site’s principal investigator. In the Safety-EDC Connection specific EDC form items can be mapped to each piece of the reporter information. When filled out, they override the base site / PI information |
| Identification of the Country Where the Reaction/Event Occurred | Text (2) | From Site or User | 2 character country code for the site’s Study Country. Or, can be mapped on the data entry form for the site to override. (e.g. event occurs when the subject is out of country) |