Moving Subjects
Veeva EDC allows you to move a subject from one Site to another. For example, a subject may relocate and need to switch sites, or they may want to move to a site that is closer to their home or office. From EDC Tools, you can easily move one or more Subjects to a new Site, including all collected data, with a single action.
Snowbird Transfers: Subject moves in EDC are not true snowbird transfers. Vault doesn’t display which Site data was collected at, and it doesn’t track the impact of movement-related timezone changes on any time or datetime data collection Items. Vault only sends closeout PDF notifications to a subject’s current Site (at the time of closeout PDF generation).
Prerequisites
Users with the standard CDMS Lead Data Manager study role can perform the actions described above by default. If your vault uses custom Study Roles, your role must have the following permissions:
| Type | Permission Label | Controls |
|---|---|---|
| Standard Tab | EDC Tools Tab | Ability to access the EDC Tools tab |
| Functional Permission | Manage Amendments | Ability to initiate subject transfers and retrospective amendments from EDC Tools |
If your Study contains restricted data, you must have the Restricted Data Access permission to view it.
Learn more about Study Roles.
How to Move a Subject
You can move a Subject from EDC Tools > Casebook Versions > Active Versions by Site. You can move one, some, or all of the subjects at one Site to another Site within the Study. When you move a Subject, Vault moves that Subject, the subject’s Casebook, and related records to the new Site. If your study is using by_site Subject ID generation and the Subject ID includes the site number in the format, Vault won’t automatically update the Subject ID to reflect the new site number when moving a subject.
To move a Subject:
- Navigate to Tools > EDC Tools > Casebook Versions > Active Versions by Site.
- Locate your subject’s current Site in the listing.
- Click the site’s Site Number to open the Site.
- Select the Subjects you want to move to the other site. You can choose one, some, or all of your Subjects.
- Click Move Subjects or select Move Subject from the subject’s Actions menu.
-
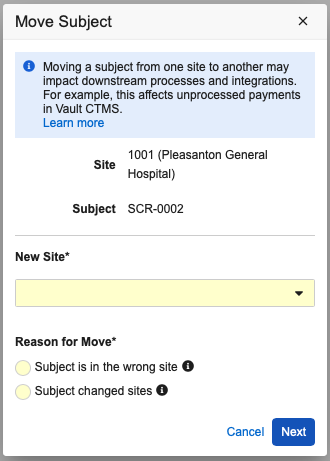
In the Move Subject dialog, select a New Site for your Subject and your reason for moving the Subject.

- Selecting Subject is in the wrong site will remove data for the Subject from the original Site and move the Subject and data to the selected Site. Note that data will not keep a reference to the original Site.
- Selecting Subject changed sites will remove data for the Subject from the original Site and move the Subject and data to the selected Site. This option allows the system to retain a reference to the original Site on existing events, protocol deviations, and procedures.
- Click Next.
- In the confirmation dialog, type MOVE to confirm the Subject move then click Move Subject.
- Vault moves your Subject to the new Site, updating all records and moving the subject’s Casebook. Vault captures this change in the Object Record Audit History in Admin > Logs.
Subject Move Restrictions
You can’t move a Subject when any of the following conditions are true:
- The Study is locked.
- The current or destination Site is locked.
- The subject’s Casebook is locked.
- Events in the subject’s Casebook are locked
- The Active Version for the source and destination Sites do not match. (Note that Vault filters the list of available Sites during transfer to those with matching Active Versions.)

