Locking Studies & Sites
Over the course of your Study, you may need to lock down the entirety of your Study or Site instead of only a Casebook, Event, or Form. Locking a Study or Site puts the Study or Casebooks in the Site in a read-only state until you unlock it. You can lock a Study while in progress for interim analysis, safety issues, or if your study is put on hold, or you can lock your Study after data collection is complete.
Note that locking at the Study- or Site-level prevents data entry into Forms in the Study, but does not change the lock status of the Casebooks, Events, or Forms in the Study. If you want to create a lock entry in the audit trail for the objects in your Study, you must first lock all the Casebooks in the study individually or lock Events and Forms in batches (with Snapshots). Then, after review is complete, you can lock the Study and Sites, and finally generate a Closeout PDF.
Prerequisites
Users with the standard CDMS Lead Data Manager application role and a Security Profile that grants access to the EDC Tools can perform the actions described above by default. If your vault uses custom Application Roles, your role must have the following permissions:
| Type | Permission Label | Controls |
|---|---|---|
| Standard Tab | EDC Tools Tab | Ability to access the EDC Tools tab |
| Functional Permission | Manage Study Milestones | Ability to lock and unlock Studies and Sites, as well as set the Billing Status for study environments from EDC Tools |
If your Study contains restricted data, you must have the Restricted Data Access permission to view it.
Learn more about Study Roles.
How to Lock a Study Environment
To lock a study Environment:
- Navigate to your Study in Tools > EDC Tools > Deployments.
- Locate the Environment you want to lock in the listing.
- Hover over the Environment to show the Actions menu.
-
From the Actions menu, select Study Data Lock.
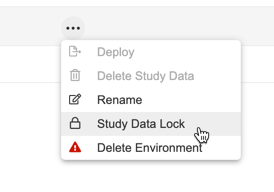
- In the Lock Study confirmation dialog, click Lock.
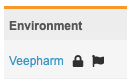
Your environment is now locked. Vault displays a Lock icon () next to the environment in EDC Tools > Deployments.
Disabled Actions in Locked Studies
When a Study is locked, no users can perform any of the following actions:
- Add new Casebooks
- Enter data in Casebooks (CRFs)
- Add new instances of repeating Event Groups, Forms, or Item Groups
- Add new Unscheduled Events
- Provide signatures
- Open, answer, or close queries
- Post queries (Coder)
- Perform SDV or DMR
- Create or update Protocol Deviations
- Perform any coding activities in Veeva Coder
- Update the Site’s casebook version
- Run casebook amendments
- Edit or create new Sites
- Add or remove Study Countries
- (Environments only) Delete the Study Environment
- (Environments only) Deploy the Study Environment into another environment
- (Environments only) Deploy into the locked environment from another environment
- (Environments only) Rename the Study Environment
- (Environments only) Delete study data in the Study Environment
- (Environments only) Restore the Study Environment
Study administrators may still perform the following:
- Initiate the Detail PDF and Data Export jobs
- Export a list of users to CSV
- Add or edit Connections
- Create and edit users and their access
Site and review users may still view audit trails and export PDFs from within the Data Entry and Review tabs.
How to Unlock a Study Environment
To unlock an environment:
- Navigate to your Study in Tools > EDC Tools > Deployments.
- Locate the Environment you want to unlock in the listing.
- Hover over the Environment to show the Actions menu.
-
From the Actions menu, select Study Data Unlock.
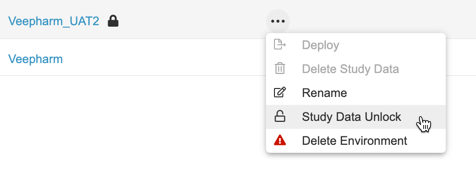
- In the Unlock Study confirmation dialog, click Unlock.
Your study environment is now unlocked, and your data entry users can resume their work.
How to Lock a Site
From EDC Tools > Sites, you can lock or unlock a Site. Locking a Site prevents any and all changes to collected data at that site.
To lock a Site:
- Navigate to EDC Tools > Sites.
- Locate the Site you want to lock in the Site listing.
-
From the Actions menu, select Lock. If the Site you’re locking has open Assessments, click Confirm in the Lock Site dialog.
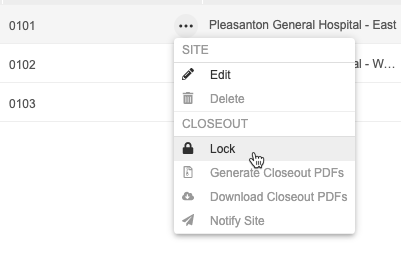
- Optional: In the Lock Study confirmation dialog, select Generate Closeout PDFs to automatically generate closeout PDFs for this site.
- Click Confirm.
Your Site is now locked. Vault displays a Lock icon next to the Site in EDC Tools.
![]()
How to Bulk Lock Sites
To lock multiple Sites at once:
- Navigate to EDC Tools > Sites.
- Locate the Sites you want to lock in the Site listing.
-
Select the Sites you want to lock.
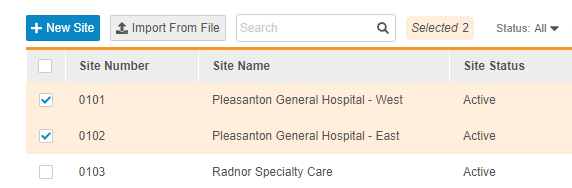
-
Click Lock Site.
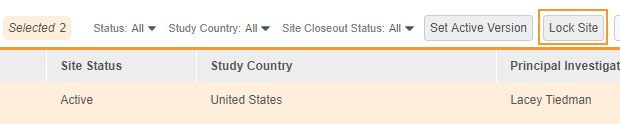
- Optional: Select Generate Closeout PDFs in the Lock Sites dialog to generate closeout PDFs for each site.
- Click Continue.
Disabled Actions on Locked Sites
When a Site is locked, no users can perform any of the following actions:
- Update the Active Version for the Site
- Run amendments in the Site
- Edit the Site record
- Add new Casebooks
- Enter data in Casebooks (CRFs)
- Add new instances of repeating Event Groups, Forms, or Item Groups
- Add new Unscheduled Events
- Provide signatures
- Open, answer, or close queries
- Post queries (Coder)
- Perform SDV or DMR
- Create or update Protocol Deviations
- Update the Site’s casebook version
- Initiate Query Rules jobs
Note that while you will still be able to initiate a Query Rules job, Vault ignores any locked Sites during execution. For example, if your Study includes two Sites, Site A and Site B, and Site A is locked, Vault will only evaluate data for Site B.
Known Issue: If a user attempts to edit an existing Protocol Deviation when the Site is locked, they will receive a server error.
EDC Tools users may still perform the following:
- Initiate the Detail PDF and Data Export jobs
- Export a list of users to CSV
- Add or edit Connections
- Manage Study Countries
- Create and edit users and their access
- Add new Sites to the Study
Site and review users may still view audit trails and export PDFs from within the Data Entry and Review tabs.
How to Unlock a Site
To unlock a Site:
- Navigate to EDC Tools > Sites.
- Locate the Site you want to unlock in the Site listing.
-
From the Actions menu, select Unlock.
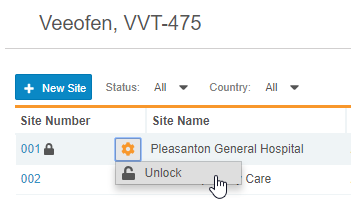
- In the Unlock Site confirmation dialog, click Confirm.
Your Site is now unlocked and can resume data collection.