Browsing Views
Views are virtual tables based on the result set of a CQL statement. A View can combine a View with other Views and Forms to create View Listings. Each view contains rows and columns, where the fields are from one or more real tables in the study database. A View Listing always shows up-to-date data, decorations, and access to the associated queries. Each time you open a view, Workbench recreates the data, using the view’s CQL statement.
You may use views to clean data from at the domain level, for example, cleaning all data related to vital signs. EDC study designers often break out domain data into multiple Forms (for ease in data entry or for maximizing rule efficiency). So, your Study may use Views to collect that data into a single View.
Prerequisites
Users with the standard CDMS Data Manager, CDMS Lead Data Manager, and CDMS Super User study roles can perform the actions described below by default. If your organization uses user-defined Study Roles, your role must grant the following permissions:
| Type | Permission Label | Controls |
|---|---|---|
| Standard Tab | Workbench Tab | Ability to access and use the Data Workbench application, via the Workbench tab |
| Functional Permission | Browse View | Ability to access the Views tab within Workbench and browse Views. Ability to save a View as a Check |
If your Study contains restricted data, you must have the Restricted Data Access permission to view it.
Learn more about Study Roles.
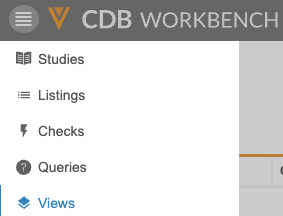
Accessing Views
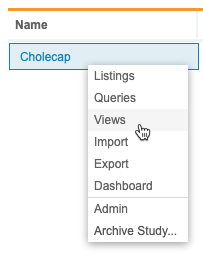
You can access views from the Views area of CDB. You can navigate to the Views area from the Navigation Drawer () or, after you select your Study, from the Study menu () on the Studies page.
|
|
From the Views page, you can click a view’s Title to open the View. You can also open a View from the View menu:
- Navigate to Views for your Study.
- Locate the View that you want to open in the list.
- Hover over the Title to show the View menu.
-
- From the View menu, select Open.
-
Search for a View
You can search for a specific view, using the Title, Category, Objective, Description, and Source columns. This search uses “contains”.
To search:
- Navigate to your Study in Workbench.
-
In the top navigation bar, click Search ().

-
By default, Workbench searches across all object types. You can select and clear checkboxes in the Type drop-down to change which objects Workbench is searching.
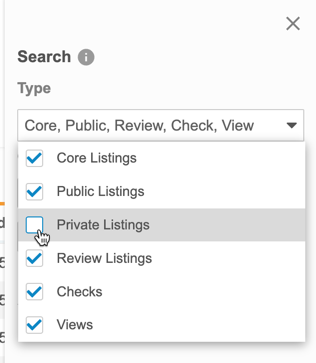
- Select the Column to search. The default is Title.
- Enter your Search Text.
- Click Search or press Enter to search.
- Click the view Title in the Results section to open it.
Workbench shows your search results in the Results section of the Search panel.
Click Close () to close the Search panel.
Sort & Filter the View List
You can sort and filter the Views page by the following columns:
- Title
- Category
- Objective
- Created On
- Created By
- Modified On
- Modified By
- Last Uploaded
If a column already has a sort or filter applied, Workbench shows the Sort icon ( for ascending or for descending) and the Filter icon (filter_list). You can click these in the Column Header to edit the sort or filter. You can also sort and filter columns that don’t already have a sort and filter.
How to Sort
To sort the Views page:
- Navigate to the Views page for your Study.
- Locate the column you want to sort by.
- In that column, hover to show the Sort & Filter button.
- Click Sort & Filter (filter_list).
- Click to expand Sort by.
- Select Ascending or Descending for the sort order.
How to Filter
To filter the Views page:
- Navigate to the Views page for your Study.
- Locate the column you want to sort by.
- In that column, hover to show the Sort & Filter button.
- Click Sort & Filter (filter_list).
- Click to expand Condition.
- Select an Operator. Workbench uses the entered Value and chosen Operator to compare the values within the column. Learn more about the available comparison operators in the CQL Reference.
- If required, enter a Value compare values against. Note that you can only use a static value and not a function. For dates, use the YYYY-MM-DD format or use the calendar picker.
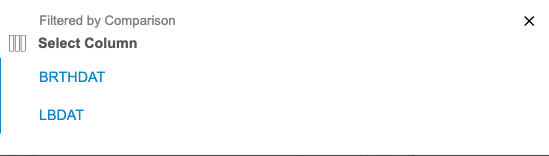
- You can also filter by comparisons. After selecting an Operator, click Compare. Then, you can select from the available columns.
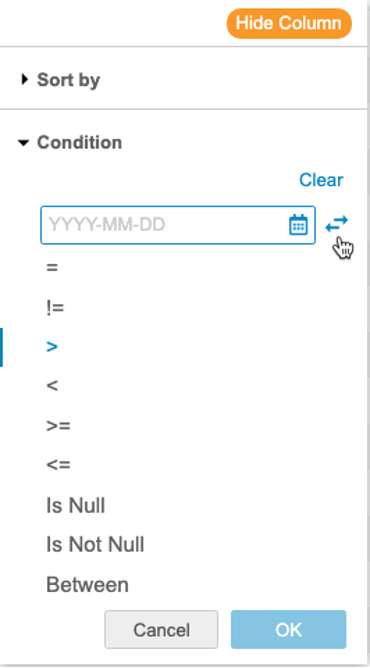
- Click OK.
How to Reset a Filter
To reset (remove) a filter from a column, open the Sort & Filter menu and click Clear.
Hide View Columns
You can hide and show columns as needed without removing them from your view using the Hide Columns option.
This setting persists across the object and Study until you unhide the columns.
CDB represents hidden columns with an orange, dotted line. CDB shows one dotted line for each set of hidden columns (columns next to each other that are all hidden).
To hide a column:
- Navigate to your view.
- Hover over the Column Header to show the Sort & Filter menu (filter_list).
-
Click Hide Column.

- CDB hides the column. Hidden columns are indicated by a dotted orange line. Click Unhide Columns to show all hidden columns.
To hide or show multiple columns:
- Navigate to your view.
-
From the Actions menu (), select Hide Columns.
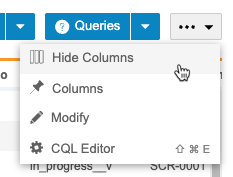
-
In the Show/Hide Columns dialog, you can select columns to show. To hide a column, clear the column’s checkbox. You can click Select All and Clear to select or clear all column checkboxes at once.
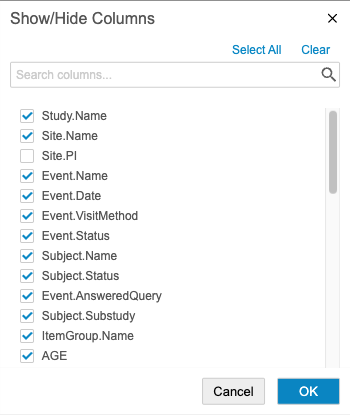
- When finished, click OK.
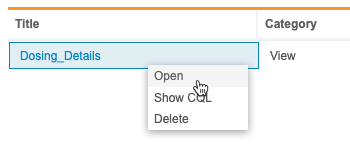
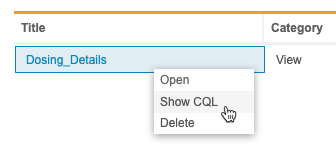
Show the CQL for a View
To show the CQL for a view:
- Navigate to Views for your Study.
- Locate the View that you want to check in the list.
- Hover over the Title to show the View menu.
-
- From the View menu, select Show CQL.
-
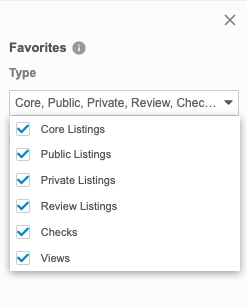
Favorite Views
You can mark viewss as favorites to easily access them later from the Favorites menu.
To mark a views as a favorite:
- Navigate to the views that you want to favorite.
-
Click Add to Favorites ().

- You can now access it from the Favorites menu ().
To remove it from your favorites, click Remove from Favorites (), or click Remove () for it in the Favorites menu.

To access your favorites, click to open the Favorites menu () in the top navigation bar after selecting a Study.

You can click the linked Object Name to open that views.
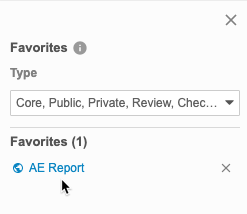
You can filter the list of objects by type.
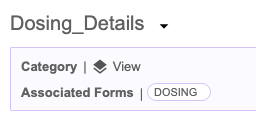
Browsing View Data
View Header
The View page’s header displays the Category and Associated Forms for the view. The Category is automatically set to layers View , and CDB generates the list of Associated Forms based on the Forms referenced in the FROM clause.
Datasheet
Each view represents the results of a CQL query or set of queries. Workbench displays those results in the Datasheet of the view. Depending on the size of the data set, you may have to scroll horizontally to view all data for a row.
Resizing Columns
To set column widths:
- Hover over the line between two columns.
- Click and drag the line to resize the columns.
Pagination
CDB displays up to 50 rows per page in a listing. Use the left and right Arrow buttons to move between pages. To go directly to a page, enter the Page Number and press Enter.
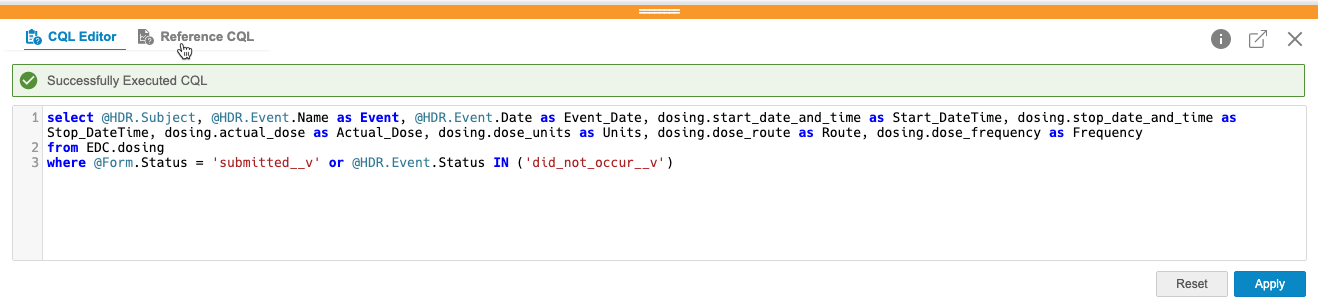
Review CQL in the CQL Editor
You can review the CQL statement for a View in the CQL Editor, as well as the reference CQL statement for the listing the View was created from.
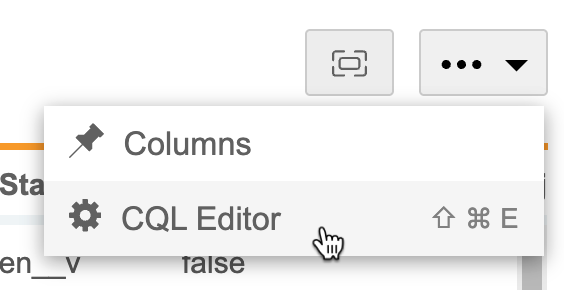
To open the CQL Editor, select CQL Editor from the Actions menu ().
You can drag the orange border of the CQL Editor to change the size of the panel. Click Pop Out () to open the CQL Editor in a separate browser window.
Click CQL Editor and Reference CQL to switch between the two CQL statements in the editor.
Pin Columns in a View
You can pin columns in your view so that those columns remain visible even when you scroll to the right.
To pin columns:
- Navigate to the View you want to work with.
- Click Columns.
- Select a Number of columns to pin. This is a count of columns from the left, the leftmost column being 1.
- Click outside of the Pin Columns menu to close it.
Workbench pins the columns, showing a bolded border on the right side of the rightmost pinned column.
Generate CSV for a View
You can download a view as a CSV file.
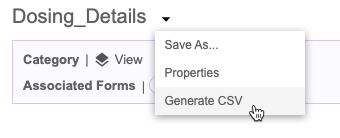
To generate a CSV for a view:
- Navigate to Views for your Study.
- Click to open the View you want to download.
-
- From the View menu (), select Generate CSV.
-
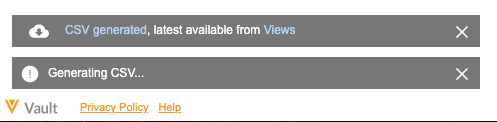
-
- Workbench shows a toast notification at the bottom of the screen when your CSV file is ready to download. Click the CSV generated link to download.
-
Workbench also allows you to download the most recently generated CSV file from the Views listing. Click Download () in the Latest Download column.