Form Configuration
Coder Tools > Study Settings includes a Form Configuration section, which lists the Forms collecting coding data within the selected Study. From here, you can assign Synonym Lists and Do Not Autocode Lists to a Form, enable dictionary-specific fields, and manage dictionary versioning for individual Forms.
Prerequisites
To configure a form in Coder Tools, the Form Definition must exist and be enabled for coding in Studio. You must also first create a Synonym List and Do Not Autocode List to assign them to a form.
Users with the standard CDMS Clinical Coder Administrator study role can perform the actions described above by default. If your vault uses custom Study Roles, your role must have the following permissions:
| Type | Permission Label | Controls |
|---|---|---|
| Standard Tab | Coder Tools Tab | Ability to access the Coder Tools tab |
| Functional Permission | Manage Coder Study Settings | Ability to edit Study Settings in Coder Tools |
If your Study contains restricted data, you must have the Restricted Data Access permission to view it.
Learn more about Study Roles.
s
Accessing Coder Tools
To access the Coder Tools administration area, click the Tools tab in the primary navigation bar, and then click Coder Tools.
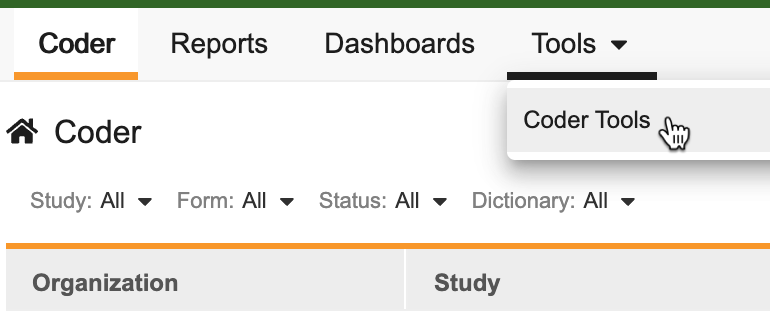
Once in Coder Tools, you can click the sub-tabs to navigate to different areas within.
Configuration Needed to Begin Coding
In order for your organization to begin coding, complete the following configuration tasks:
- Assign a Dictionary to the form
- Optional: Assign a Synonym List to the form (this is required if autocoding from the synonym list)
- Optional: Assign a Do Not Autocode List to the form
- Optional: Configure the form’s coding method
Assign a Dictionary to a Form
Before coders can code on a form, you must assign a dictionary to code from. Your options are limited by the Form Type of the form (WHODrug versions for Concomitant Medication (CM) forms, MedDRA for Adverse Event (AE) and Medical History (MH)).
Dictionary License Validation for Versioning: Before you can update a Form to a version of a MedDRA or WHODrug dictionary that is in Pending Validation status, you must validate the license for that dictionary. New dictionary releases are not be available for assignment until you validate your license. Learn more about Dictionary License Validation.
To assign a Dictionary Release to a Form:
- Locate the Form you want to edit in Coder Tools > Study Settings > Form Configuration.
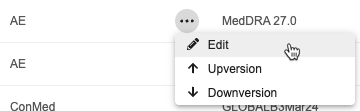
- Hover over the Form to display the Actions menu.
- From the Actions menu, select Edit.
- In the Edit Form dialog, select a Dictionary.
- Click Save.
- In the confirmation dialog, click Confirm.
If there are submitted forms for the Form Definition already in the study, assigning a dictionary to a Form starts the Reconstitute Code Requests job, which creates Code Requests for those submitted forms. If code requests exist for a Form, but no coding has been completed, you can change the dictionary release assigned to the Form.
Changing the Dictionary Release for a Form with Coded Code Requests: If you want to change the dictionary assigned to a form but coding has been completed on code requests for the form, you must use the Uncode action to uncode any code requests that have been coded. Once all coded code requests have been uncoded, you can proceed with changing the dictionary that is assigned to the form.
Assign a Synonym List to a Form
Before Vault can use a Synonym List for autocoding, and before coders can request to add new Synonyms, you must first assign a Synonym List to a coding Form.
To assign a Synonym List to a Form:
- Locate the Form you want to edit in Coder Tools > Study Settings > Form Configuration.
- Hover over the Form to display the Actions menu.
-
From the Actions menu, select Edit.
- In the Edit Form dialog, select a Synonym List.
- Click Save.
- Vault assigns the Synonym List to the Form. Vault now uses this Synonym List to inform autocoding on this Form.
You can edit the Synonym List assignment later.
Assign a Do Not Autocode List to a Form
Before Vault can use a Do Not Autocode List for autocoding, you must first assign a Do Not Autocode List to a coding Form.
To assign a Do Not Autocode List to a Form:
- Locate the Form you want to edit in Coder Tools > Study Settings > Form Configuration.
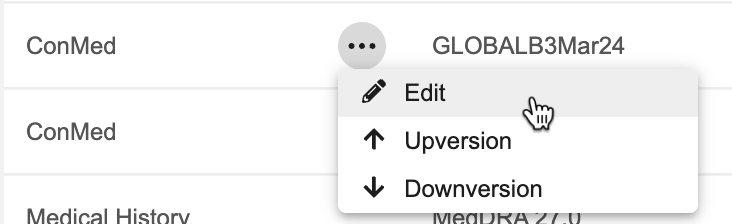
- Hover over the Form to display the Actions menu.
-
From the Actions menu, select Edit.
-
In the Edit Form dialog, select a Do Not Autocode List.
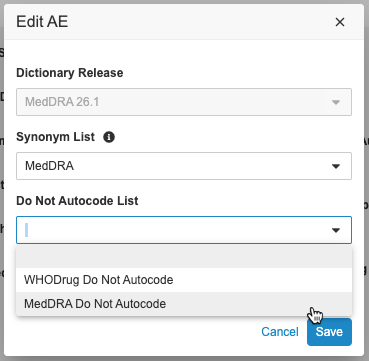
- Click Save.
- Vault assigns the Do Not Autocode List to the Form. Vault now uses this Do Not Autocode List to inform autocoding on this Form.
You can edit the Do Not Autocode List assignment later. Note that if you edit the assigned list, all coded Forms are reset to the Uncoded status.
Upversioning a Form
When a new WHODrug or MedDRA dictionary release is available, you can upversion a Form and the form’s assigned Synonym List to reference that new dictionary version. Upversioning a Form itself and the Synonym List that the Form uses are separate actions, but both are required to update the Form.
Learn more about Dictionary Versioning for details.
Additional Coding Fields for WHODrug Forms
If a WHODrug form is configured to collect values for Indication and Route, you can configure the Form to display those values and use them to inform Code Request groupings.
Indication and Route are configured individually. You can select one, both, or neither of these fields.
Indication
| Enabled (Checkbox selected) |
When the Indication checkbox is selected:
|
| Disabled (Checkbox not selected) |
When the Indication checkbox is not selected:
|
Route
| Enabled (Checkbox selected) |
When the Route checkbox is selected:
|
| Disabled (Checkbox not selected) |
When the Route checkbox is not selected:
|
To enable WHODrug coding fields:
- Navigate to Tools > Coder Tools > Study Settings.
- Click the name of the Study you want to select.
- Locate the Form you want to update in the Form Configuration section.
- Hover over the Form to display the Actions menu.
-
From the Actions menu, select Edit. Veeva EDC opens the Edit Form dialog.
-
Optional: Select the Code with Indication and Code with Route checkboxes.
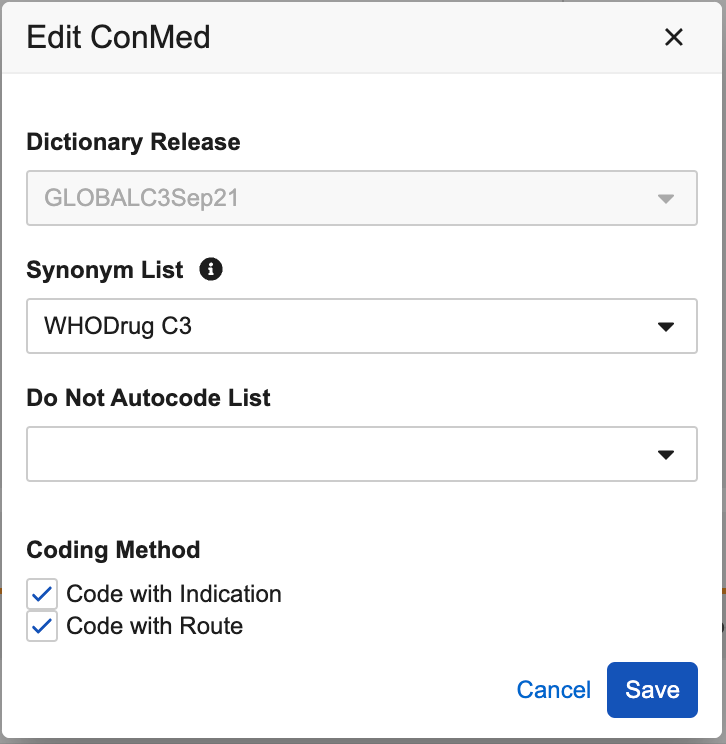
- Click Save.
- In the confirmation dialog, click Confirm.
Enabling SAE Prioritization for MedDRA Forms
If a MedDRA form collects a Seriousness value, you can configure the form to display the collected Seriousness property during manual coding by enabling SAE (Serious Adverse Event) prioritization. Displaying the Seriousness of an adverse event allows coders to easily identify serious adverse events and prioritize them for coding.
| Enabled (Selected) | Veeva Coder displays a Seriousness column in the Code Request Listing page. The Seriousness value also informs how Veeva Coder groups Code Requests in Grouped view. |
| Disabled (Not selected) | Veeva Coder does not display the Seriousness column by default, and Seriousness does not inform the grouping of Code Requests. |
To enable SAE prioritization for a Form:
- Navigate to Tools > Coder Tools > Study Settings.
- Click the name of the Study you want to select.
- Locate the Form you want to update in the Form Configuration section.
- Hover over the Form to display the Actions menu.
-
From the Actions menu, select Edit. Veeva Coder opens the Edit Form dialog.
-
Select the Enable SAE Prioritization checkbox.
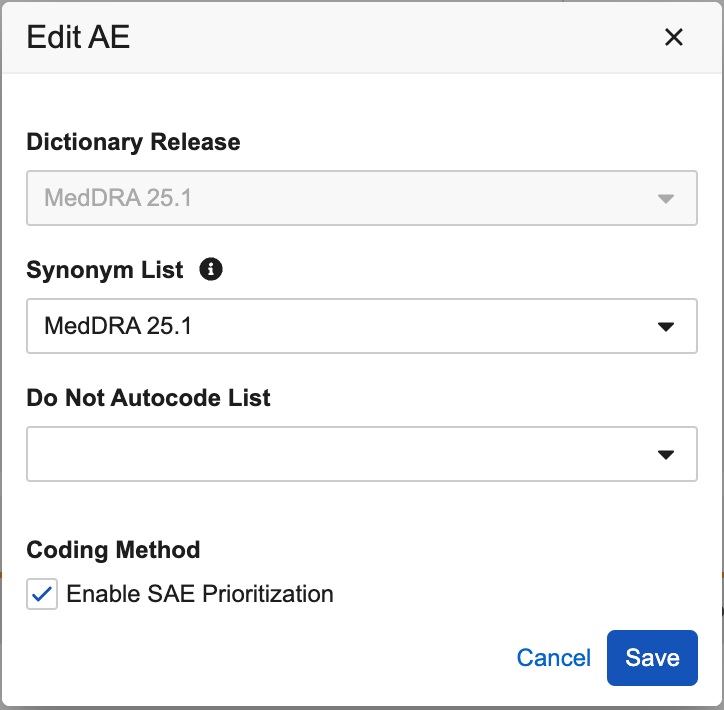
- Click Save.
- In the confirmation dialog, click Confirm.
To disable SAE prioritization for a Form, edit the Form and clear the Enable SAE Prioritization checkbox.