Mask Blinded Data
Prerequisites
Users with the standard CDB Administrator or CDMS Super User study role, or with the Vault Owner security profile, can perform the actions described below by default. If your organization uses user-defined Study Roles, your role must grant the following permissions:
| Type | Permission Label | Controls |
|---|---|---|
| Standard Tab | Workbench Tab | Ability to access and use the Data Workbench application, via the Workbench tab |
| Functional Permission | Configure CDB | Ability to perform configurations in Workbench that apply to all studies from the Configurations area |
If your Study contains restricted data, you must have the Restricted Data Access permission to view it.
Learn more about Study Roles.
About Masking
When you enable the Mask Blinded Data feature, you can use masking configuration to define the display of blinded data. By default, blinded data won’t display anywhere Workbench for users who don’t have access to blinded data (those users without the Restricted Data Access permission).
If you have the Conditional Unblinding feature enabled, that criteria controls which cells of data are masked. This applies to all Studies within the vault.
Masked items in exports will have the character data type, which is reflected in the manifest.json file and as the SAS data type.
In the Workbench UI, masked items show “BLINDED” instead of the item value. You can also choose to have specific values for masked items based on their data type.
How to Enable Mask Blinded Data
To enable the Mask Blinded Data feature in your vault:
- Open Workbench.
- Navigate to Configurations via the Navigation Drawer.
-
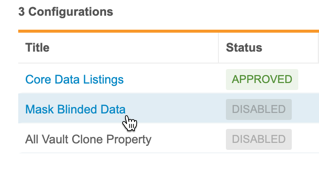
Click Mask Blinded Data to open that configuration area.
- Switch the enablement toggle to On.
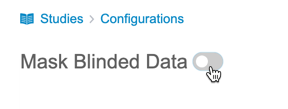 This enables the feature and shows the Define Masking Areas options.
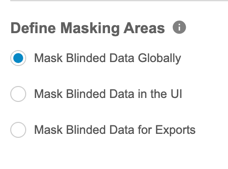
 - Select your masking areas:
- Mask Blinded Data Globally: Apply masking to blinded data in both the Workbench UI and in export packages.
- Mask Blinded Data in the UI: Apply masking to blinded data in only the Workbench UI. With this option, there is no masking in export packages.
- Mask Blinded Data for Exports: Apply masking only in export packages. With this option, there is no masking in the Workbench UI.
- Optional: Select Enable data type-specific masking to enable masked values that are specific to different data types.
- Click Save.
Masking selections are reset upon disabling the feature.
When Data Type Specific Masking is enabled, DQS uses the following for masking data:
| Data Type | Masked Value |
|---|---|
| Text | "BLINDED" (String) |
| Boolean | "BLINDED" (String) |
| Date | Jan 1, 1583 |
| Datetime* | Jan 1, 1583 12:00 AM |
| Time | 00:00:00 |
| Integer | -2147483648 |
| Decimal | -9999.9999 |
*For datetime-type items, enabling data type masking converts the data type to datetime19 in any SAS export files.
Known Issue: The mask for decimals (-9999.9999) is rounded to -10000 in review listings.