Importing Veeva EDC Data
With Veeva Clinical Data, data from Veeva EDC flows incrementally into Veeva CDB. In CDB Workbench, CDB creates a Core Listing for each Form in your study. Each time you run this job, CDB updates the data within to reflect that in EDC.
Prerequisites
Users with the standard CDMS Lead Data Manager study role or the Vault Owner security profile can perform the actions described below by default. If your vault uses custom Study Roles, your role must have the following permissions:
| Type | Permission Label | Controls |
|---|---|---|
| Standard Tab | EDC Tools Tab | Ability to access the EDC Tools tab |
| Functional Permission | Manage Jobs | Ability to create, edit, and delete scheduled jobs |
| Functional Permission | View Import | Ability to access the Import page |
| Functional Permission | Download Import Package | Ability to download import packages |
If your Study contains restricted data, you must have the Restricted Data Access permission to view it.
Learn more about Study Roles.
Importing the Data in Workbench
With incremental import, CDB imports your study data from Veeva EDC every fifteen (15) minutes for new data. This happens automatically, without any action required from the user. Data from Veeva EDC is normalized at the form level.
Study design changes are loaded once a day at 00:00 GMT. If a design change is detected, all incremental refreshes are paused until 00:00 GMT when the latest study design is loaded.
These incremental import packages include the following data:
- Study properties
- Site properties
- Subject properties
- All casebook data
- Queries
- SDV Status
- DMR Status
CDB creates a Core Listing for each Form in your Study. A Core Listing contains the following columns, but note that an administrator may have configured your Study to have different core listing columns:
- Study.Name
- Site.Name
- Site.PI
- Event.Name
- Event.Date
- Event.Status
- Subject.Name
- Subject.Status
- A column for each Item on the Form
When import is finished, Workbench sends you, as well as any other users subscribed to the Source, an email notification. If the reprocessing of a package results in a change from the previous load, Workbench will also send a notification to you and users subscribed to that Source.
When there is a change to your study’s design or a load error, CDB will pause the incremental imports (every 15 minutes). When this occurs, CDB displays a banner indicating this on the Import page.
View Sources & Import Packages
You can review the Sources for your Study and any associated import packages from the Import page.
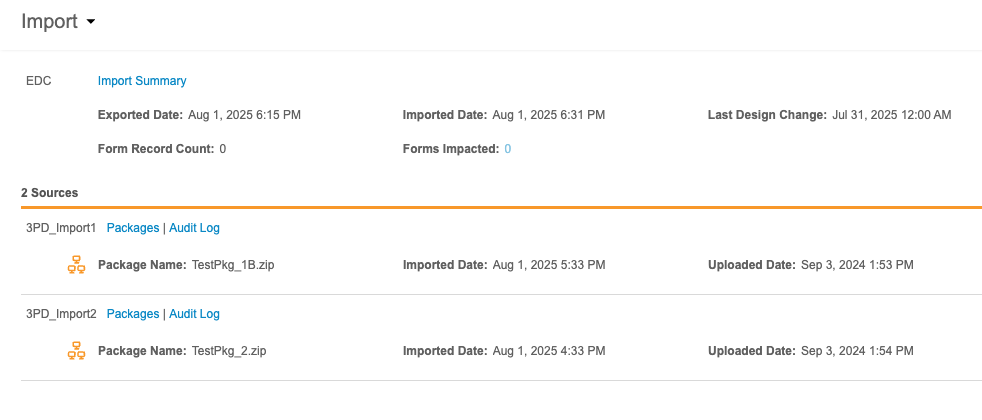
At the top of this page is the import information for the Primary Source, whether that source is Veeva EDC or a third party EDC system. This header includes the following information:
- A link to download the Import Summary
- Exported Date (the date this data was exported from the EDC system)
- Imported Date (the date this data was imported into Workbench)
- Last Design Change (the date and time of the last study design/protocol change in the EDC system)
- Form Record Count (the number of form records impacted by newly imported package)
- Forms Impacted (the number of forms impacted by newly imported package)
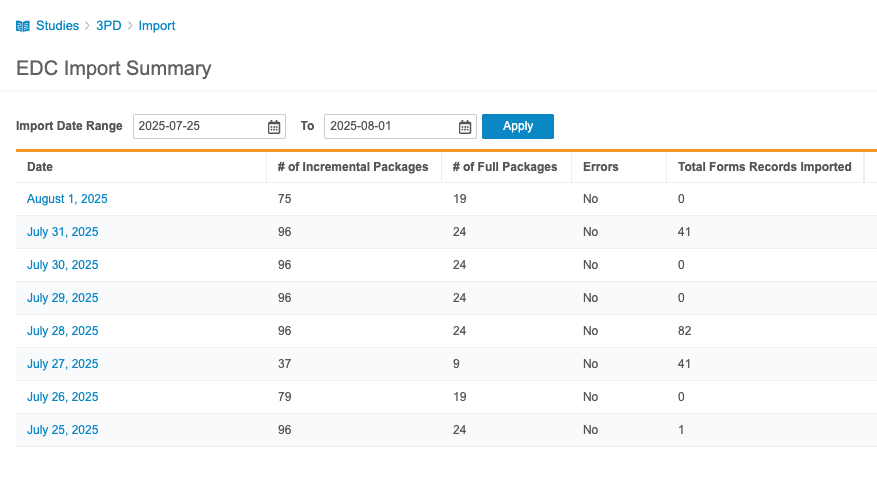
The Import Summary summarizes all incremental loads from the Veeva EDC. It includes the following information for each day:
- Date
- # Number of Incremental Packages (the number of incremental packages imported during this day)
- # Number of Full Packages (the number of full packages imported during this day)
- Errors (Indicates with “Yes” or “No” if there were errors encountered during import)
You can filter this list by Import Date Range.
Click on a Date to review all packages for that day. For each import package, Workbench includes the following information:
- EDC Exported Date
- Uploaded Date
- Imported Date
- Full Load (true/false checkbox)
- Total Form Records Imported
- Status
- Details
Viewing Import Status
You can check the status of your import package from Import > Packages. This page lists the status of every import package, from both Vault EDC and third party tools. You can also download import packages and issue logs (errors and warnings) from this page.
Complete Status: For an import package to move into the Complete import status, a Workbench user in your Study must open a listing. Otherwise, the import stays in the In Progress status. If your Study has the auto swap feature enabled, this isn’t required. This is the case for all incremental and OpenEDC studies, as they have the auto swap feature enabled by default.
Users without the Restricted Data Access permission can download the import package log, but they can’t download the data file. Users with Restricted Data Access can download a package with blinded data.
Filtering
You can easily filter the list to show only complete or failed imports using the Import Status Filters. Click Error to show only failed imports, or click Complete to show completed imports.
Reprocessing
Workbench automatically reprocesses production third party data packages that contain the recoverable warning codes listed below 24 hours after the import or last reprocess time.
- D-002: Site not found
- D-003: Subject not found
- D-004: Event not found
The presence of these codes means that individual rows in the data file could not be imported because a match to the Primary Source was not found.
Workbench does not reprocess packages with other warning or error codes because the reprocess looks for newly entered data from the Primary Source, and only the above warnings can resolve via newly entered data. Note that automatic reprocessing is only for production environments, not TST, TRN, or VAL (even if they have the above warnings).
Workbench Import Statuses
When an import package is able to import with only warnings, Workbench highlights the status in orange to indicate that there are warnings. When import finishes, you can download the issue log to review the warnings.
| Status | Description |
|---|---|
| Queued | The package is in the processing queue. There is a package ahead of this one in line that also contains changes, and this package is waiting for a paused package to be approved or rejected. |
| Paused | CDB detected a change in the manifest, and so import is paused until you approve or reject the package. |
| Approved | The change in the manifest was approved. CDB will now import the package. |
| Rejected | The change in the manifest was rejected. |
| Skipped | The package was skipped and not imported. Another package was imported for the Source before this package was processed. This status can only apply to third party packages. |
| In Progress | The import process has begun for this package, and Workbench has not identified any errors or warnings. |
| In Progress (with warnings) | The import process is ongoing, but Workbench has identified a warning. |
| Error | Import failed because there are one or more errors in the import package. Download the issue log and review the errors. |
| Complete | Workbench imported the package successfully, with no errors or warnings. |
| Complete (with warnings) | Workbench imported the package successfully, but there are one or more warnings. Download the issue log and review the warnings. |
| Not Imported | Workbench skipped this package because a newer package for the same source was uploaded before processing began. When a package enters the Not Imported status, Workbench also replaces the processing date with “Replaced”. |
| Reprocess in Progress | Workbench has begun reprocessing this package because a new package from another source was imported. |
| Reprocessed Complete | Workbench finished reprocessing this package with no errors or warnings. |
| Reprocessed Complete (with warnings) | Workbench finished reprocessing this package, but there are one or more warnings. Download the issue log and review the warnings. |
| Reprocessed Error | Reprocessing failed because there are one or more errors in the import package. Download the issue log and review the errors. |
Download the Import Package
To download the import package:
- Navigate to Import for your Study.
- Locate your Source in the source list.
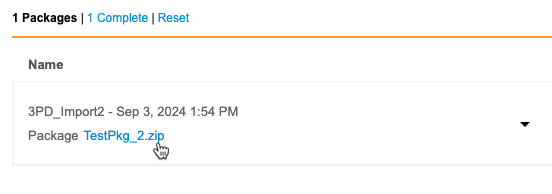
- Click Packages to open the Packages page for your Source.
- Locate your import package in the list.
- Extract the files from the ZIP folder and view them in a tool of your choosing.
Download the Logs
You can download the Import Log (CSV) for any import and the Issue Log (CSV) for an import that fails. The Import Log lists details about the import job and the data ingestion into Workbench.
The import log lists the following:
- Transformation Start Time
- Transformation Completion Time
- Transformation Duration
- Import Start Time
- Import Completion Time
- Import Duration
To download the import log:
- Navigate to Import for your Study.
- Locate your Source in the source list.
- Click Packages to open the Packages page for your Source.
- Locate your import package in the list.
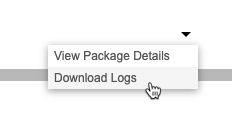
- From the Package () menu, select Download Logs.

Issue Log
The Issue Log lists all errors and warnings that Workbench encountered while importing the package.See a list of possible errors and warnings here.
To view the issue log:
- Navigate to the Packages page for your Source.
- Locate your import package in the list.
- From the Package () menu, select View Package Details.
- In the Package Details panel, click Issues.
- Optional: In the Issue Log panel, click Download () to download a CSV of the log.
To download the issue log without first viewing it in the application:
- Navigate to the Packages page for your Source.
- Locate your import package in the list.
- From the Package () menu, select Download Logs.
Restricted (Blinded) Forms
In Veeva EDC, study designers can mark Forms as Restricted. This means that all Items on the Form are also Restricted.
For users who have access to restricted data (typically lead data managers), restricted data behaves the same way as unrestricted data. For blinded users (users without the Restricted Data Access permission), the following behavioral rules apply to any imported restricted data:
- If an Item (column) is restricted:
- The CQL projection doesn’t return the restricted item’s column.
- The CQL projection doesn’t return any derived columns that reference the restricted item.
- If a blinded user references the restricted Item in their CQL statement, CQL still doesn’t return the column.
SHOWandDESCRIBEdo not return the restricted Item.
- If a row is restricted:
- The result set doesn’t return any rows from the Form or Item Group.
- If a listing file (csv) is restricted:
- The default
@HDRcolumns are included in the listing, but no Item columns are included.
- The default
- If a Source (package) is restricted:
- CQL doesn’t return any Items or column results from the restricted Source in any listing.
- CDB marks all Item Definitions, Item Group Definitions, and Form Definitions within the Source as restricted.
- All data rows are marked as restricted.
- The default @HDR columns will still appear in the core listings.
Core Listings from EDC Import
Workbench automatically generates a Core Listing for each unique Form in a Study. The default CQL query for these listings is:
SELECT @HDR, * from source.filename
For example, if a Study contains a Chemistry form and a Hematology form, CDB creates two Core Listings: Chemistry and Hematology, using these queries:
| Chemistry |
|
| Hematology |
|


