Performing Actions on Listings
You can perform various actions on data listings, including opening, responding to, and closing queries and observations, and setting and managing review statuses in Review Listings. Responding to and closing queries can also be done in query listings. Data listings created with only header fields do not support queries or observations.
Prerequisites
Users with the CDMS Lead Data Manager and CDMS Data Manager standard study roles can perform the actions described below automatically. If your organization uses custom Study Roles, your role must grant the permissions listed in the table below.
Users with the CDB Data Provider study role, or roles based on it, must have access assigned to listings by Source from Admin > Users, in order to answer non-EDC queries for a given data source.
| Type | Permission Label | Controls |
|---|---|---|
| Standard Tab | Workbench Tab | Ability to access and use the Data Workbench application, via the Workbench tab |
| Functional Permission | API Access | Ability to access and use the Vault EDC API. (This permission is also required to use CDB.) |
| Functional Permission | Open Query | Ability to create new (open) queries and comment on queries without moving them into the Answered status |
| Functional Permission | Close Query | Ability to close queries |
| Functional Permission | Answer 3rd Party Queries | Ability to answer queries on third party data items in Workbench |
| Functional Permission | View All CDB Query Listings | Ability to view all query listings |
| Functional Permission | View All Listings | Ability to view all listings |
| Functional Permission | Create Observation | Ability to create new observations. |
| Functional Permission | View Observation | Ability to view observations. |
| Functional Permission | Close Observation | Ability to close observations. |
| Functional Permission | Reply Observation | Ability to reply to observations and set their status as pending and/or open. |
If your Study contains restricted data, you must have the Restricted Data Access permission to view it.
Learn more about Study Roles.
Availability: Clinical DataBase (CDB) is only available to CDB license holders. Contact your Veeva Services representative for details.
Query Actions
Queries are used to track inquiries into entered data for Items and Event Dates. Query actions of opening, responding to, and closing queries can be performed either individually or in batches. The batch option allows action on up to 100 queries simultaneously. For example, 100 queries can be generated in a batch containing the same query text.
The following items are eligible for query actions:
- EDC Event Dates
- EDC Form Items
- Non-EDC Form Items
You can’t create, respond to, or close queries on locked form Items or Event Dates.
When performing query actions, you can select any cell that references a single Event Date or Form Item, including those that are part of a univariate function (for example, date format, union, and subquery). Queries are associated with the referenced Event Date or Form Item.
If a cell references more than one Item or Event Date, or doesn’t reference either, the cell details panel will not open.

Quick Queries
A quick query is a standardized message that can be used by data managers when creating queries. Quick queries simplify the querying process by offering a streamlined option to confirm data values as entered while still allowing for custom messages. Quick queries support both individual and batch manual query creation and automated creation with CDB Checks. You can also configure a listing-defined quick query. This is a listing-specific quick query for a given item in your listing.
Opening a Query
You can create two types of queries: quick queries (confirm value or listing defined) and custom queries. The custom option allows you to enter custom text, while quick queries provide a standardized message. You can also add custom text to the quick query standardized message.
To open a single query:
- Navigate to the listing.
- Click the Cell where you want to open a query.
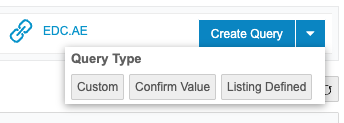
- Click Create Query in the Cell Details panel.
-
Choose the Query Type (Custom, Confirm Value, or, if available, Listing Defined).
- For the Custom query type, enter the message in the text field. For the Confirm Value or Listing Defined query types, you can leave the standardized message unchanged or edit the text. You can include column values in your query message. Select a Column in the Insert column data drop-down menu to insert a token for that column. Workbench will dynamically insert that column’s value in place of the token for the query message.
- Click Save.
To open queries in a batch action:
- Navigate to the listing.
- Select the Checkboxes for the rows you want to query.
- Optional: To select all rows on the current page, select the Select All checkbox.
- Click the Queries dropdown and select Create.
- From the Create Query on dropdown menu in the Cell Details panel, select the column that you want to create a query on.
-
Choose the Query Type (Custom, Confirm Value, or, if available, Listing Defined).
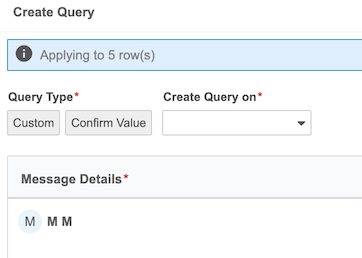
- For the Custom query type, enter the message in the text field. For the Confirm Value or Listing Defined query types, you can leave the standardized message unchanged or edit the text. You can include column values in your query message. Select a Column in the Insert column data drop-down menu to insert a token for that column. Workbench will dynamically insert that column’s value in place of the token for the query message.
- Click Submit.
Use CDB Checks to automatically create and close queries based on a defined set of criteria.
Responding to a Query
You can respond to queries on EDC and third party data with a message. Your response displays in the Query Details and Cell Details panel, as well as the Last Message column of the listing. Query messages are displayed in chronological order, from oldest to newest.
To respond to a query:
- Navigate to the listing.
- Click the Cell containing the query.
- Click Answer Query.
- Enter a message.
- Click Save.
The system adds your query message to the query.
Query Status: When a user with Open Query permission responds to a query, the query status updates to Open. If a user only has the Answer Query permission (i.e., not Open Query permission), the query status is set to Answered. In other words, responses from Data Managers always set the query status to Open, while responses from Site users set the query status to Answered.
Closing a Query
Once a system or manual query is resolved, you can close queries on EDC and third party data from the Cell Details panel. Note that you can’t close a query when the related data Item or Event Date is locked.
To manually close a query:
- Navigate to the listing.
- Click the Cell containing the query.
- Optional: Enter a message.
- Click Close.
To close multiple queries in a batch action from a data listing:
- Navigate to the listing.
- Select the Checkboxes for the rows containing queries you want to close.
-
- Optional: To select all rows on the current page, select the Select All checkbox.
-

-
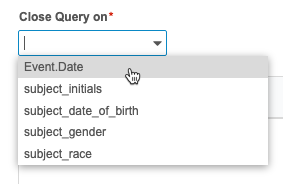
- Click Queries > Close. This opens the Close Query panel.
-
-
- For Close Query on, select either the Event Date or the Item that you want to close queries on.
-
-
- Optional: Enter a query message in Message Details.
-

- Click Close.
The system can automatically close queries created by EDC Rules or CDB Checks based on a defined set of criteria.
Tracking Queries with Summary Links
Every listing with queries offers summary links near the top of the page. You can click these links to go to the All Queries page, which is filtered to show only the queries created from that specific listing. Links are grouped by status: Open, Answered, and Closed.

Observation Actions
Before generating a query, discrepancies must be reviewed by the data management team and/or discussed across various teams. Observations allow data managers to collaborate with colleagues before generating queries.
You can create observations on Form Items, single-function Form Items, and Event Dates using EDC or third party data. Observations are visible wherever the Item is displayed, so the observation follows the data in Core, Review, and Custom data listings.
An observation decoration appears in each cell that contains at least one associated Open or Pending observation. Observations remain in the listing even if the cell value changes.

Creating Observations
You can create an observation individually or in a batch action. Creating an observation moves it to the Open status.
To create an observation individually:
- Navigate to the listing.
- Click the Cell where you want to create an observation.
-
From the Observations tab, click Create Observation.

-
Choose a category from the dropdown menu (Mismatch, Out of Range, or Unexpected).
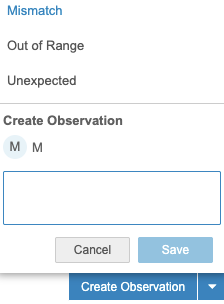
- Enter your observation details.
- You can include column values in your observation details. Select a Column from the Insert column data drop-down menu to insert a token for that column. You can include multiple tokens in one observation. Workbench will dynamically insert that column’s value in place of the token for the observation message.
- Click Save.
To create multiple observations in a batch action:
- Navigate to the listing.
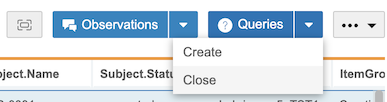
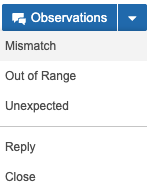
- Click Observations in the upper-right navigation bar.
-
Choose a category from the dropdown menu (Mismatch, Out of Range, or Unexpected). Your selected category is displayed above the listings.
-
Click the Cells where you want to create an observation.
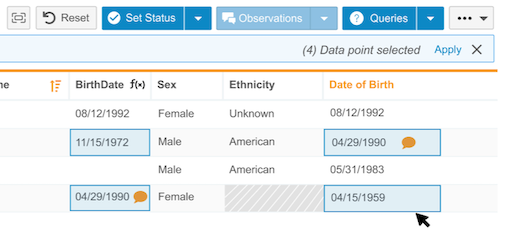
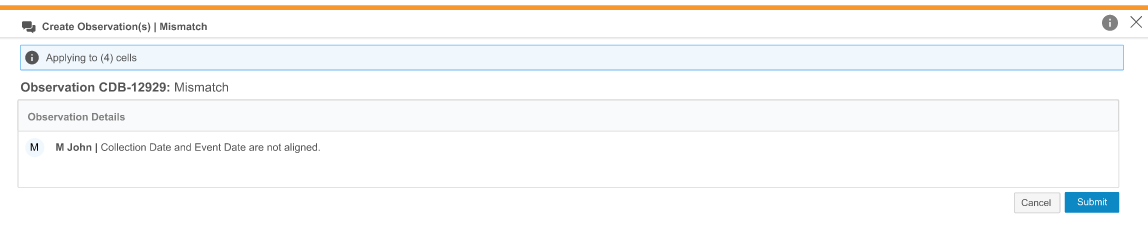
- Click Apply.
- Enter your observation details.
- You can include column values in your observation details. Select a Column from the Insert column data drop-down menu to insert a token for that column. You can include multiple tokens in one observation. Workbench will dynamically insert that column’s value in place of the token for the observation message.
- Click Submit.
You can’t create, respond to, or close observations on locked Form Items or Event Dates.
Assigning Observations
Users with View All Listings and View Observations permissions can be assigned to an observation. Assigning observations allows for tracking multiple reviews, questions between colleagues on a data item, or other collaboration.
To assign a user from the Observations page:
- Click the Row containing the observation.
- From the Observation Details panel, click Reply > Assign.
- Select the user’s name from the Assign dropdown menu.
-
Enter a message in the Message field.
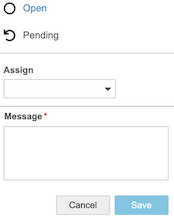
- Click Save.
Responding to an Observation
You can respond to an observation in the Observations tab. Responding to an observation changes the status to Open or Pending, depending on your selection.
To respond to an observation:
- Navigate to the listing.
- Click the Cell containing the observation.
- Click Reply.
- Optional: Set the status of the observation to Open or Pending.
- Enter a message.
- Click Save.
Closing an Observation
You can close an observation individually or in a batch action. Closing an observation moves it to the Closed status. Observations can be closed when Open or Pending.
To close an observation individually:
- Navigate to the listing.
- Click the Cell containing the observation.
-
Click Close.
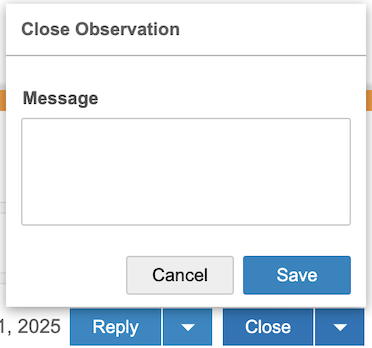
- Optional: Enter a message.
- Click Save.
To close multiple observations in a batch action:
- Navigate to the listing.
- Click the Cells containing the observation.
- Click Close.
- Optional: Enter a message.
- Click Save.
Exporting Observations
You can export all observations and observation messages in your study as a CSV file. The CSV file contains the same columns as the observation listing, and any sorting or filters you apply in the listing also apply to the exported list.
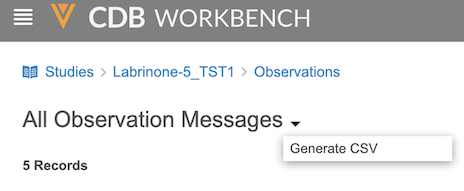
To export observations:
- Navigate to the Observations page for your Study.
- Click the Title of the observation listing you want to export.
-
From the Observations menu, select Generate CSV.
- To download the CSV file, refresh the page and click the Download CSV icon () at the top right of the page.
Tracking Observations with Summary Links
Every listing with observations offers summary links near the top of the page. You can click these links to go to the All Observations page, which is filtered to show only the observations created from that specific listing. Links are grouped by status: Open, Pending, and Closed.
Protocol Deviations
You can create a PD one at a time or you can create multiple PDs at once with the same categorization. Learn more about protocol deviations.
Create a Protocol Deviation
You can create a PD one at a time or you can create multiple PDs at once with the same categorization.
You can create a PD at the Subject, Event, Form, or Item level.
- For a Subject-level PD, create the PD on the Subject.Name.
- For an Event-level PD, create the PD on the Event.Date.
- For a Form-level PD, create the PD on the Form.Name.
- For an Item-level PD, create the PD on the Item.
To create a single PD:
- Navigate to the listing in which you want to create a PD.
- Locate the Cell containing the data point you want to create a PD against.
- Click the Cell to open the Cell Details panel.
-
If needed, click Protocol Deviations to open that tab in the panel.

-
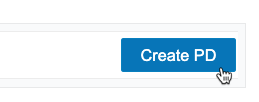
Click Create PD.
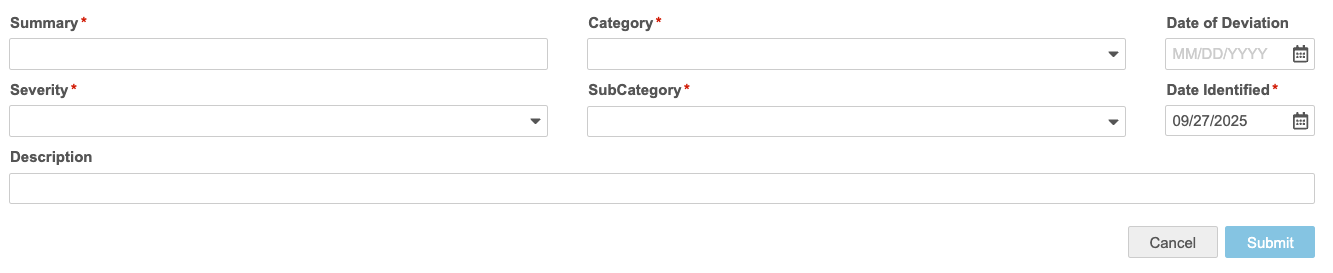
- Fill out the details of your PD:
- Create Protocol Deviation on: Select a column to create your PDs on.
- Summary: Provide a summary explanation of your PDs.
- Category: Select the category for your PDs.
- Date of Derivation: Enter or select the Date of Derivation. This is the date that the derivations occurred.
- Severity: Select the severity of the PDs.
- SubCategory: Select the SubCategory of the PDs.
- Date Identified: Enter or select the Date Identified. This is the date that the derivations were identified (this may occur at or after the Date of Derivation).
- Description (Optional): Enter a description of your PD.
- When finished, click Submit.
To create PDs in bulk:
- Navigate to the listing in which you want to create PDs.
-
Click PDs.

-
Click Create.

-
Select the Rows (checkboxes) on which you want to create PDs.

- Click Apply.
- In the Protocol Deviation Action panel, enter the details of your PD. This includes identifying which column to create the PD on.
- Create Protocol Deviation on: Select a column to create your PDs on.
- Summary: Provide a summary explanation of your PDs.
- Category: Select the category for your PDs.
- Date of Derivation: Enter or select the Date of Derivation. This is the date that the derivations occurred.
- Severity: Select the severity of the PDs.
- SubCategory: Select the SubCategory of the PDs.
- Date Identified: Enter or select the Date Identified. This is the date that the derivations were identified (this may occur at or after the Date of Derivation).
- Description (Optional): Enter a description of your PD.
- When finished, click Submit.

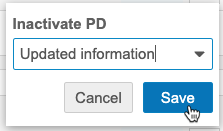
Inactivate a Protocol Deviation
You can inactivate PDs. Inactivating a PD indicates that no further action is required or that it no longer applies. By default, there are two Change Reasons for inactivation: Updated information and Self-evident correction.
To inactivate a PD:
- Navigate to the PD that you want to inactivate.
- In the Protocol Deviation details, click Inactivate.
-
Select a Change Reason.
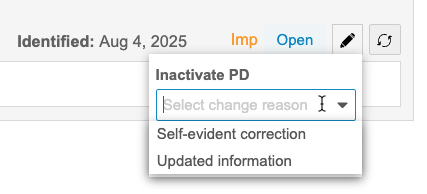
- Click Save.
Review Listings
All query actions can also be performed in Review Listings, which provide an additional layer of query review. You can set and view record statuses and provide reasons for each status. A row’s status can be set individually or in batches and filtered by review and query status. Statuses include In Progress, Reviewed, Unreviewed or as having a Known Discrepancy.