Entering Data
Veeva EDC collects data using case report Forms. These Forms contain data collection Items (also known as “fields” or “controls”). These Items are questions that you answer within the Form.
Prerequisites
Users with the standard CDMS Principal Investigator, CDMS Sub Investigator, and CDMS Clinical Research Coordinator application roles can perform the actions described above by default. If your vault uses custom Application Roles, your role must have the following permissions:
| Type | Permission Label | Controls |
|---|---|---|
| Standard Tab | Data Entry Tab | Ability to access the Data Entry tab |
| Functional Permission | Data Entry | Ability to enter study execution data |
If your Study contains restricted data, you must have the Restricted Data Access permission to view it.
Learn more about Study Roles.
Types of Fields
Each Item object record includes an item control. An item control is the type of field in which you enter data. Click into a control field, and then select or type to enter data. You’ll see more details about each type of control on the next step.
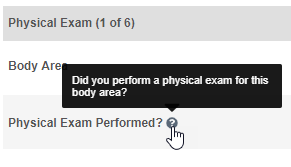
Depending on your study’s design, certain Items may have a tooltip. When you hover over the Information (i) icon, Vault displays help content for that item field.
See the Data Collection Item Types reference for a list of item types and how to enter data into each type.
Unknown Dates & Times
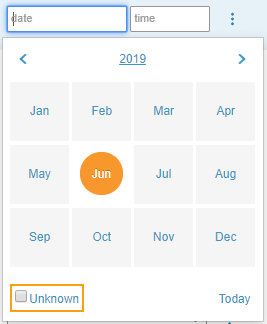
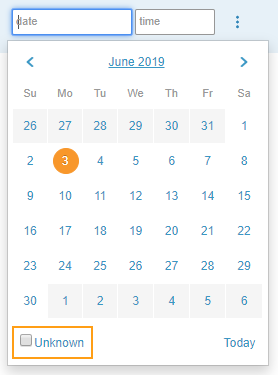
Depending on your study’s design, you may be able to mark dates (either the month and day or only the day) and times as unknown. For example, if a subject does not recall the time they took an over-the-counter medication, you can select the date and mark the time as unknown.
| Entering Unknown Dates & Times | |
|---|---|
| To mark a month as Unknown, select the Unknown checkbox instead of a month while selecting a date in the calendar. |
|
| To mark a day as Unknown, select the Unknown checkbox instead of a day while selecting a date in the calendar. |
|
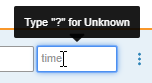
| To mark a time as Unknown, enter a single “?” (question mark) or “UN:UN” in the Time field. |
|
How to Open a Form
To open a Form:
- Navigate to the subject’s Casebook using the listing pages or the breadcrumb menu.
- Locate the Form you want to open in the casebook schedule.
- Click the Form name to open it.
Depending on when your study was created, the Form may open in the Form Panel to the right of the casebook schedule, or in a new page.
How to Fill a Form
To fill a Form:
- Navigate to the Form within the subject’s casebook.
- Click the Form to open.
- Begin filling the form’s fields. Vault saves your changes as you move from field to field.
- Optional: If you didn’t collect data for a certain Item, you can mark it as Intentionally Left Blank. See details below.
- When finished, click Submit.
Clicking Submit does not save data. Vault automatically saves data as you fill the Form. Clicking Submit indicates that you are finished entering data, and that the Form is ready for review, moving the Form into its Submitted status.
How to Edit a Completed Form
If needed, you can edit data after you have completed a Form. Editing a Form moves it from the Submitted status into the In Edit status. The Form remains in that status until you complete it again.
To edit a completed Form:
- Navigate to the Form within the subject’s casebook.
- Click the Form to open.
- Click Edit Form. This returns the Form to the In Progress status.
- Select a Reason for Change. Depending on your study’s design, you may be able to select Other (please specify) and enter your own reason. While the Form is In Edit, the Reason for Change remains visible in a dropdown under Items that have been edited.
- Make your changes.
- When finished, click Submit.
After the edited Form has been submitted, Vault shows the following Data Changed icon on any Items that you edited. You can hover over this icon to view the Reason for Change.
![]()
Reason for Change
Whenever you make a data change after submitting a form, you must include a Reason for Change. This note is included in the audit trail entry associated with your data change. Once you click the Edit Form button, Vault opens a dialog from which you can select a Reason for Change. Then when editing an individual item, the Reason for Change drop-down displays below the field. The value you selected after clicking Edit Form is the default option in this drop-down. You can select another value.
Vault records both Reason for Change selections in the field audit trail.
Adding Forms & Item Group Sections
Depending on your study design, you may be able to add new Forms and Item Groups to certain events in a casebook. For example, you may have a Medical History form, and you can add forms for each medical history event that you need to record for the subject. You may also have a repeating Body System Exam item group on a Physical Exam form. You can create a new Item Group (section) for each body system examined.
You can add a repeating or common form from the casebook. Note that your study’s design may limit the number of times a form can repeat.
-
Navigate to the repeating or common form, either through the breadcrumb menu or the casebook schedule.

- From the table view, click + New.
- Vault adds the new form to the subject’s casebook and opens the form in edit mode. You can return to the form later using the breadcrumb menu.
- Enter data in the form.
- Click Complete.
If your Study has recently undergone an amendment, note that Vault automatically creates your new Form using the most recently assigned casebook version.
You can add a new sequence of a repeating Item Group from within the Form containing it. Note that your study’s design may limit the number of times an item group can repeat.
- Navigate to the form containing your repeating Item Group.
- If sequences already exist, scroll past the last existing sequence. Depending on your study’s design, Vault may automatically create all required Item Groups for a Form. For example, for a Physical Exam form, Vault may add an Item Group for each body system examined.
-
Click + New Section.
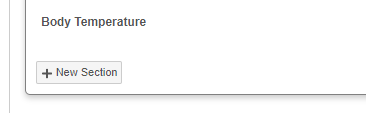
- Vault adds a new sequence of the Item Group to the Form.
- Enter data in the Item Group.
- Click Complete when finished entering data for the entire Form.
If your Item Group uses tabular view, click +New in that view to add a new Item Group.
If your Study has recently undergone an amendment, note that Vault automatically creates your new Item Group using the most recently assigned casebook version.
Intentionally Left Blank
You can mark Forms and individual Items as Intentionally Left Blank to let the sponsor know that the data wasn’t collected and why.
Marking Read-only Default Data as ILB: When an Item Group containing read-only default data is marked as Intentionally Left Blank, the default data remains.
Forms
To mark a Form as Intentionally Left Blank:
-
Select the Mark as Blank button at the top right hand corner of the form.

-
In the dialog, select a reason why the data wasn’t collected from the drop-down list.
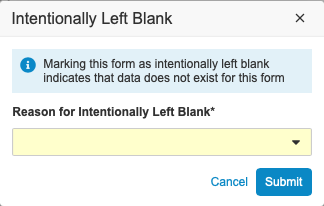
- Optional: If your study design allows, you can select Other (please specify) and enter your own reason in the text field.
- Click Submit.
Note that a form must have at least one change reason to be marked as Intentionally Left Blank.
Items
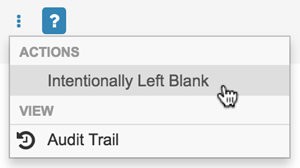
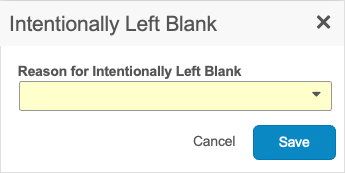
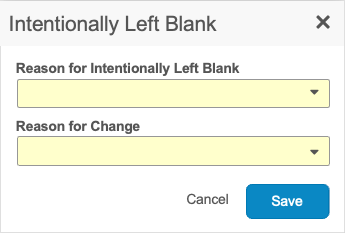
To mark an Item as Intentionally Left Blank:
-
Select Intentionally Left Blank from the item’s More Actions menu.
-
In the dialog, select a reason why the data was not collected from the drop-down list.
-
When marking an Item as Intentionally Left Blank on a submitted Form, you must select a Reason for Change.
-
Click Save.
Marking an item Intentionally Left Blank prevents Vault from generating any system queries against it, unless the Item is required and was configured to automatically fire queries on items marked as ILB in Studio. If you select Intentionally Left Blank for a field which already contains a value, Vault will prompt you to clear the existing value. To undo the Intentionally Left Blank action, click Edit (). If you or another data entry user resets the form, Vault clears the Intentionally Left Blank field.
Behavioral Rules
The following behavioral rules apply when you mark an Item or Form as Intentionally Left Blank:
- When you mark or unmark an Item on a previously submitted Form, Vault prompts you to specify a change reason.
- When you mark a Form as Intentionally Left Blank and select a reason, Vault automatically marks all Items on the form as Intentionally Left Blank and gives the reason that you selected. If any Items were previously marked as Intentionally Left Blank and a reason was selected, Vault updates those Items to use the new reason for marking the Form as Intentionally Left Blank.
- When you mark or unmark an Item or Form as Intentionally Left Blank, Vault automatically removes any completed Data Management Review (DMR) or Source Data Verification (SDV) from the Item or Form.
- When you mark a Form as Intentionally Left Blank, Vault automatically removes any existing form links for that Form.
- If a Form is already linked to an Item, that Form can’t be marked as Intentionally Left Blank.
- When an Item Group containing read-only default data is marked as Intentionally Left Blank, the default data remains.
Non-Conforming Data Value Entry
Veeva EDC warns you when you have entered a non-conforming data value. This way, you can correct your input to a valid format prior to attempting to save.
If, after seeing this warning, you don’t correct your data input, Veeva EDC highlights the item control in red and displays the error message below the item control.
Vault will not save non-conforming data values. The Complete button is disabled, and Veeva EDC doesn’t auto-save the form, instead displaying an error. Clicking the link in this error will scroll the form down to the non-conforming data value. If you refresh the page, Vault clears the non-conforming data value.
Dynamic Scheduling
Based on your study design, Vault may add Events and Forms or to your casebook schedule, or conditionally enable Items and Item Groups based on the data you enter into a Form. For example, if you enter Female for Gender, Vault enables the Pregnancy Test Result item. If you enter Male, Vault disables the Pregnancy Test Result item. You cannot enter data for disabled Items. Vault does not create tasks based on disabled Item fields. For another example, if you choose Yes for a Follow Up Visit Required item, Vault creates a Follow Up Visit event and its related Forms.
If you later edit the value for a controlling Item, Vault prompts you to delete the values you entered on any dependent Items or Forms. Review the list of Item values this action deletes, and confirm. Note that you cannot save a change to a controlling Item without deleting those dependent values.
Vault does not create any system queries if an Item field is disabled.
Restricted Data
Certain forms in your study may be restricted (blinded). If you don’t have permission to access restricted data, you won’t be able to see any restricted Form.
If you do have permission to access restricted data, Vault marks any restricted forms with the Restricted () icon.
Form Actions
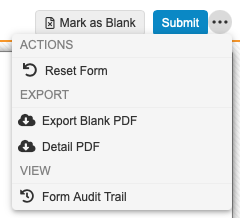
You can perform several actions on a Form. The following actions are available from the form’s Actions () menu:
- Reset Form: Resets all items on a form to blank and sets the form status to Blank. This action is only available on Forms in the In Progress status. Click Edit Form to return a complete form to In Progress.
- Export Blank PDF: Generates a blank PDF of the form.
- Detail PDF: Generates a detail PDF of the form.
- Form Audit Trail: Opens an audit trail specific to the form.
Repeating Item Group Actions
You can perform several actions on repeating Item Groups. Note that these actions aren’t available for non-repeating Item Groups. The following actions are available from the repeating item group’s More Actions () menu:
- Intentionally Left Blank: Marks all Items in the Item Group (section/row) as Intentionally Left Blank using the specified reason.
- Unset Intentionally Left Blank: Unsets the Intentionally Left Blank status on all Items in the Item Group instance (section/row).
- Reset Section/Row: Resets (clears) all Item values in the Item Group (section/row).
- Remove Section/Row: (Only available when the Status is Blank) Removes the Item Group section/row. This is only available when no data has been entered and no queries have been opened. If the section/row is no longer needed after data has been entered, users can instead mark it as intentionally left blank.
Item Actions
The following actions are available from the Item level More Actions () menu:
- Intentionally Left Blank: Marks an item as Intentionally Left Blank. Vault twill not create queries based on missing data. Note that the item must be Blank to use this action.
- Field Audit Trail: View an audit trail specific to this Item. Note that this option is only available when there is at least one logged change to the item field.
Marked for Removal
Forms and Events can be Marked for Removal. This status is indicated with this icon:
When a Form or Event is dynamic (added via rules), has entered data, and then a user edits the controlling Item in such a way that the Form or Event is removed from the schedule, the Form or Event is Marked for Removal. Vault can’t just remove the Form or Event, because they contain data. A user must reset the Form or Event before it can be removed from the schedule.
Viewing Completion Guidelines
Your Study may include Completion Guidelines. This is a PDF that provides supplemental, form-specific instructions for entering data and can be accessed at any time during the study. This document typically includes:
- General information about data entry in EDC
- Protocol-specific instructions for forms, items, measurement methods, devices, etc.
- Guidelines for handling issues or uncertainties with source documents
Completion Guidelines are available in the page header of the tab, once you’ve navigated into your Study.
Click View () to view the PDF in a viewing window.
Click Download () to download the PDF.
