Managing Casebooks
Veeva EDC uses two objects to manage participants in a study: Subject and Casebook. A Subject record represents an individual subject participating in a Study. That subject’s Casebook object contains all other records related to the Subject for that Study.
Prerequisites
Users with the standard CDMS Principal Investigator, CDMS Sub Investigator, and CDMS Clinical Research Coordinator application roles can perform the actions described above by default. If your vault uses custom Application Roles, your role must have the following permissions:
| Type | Permission Label | Controls |
|---|---|---|
| Standard Tab | Data Entry Tab | Ability to access the Data Entry tab |
| Functional Permission | Add Casebook | Ability to add new Casebooks |
| Functional Permission | Data Entry | Ability to enter study execution data |
If your Study contains restricted data, you must have the Restricted Data Access permission to view it.
Learn more about Study Roles.
Creating a Casebook
Creating a Casebook automatically creates a new Subject, as well as Events, Forms, and Items related to the Study. Note that the Subject ID is defined during study design.
-
Navigate to the Casebook listing page.

-
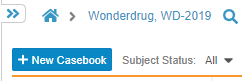
Click + New Casebook.
- In the Create Casebook confirmation dialog, click Create.
- Vault creates the new Casebook record and opens it in the casebook schedule.
From the Casebook, you can define dates for events in your study, as well as open and fill forms.
Casebook Creation Disabled
The ability to create new Casebooks may be disabled in the following circumstances:
- The Study is locked.
- The Site is locked.
- Your Study has the ability to manually create Casebooks disabled. Your Study is using an external integration, like IRT, to create your Casebooks.
Viewing a Casebook
You can access existing casebooks in the Casebook listing page.
To view existing casebooks:
- Navigate to the Casebook listing page.
- Click a Casebook in the list to open.
- Vault opens the Casebook. You can now sort the schedule, collapse and expand Events, and click into Forms to enter data.
Casebook Header
The casebook header spans the casebook page, just below the breadcrumb navigation. The header typically displays demographic information, like Subject ID, Date of Birth, Gender, Race, and Subject Initials. Certain fields populate the header. These fields are defined and configured during study design. Hover over the Information () icon next to the Subject ID to see the current casebook version.
Sorting Events in a Casebook
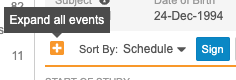
You can sort the Events in the casebook schedule by the Planned (from the Study definition) or actual Event (user-entered) date. Use the Schedule and Event Date order options to sort Events on your casebook schedule. You can expand or collapse Events from the Schedule Header in Data Entry UI V2.
Data Entry UI Version 1:

Data Entry UI Version 2:
No matter which sorting method you use, the Event or Planned Date display along with the Event in the same manner. Note that the order of Events in the breadcrumb drop-down menu always matches the Schedule order.
Casebook Schedule
Each Casebook contains all Events and Forms for a given Subject. The Casebook displays these events and forms chronologically in the casebook schedule. Veeva EDC displays Event and Form records in a tree view from Start of Study to End of Study. The casebook schedule displays only records you have permission to view.
Casebook-level Actions
You can perform actions on a Casebook record using the casebook schedule’s Actions menu.
- Delete Subject: Deletes the Subject and the Casebooks. This action is only available to users with roles that grant the Delete Casebook permission. See details here.
- Export Blank PDF generates a blank PDF of all forms in the casebook schedule.
- Export Detail PDF generates a detail PDF of all forms in the casebook schedule.
- Subject Audit Trail opens an audit trail for the Casebook.
Sign a Casebook
Click the Sign button at the top of the page to select and sign all Completed forms. See details here.
Event Actions
When viewing the casebook schedule, you can perform several actions on your events.
- Enter and change an Actual Start Date for an Event.
- Enter and change the Visit Method for an Event.
- Add an Unscheduled Event to the casebook.
- View the Event History (audit trail).
- Provide an eSignature.
Planned and Actual Dates
Before you or another user has defined an Actual Start Date for an Event, each Event displays a date range in the casebook schedule: Planned No Earlier Than to Planned No Later Than. For example, the Baseline Visit event displays the range ‘5/1/2017 - 5/5/2017.’ If there is only one planned date and not a planned range, the Event displays a single date.
To define an Actual Start Date for an event, click Enter Date and select the date from the calendar. You can also define the Actual Start Date by clicking the Down arrow on your keyboard and entering the date in the field.
Did Not Occur
If for some reason an event in your study did not occur, you can click Did Not Occur in the casebook schedule. Vault prompts you to enter a reason. Once you have marked an event as Did Not Occur, Vault does not create any forms for that event, and you can proceed to the next event in the casebook schedule.

Note that you can change this status by selecting Enter Date from the event’s More Actions menu. Vault allows you to Enter Date or mark a date as Did Not Occur for one event at a time. You can only mark the event as Did Not Occur starting from the latest completed visit in the configured schedule. For example, you cannot mark Visit 3 as Did Not Occur if you haven’t already entered a date or marked Visit 2 as Did Not Occur.

Changing an Event Date
To change an Event date:
- Select Edit Event Date from the event’s More Actions menu in the casebook schedule.
- Select a Reason for Change.
- Click OK.
Visit Method
If Visit Method is configured for your study, you’ll be required to specify the type of visit for your Event when entering an Event Date. You can edit the visit method after entering if necessary.
To edit a Visit Method:
-
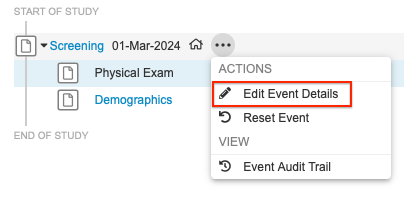
Select Edit Event Details from the event’s Actions menu.
-
Choose a Visit Method and select a Reason for Change.

-
Click Save.
Visit Method is displayed as an icon next to the Event name once entered.
![]()
Learn more about Visit Method.
Events with No Overdue Date
Events can be configured so that no Forms in that Event ever become overdue. These Forms don’t display as overdue in the task bar.
Adding New Cycles (Event Groups)
Depending on your study design, Casebooks may allow for cycles, or repeating Event Groups. Repeating Event Groups allow you to add an Event Group to a Casebook multiple times. Each time you add that Event Group, it contains the same collection of Forms and Items as the previous. Each new Event Group may have a customized label, and often incremented labels, such as Visit 1, Visit 2, Visit 3, etc. Note that you must enter an Event Date before adding new visits.
Each instance of the repeating Event Group is an Event Group sequence.
To add a new Event Group sequence:
- Navigate to the casebook schedule.
- Click + New Event.
- The New Event dialog opens. Select the repeating Event Group.
- Click Add {#} Events..
- Vault creates a new Event Group sequence and adds Forms to each of its Events.
You can continue to add Event Group sequences until you reach the configured Repeat Maximum (by study design).
You can delete an unscheduled event if all of the forms in the event are blank. Choose Delete Event from the unscheduled event’s More Actions menu to remove it.
Adding Unscheduled Events
You may need to document events that weren’t planned. You can easily create an Event record from the casebook schedule. Vault automatically creates forms for the new event. These forms are based on your study design.
To add an unscheduled event:
- Navigate to the casebook schedule.
-
Click + New Event.

- The New Event dialog opens. Select an Event.
- Enter the date of the unscheduled Event.
- Click Save.
- Vault creates a new, unscheduled Event record and adds log forms to the event.
You can delete an unscheduled event if all the forms are blank. To delete an unscheduled event:
-
From the unscheduled event’s More Actions menu, click Delete Event.

-
In the Delete Event dialog, click Continue. The unscheduled event is deleted from the Casebook.
Note that adding an unscheduled event may create a single event or an event group, based on your study design. The number in the Add Events button reflects the number of events Vault creates.
Dynamic Scheduling
Your study may include data validation rules that automatically add Event Groups to a Casebook based on data that you enter.
During a study, you may enter data incorrectly or a subject’s status may change. Updates to Form values may change which Event Groups are needed for the Casebook. When the data validation rule that added the Event Group is no longer true, Vault automatically removes the Event Group if all Forms in the Event Group are blank. If any of those Forms is not blank, you must use the Reset Form action to reset the Form status to blank. Once you have reset the necessary Forms, return to the first Form with the data validation rule. Submit the Form with updated values.
Completing Tasks from a Casebook
You can easily navigate to Event and Form records associated with your Casebook from the casebook schedule.
- Clicking on an Event opens the first incomplete Form in that Event.
- Clicking a Form opens that Form. Once you submit a Form, Vault EDC returns you to the parent Casebook.
Viewing Completion Guidelines
Your Study may include Completion Guidelines. This is a PDF that provides supplemental, form-specific instructions for entering data and can be accessed at any time during the study. This document typically includes:
- General information about data entry in EDC
- Protocol-specific instructions for forms, items, measurement methods, devices, etc.
- Guidelines for handling issues or uncertainties with source documents
Completion Guidelines are available in the page header of the tab, once you’ve navigated into your Study.
Click View () to view the PDF in a viewing window.
Click Download () to download the PDF.
