Repeating & Common Forms
Repeating forms allow answers to the same set of questions to be captured multiple times. Common forms are forms not associated with a single event, instead spanning across all study events. For example, the Concomitant Medication form may be a common form.
Prerequisites
Users with the standard CDMS Principal Investigator, CDMS Sub Investigator, and CDMS Clinical Research Coordinator application roles can perform the actions described above by default. If your vault uses custom Application Roles, your role must have the following permissions:
| Type | Permission Label | Controls |
|---|---|---|
| Standard Tab | Data Entry Tab | Ability to access the Data Entry tab |
| Functional Permission | Data Entry | Ability to enter study execution data |
| Functional Permission | View Form Linking | Ability to view Form Links |
| Functional Permission | Edit Form Linking | Ability to edit Form Links |
If your Study contains restricted data, you must have the Restricted Data Access permission to view it.
Learn more about Study Roles.
Repeating Forms
Repeating forms are forms that you can use multiple times during a study. These forms allow users to capture data for the same set of questions multiple times during a single event or study. Vault displays repeating forms on the casebook schedule. If there is more than one repeating form completed in a casebook, the casebook schedule displays the form name with a count of forms. Repeating forms are associated with a study event. To view repeating forms, navigate to that form using either the breadcrumb menu or the casebook schedule.
Your study’s design may limit the number of times a repeating form can repeat.
Common Forms
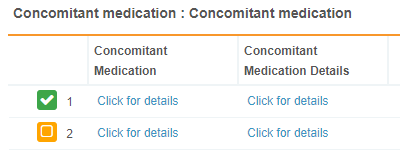
Common forms are forms that span across study events, such as a Concomitant Medication or Adverse Event form. Common forms are associated to the casebook, rather than an event. Vault displays common forms in the casebook schedule and the breadcrumb menu. Clicking a common form the breadcrumb menu displays a table view of existing forms.
Viewing Repeating & Common Forms
Once you have created repeating or common forms, you can return to them through the breadcrumb menu or the casebook schedule.
Repeating and common forms display in a table view. The table includes all forms of that type, for example, all concomitant medication forms associated with a subject. When viewing all of your repeating forms in table view, Vault displays a column for each repeating item group in that form.
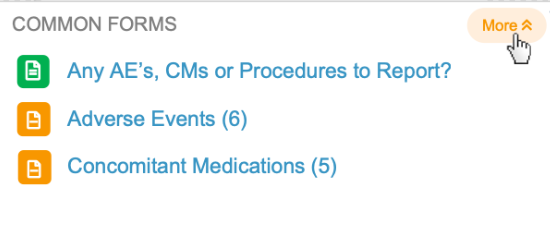
You can expand or collapse the Common Forms panel under the schedule tree using the More or Less buttons.
In the Form Panel, each row has a Click for details link in the Item Group’s column that opens that Item Group in the form viewer.
After you click to view a single repeating or common form, you can view other forms of that repeating or common form by clicking the left and right arrows next to the form name.
Adding a Repeating or Common Form
You can add a repeating or common form from the casebook. Note that your study’s design may limit the number of times a form can repeat.
-
Navigate to the repeating or common form, either through the breadcrumb menu or the casebook schedule.

- From the table view, click + New.
- Vault adds the new form to the subject’s casebook and opens the form in edit mode. You can return to the form later using the breadcrumb menu.
- Enter data in the form.
- Click Complete.
If your Study has recently undergone an amendment, note that Vault automatically creates your new Form using the most recently assigned casebook version.
Form Linking
In the Data Entry tab, you can link related forms through Form Linking. For example, one or more Concomitant Medication forms can be linked to an Adverse Event or Medical History form in order to group similar or related data or indicate cause and effect. If your Study has Form Linking configured, the linked form displays in the Data Entry tab as a toggle option, from which you can view, add, and edit linked forms. If your form doesn’t have any form links added and the Warn When Empty field in Studio is set to “Yes,” the form link tab will be highlighted in red and you’ll be prompted to link a form. Note that you can’t link forms that are marked as Intentionally Left Blank and marking a form as blank after linking will remove all form links.
Repeating Item Groups
In addition to repeating forms, your study may also include repeating item groups, which allow you to answer the same set of questions multiple times on a given form. For example, your study may use a repeating item group for a physical exam. Repeating item groups can be used in both repeating and standard forms.
Your study’s design may limit the number of times a repeating item group can repeat.
When viewing a repeating item group in a form, you can click + New Section to create a new item group. Vault then creates the new item group and its associated items.
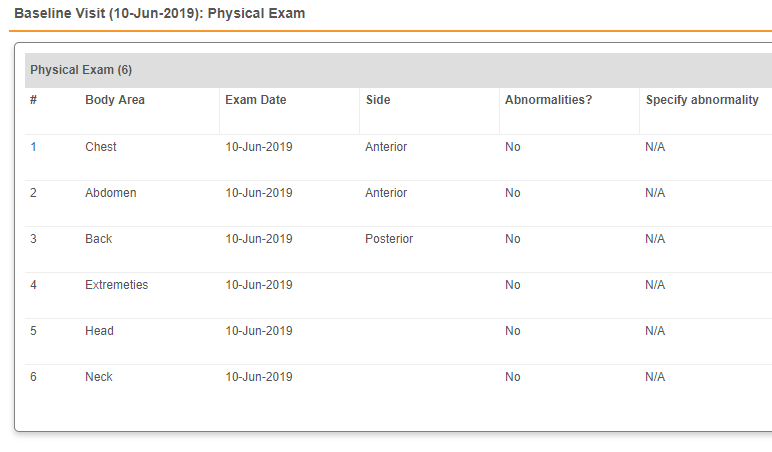
Some study designs may include a Form with an automatically created, default number of repeating Item Groups. For example, a Physical Exam form may include five Item Groups by default, one for each body system included in the exam.
Viewing Repeating Item Groups
How repeating Item Groups display in View mode depends on your study design. All repeating Item Groups display the same in Edit mode.
Tabular View
This Physical Exam repeating Item Group is in tabular view. You can click +New to add Item Groups when in tabular view.
Vault displays the appropriate query status icon for Item-level queries in the item’s table cell in tabular view. You can click the query status icon to open the query in the Query dialog, where you can answer the query. Note that users can’t edit data, create queries, or perform SDV or DMR from tabular view.
Form View
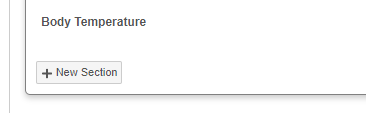
This Physical Exam repeating Item Group is in form view. When in form view, click +New Section to add an Item Group.

Tabular Data Entry (Editable Grids)
If Editable Grids is configured in Studio, you can enter data for repeating Item Groups in a grid-like format.
To configure Editable Grids, see Creating Forms, Item Groups & Items.
Adding a Repeating Item Group (Section)
You can add a new sequence of a repeating Item Group from within the Form containing it. Note that your study’s design may limit the number of times an item group can repeat.
- Navigate to the form containing your repeating Item Group.
- If sequences already exist, scroll past the last existing sequence. Depending on your study’s design, Vault may automatically create all required Item Groups for a Form. For example, for a Physical Exam form, Vault may add an Item Group for each body system examined.
-
Click + New Section.
- Vault adds a new sequence of the Item Group to the Form.
- Enter data in the Item Group.
- Click Complete when finished entering data for the entire Form.
If your Item Group uses tabular view, click +New in that view to add a new Item Group.
If your Study has recently undergone an amendment, note that Vault automatically creates your new Item Group using the most recently assigned casebook version.
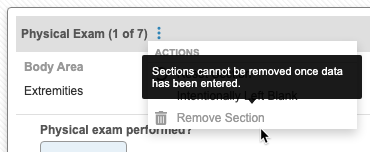
Remove a Repeating Item Group
You can remove an instance (section or row) of a repeating Item Group as long as the following conditions are met:
- No data has been entered into any of the group’s Items.
- No queries have been opened against any of the group’s Items.
If these conditions aren’t met, Vault disables the removal action. Instead of removing the section or row, you can mark it as intentionally left blank.
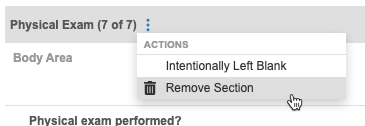
Form View
To remove a section:
- Open the Form containing the repeating Item Group.
- Scroll to the section you want to remove.
- Hover over the section header to show the More Actions menu.
-
- From the More Actions menu (), select Remove Section.
-
-
- In the Remove Section dialog, select a Reason.
-
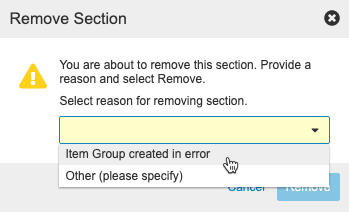
- If you chose Other (please specify) for Reason, enter your reason in the text entry field.
- Click Remove.
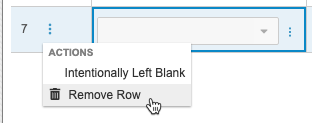
Tabular View (Editable Grid)
To remove a row:
- Open the Form containing the repeating Item Group.
- Scroll to the row you want to remove.
- Hover over the Row to show the More Actions menu in the Reference # column.
-
- From the More Actions menu (), select Remove Row.
-
- In the Remove Row dialog, select a Reason.
- If you chose Other (please specify) for Reason, enter your reason in the text entry field.
- Click Remove.