Creating Custom Study Roles
For your convenience, several standard Study Roles are available by default. You can see a list of those standard roles here. You can assign these standard roles to users in your study, or you can assign your users custom roles. You can copy the standard Study Roles to use as a template when creating your custom roles as well.
Processing Time for Role Creation and Assigment: Role creation and assignment updates User Role Setup records and requires recalculation of group membership and sharing rules. When users are assigned to a newly created role, processing time may take up to several hours and users will have limited access until processing is complete. Subsequent user assignments to the same role take effect immediately.
Prerequisites
Contact Veeva Services to enable Role by Study in your vault.
For Query Team Restrictions, a study designer can enable this feature for your study in Studio > Settings.
Users with the Vault Owner security profile, the CDMS Lead Data Manager study role, or the CDMS User Administrator study role are able to perform the actions described above by default.
If you have a custom Study Role, you must have the following permissions:
| Type | Permission Label | Controls |
|---|---|---|
| Standard Tab | System Tools Tab | Ability to access the Tools > System Tools tab |
| Functional Permission | Manage Study Roles | Ability to create, edit, and delete custom Study Roles from Tools > System Tools > Role Management |
If your Study contains restricted data, you must have the Restricted Data Access permission to view it.
Learn more about Study Roles.
Creating a Custom Role
You can create Study Roles from scratch or by copying an existing Study Role. If you create a new Study Role from scratch, there are additional configuration steps you must perform for your new role to become functional.
User Creation Permissions: If your assigned Study Role grants the Manage Study Roles permission, but not the Manage Users permission, you can only create roles that have the same or less permissions than you have in your own role.
Role Creation Processing Time: Once you create a custom Study Role, a user administrator can assign it to users in your Study immediately. However, it may take up to 4-6 hours before a user with the new role can view data, due to the processing that Vault performs as part of role creation. We recommend that you create custom roles first to allow time for processing to finish before your users begin work.
Multi-role Users & Restricted Data Access: Restricted Data Access doesn’t apply across multiple Study Roles. If a user has multiple Study Roles, either every Study Role must grant the Restricted Data Access permission or none can. A user with multiple roles cannot be granted Restricted Data Access for only one Study Role and not for the others. Such a configuration results in unexpected system behavior. Do not configure your Study Roles this way.
New Study Role
To create a new Study Role from scratch:
Create the Role
To create a new role:
- Navigate to Tools > System Tools > Role Management.
-
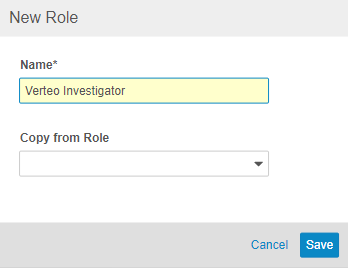
Enter a Name for your new role. Note that this Name must be unique at the vault level.
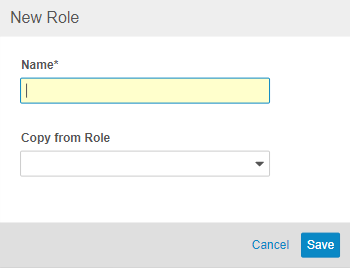
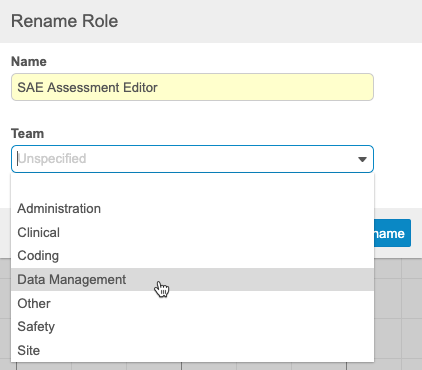
- Optional: Select a Team for your new role. This is the team this role works on queries within.
- If you are creating a custom role from scratch, don’t select a role in Copy from Role.
-
Select the permissions that you want to assign this role in the Standard Tabs, Permissions, User Defined Objects, and, if multi-role security is enabled, User Defined Permissions sections. Selecting the permission assigns the permission. If you don’t select a permission, this role will not have that permission.
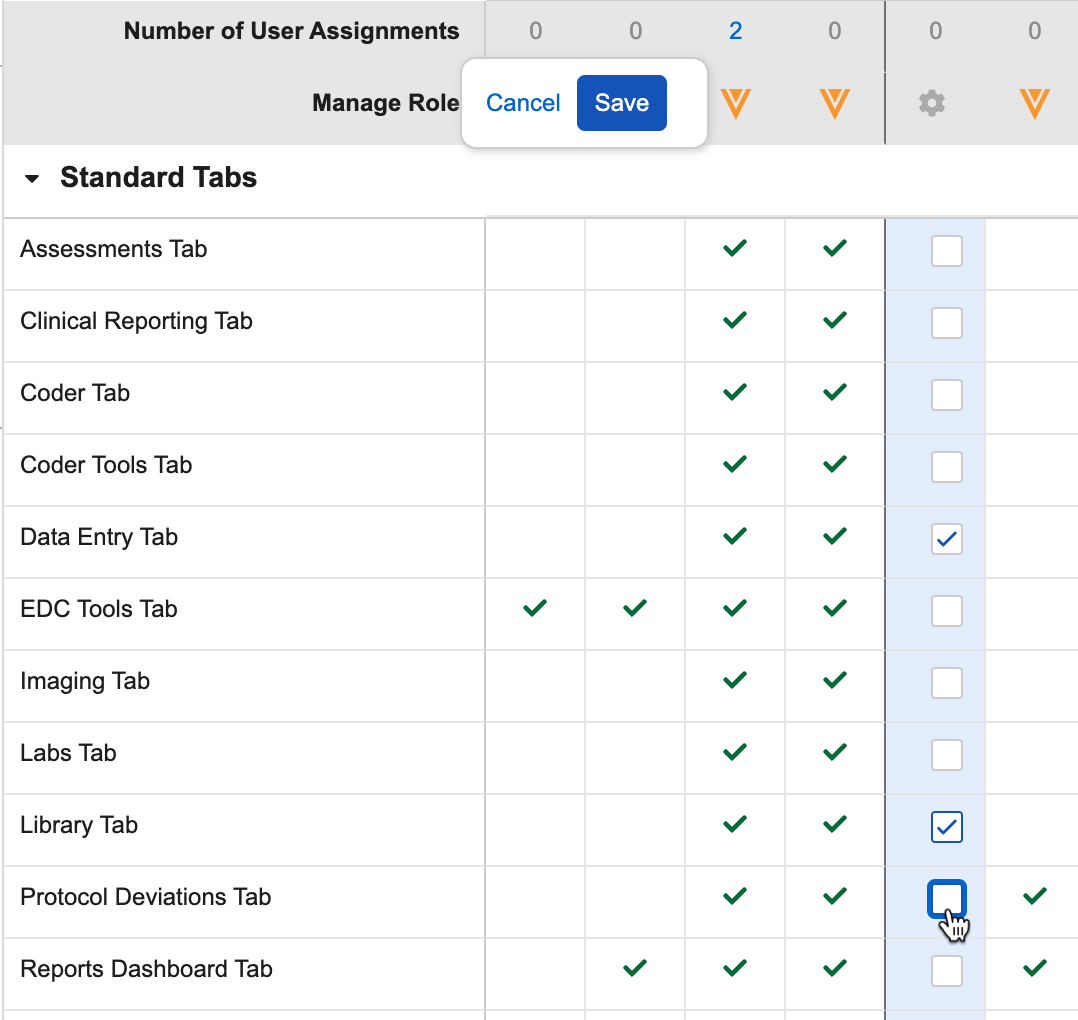
- Click Save.
Vault creates a custom Security Profile and Permission Set with the appropriate permissions and maps it to your new Study Role. If your vault is using multi-role security, Vault only creates a Permission Set. If you want to assign permissions for custom objects and tabs, you can perform that configuration now. See details here.
Copy from Existing Role
To create a new Study Role by copying an existing or standard Study Role:
- Navigate to Tools > Role Management.
-
Enter a Name for your new role. Note that this Name must be unique at the vault level.

-
Select a standard Study Role in Copy from Role. Vault copies this Study Role into your custom Study Role.
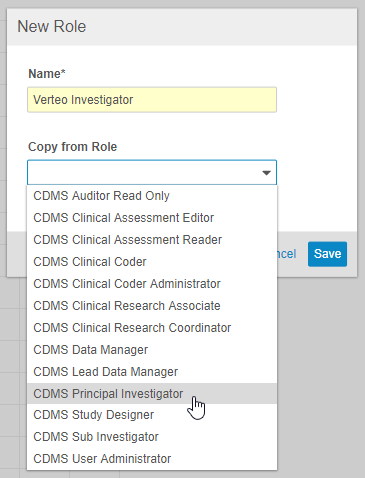
- Click Save.
- Select the permissions that you want to assign this role in the Standard Tabs, Permissions, User Defined Objects, and, if multi-role security is enabled, User Defined Permissions sections. Selecting the permission assigns the permission. If you don’t select a permission, this role will not have that permission.
- Click Save.
Vault creates a custom Security Profile and Permission Set with the appropriate permissions and maps it to your new Study Role. If you want to assign permissions for custom objects and tabs, you can perform that configuration now. See details here.
Editing Custom Roles
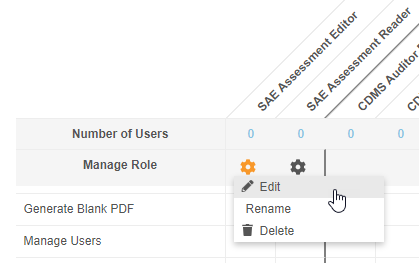
You can edit custom Study Roles from Tools > Role Management as needed.
Once a role has been edited, you can publish the updated role to other connected vaults by ensuring that the role has been selected in the User Defined Roles deployment list and deploying the role to the target vault. When you edit a custom Study Role, Vault immediately applies those changes to every user with that role assigned.
To edit a custom Study Role:
- Navigate to Tools > System Tools > Role Management.
- Select and deselect permissions as needed.
- Click Save.
Rename a Role
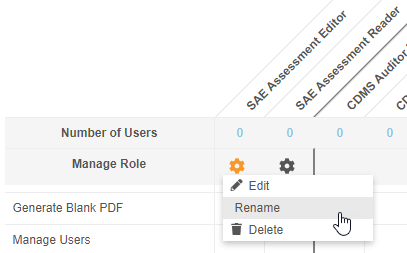
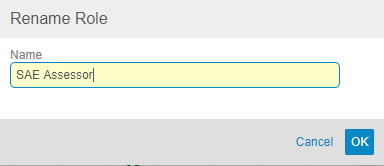
You can rename custom Study Roles that are not currently assigned to any users in the vault.
Once a role has been renamed, you can publish the updated role to other connected vaults by ensuring that the role has been selected in the User Defined Roles deployment list and deploying the role to the target vault.
As is the case in the source vault, for the role to be renamed in the target vault, there must not be any users in the target vault that are assigned that role.
To rename a custom Study Role:
- Navigate to Tools > System Tools > Role Management.
- Click Save.
Change Teams
To change the Team assigned to a role:
- Navigate to Tools > System Tools > Role Management.
- Click Save.
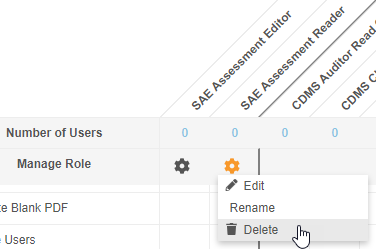
Deleting a Role
In some cases, if your organization is no longer using a custom Study Role and no users are currently assigned that role, you can delete it. For vaults created after the 21R2 release, which have the multi-role security feature, custom roles cannot be deleted if they have been deployed. For vaults created before the 21R2 release, which do not have the multi-role security feature, custom roles can be deleted in DEV vaults but the deletion does not take effect in other vaults.
To delete a custom Study Role:
- Navigate to Tools > System Tools > Role Management.
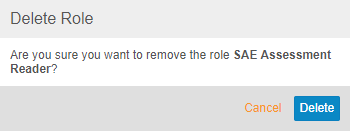
- In the Delete Role confirmation dialog, click Delete. Vault deletes your custom Study Role.
Teams
Veeva EDC includes Teams. If your Study uses the Team Query Restrictions feature, these teams control the ability to close queries created within a team. If a query is created by one team, for example, the Clinical team, then only members of that team can close the query. In this example, a member of the Data Management team would be able to comment on the query, but that user wouldn’t be able to close it.
You assign custom roles to a team during role creation or by renaming the role. Note that a role may only belong to one team.
| Team | Standard Roles |
|---|---|
| Administration |
|
| Clinical |
|
| Coding |
|
| Data Management |
|
| Other |
|
| Site |
|
Available Permissions
The functional permissions listed in Role Management represent a combination of Application Role and Security Profile based permissions. In Tools > Role Management, each row represents either a functional permission or the ability to access a standard tab (such as Data Entry or Coder) in Veeva EDC. A selected (checked) permission indicates that a role has this permission.
Refer to this table for information about permissions and what standard Study Roles have these assigned.
Which permissions display in the User Defined Objects and User Defined Permission Sets sections depend on your vault’s configuration.
The tables below list each functional permission and a description of what it controls.
Standard Tabs
You can control access to the following standard tabs from the Standard Tabs section of the role table:
| Field | Controls |
|---|---|
| Assessments Tab | Ability to access the Assessments tab |
| Clinical Reporting Tab | Ability to access EDC Clinical Reporting via the Clinical Reporting tab. Note that EDC Clinical Reporting is only available in production environments. |
| Coder Tab | Ability to access the Coder tab |
| Coder Tools Tab | Ability to access the Coder Tools tab |
| Data Entry Tab | Ability to access the Data Entry tab |
| Data Loader Tab | Ability to access the Data Loader tab |
| EDC Tools Tab | Ability to access the EDC Tools tab |
| Imaging Tab | Ability to access the Imaging tab |
| Labs Tab | Ability to access the Labs tab |
| Library Tab | Ability to access the Library tab |
| Protocol Deviations Tab | Ability to access the Protocol Deviations tab |
| Randomization Tab | Ability to access the Randomization tab |
| Reports Dashboards Tab | Ability to access the Reports and Dashboards tabs |
| Review Tab | Ability to access the Review tab |
| Studio Tab | Ability to access the Studio tab |
| Study Grade Tab | Ability to access the Study Grade tab |
| System Tools Tab | Ability to access the Tools > System Tools tab |
| Safety Integrations Tab | Ability to access the Tools > Safety Integrations tab |
| Workbench Tab | Ability to access and use the Data Workbench application, via the Workbench tab |
Permissions
After standard tabs, permissions are grouped into functional areas. You can collapse and expand these sections.
| Field | Controls |
|---|---|
| Data Entry | |
| View Casebook | Ability to view information about and from subject Casebooks (for reports, dashboards, and CDB) |
| Add Casebook | Ability to add new Casebooks |
| Delete Casebook | Ability to delete subject Casebooks with or without data and related object records |
| Data Entry | Ability to enter study execution data |
| View Form Linking | Ability to view Form Links |
| Edit Form Linking | Ability to edit Form Links |
| Generate Detail PDF | Ability to export detail PDFs |
| Generate Blank PDF | Ability to export blank PDFs |
| Sign | Ability to provide an electronic signature on study data |
| Queries | |
| View Query | Ability to view queries |
| Open Query | Ability to create new (open) queries and comment on queries without moving them into the Answered status |
| Answer Query | Ability to answer queries, moving them into the Answered status. This permission doesn’t provide the ability to open queries. |
| Close Query | Ability to close queries |
| Close All Queries | Ability to close all queries, regardless of which query team created the query |
| Edit Observed Source Value | Ability to edit the observed source value in a query |
| View Observed Source Value | Ability to view the observed source value in a query |
| Observations | |
| Create Observation | Ability to create new observations. |
| View Observation | Ability to view observations. |
| Close Observation | Ability to close observations. |
| Reply Observation | Ability to reply to observations and set their status as pending and/or open. |
| Review | |
| View SDV | Ability to view SDV status |
| Edit SDV | Ability to perform SDV |
| View DMR | Ability to view DMR status |
| Edit DMR | Ability to perform DMR |
| Freeze Data | Ability to freeze and unfreeze data |
| Lock Data | Ability to lock and unlock data |
| View Snapshots | Ability to view Snapshots |
| Manage Snapshots | Ability to create, edit, and overall manage Snapshots |
| Assessments | |
| View Medical Assessments | Ability to view completed Assessments |
| Edit Medical Assessments | Ability to perform (edit) Assessments |
| Manage Assessments | Ability to assign Study Roles to Assessment Definitions from EDC Tools > Assessments |
| Study Administration | |
| Manage Study Milestones | Ability to lock and unlock Studies and Sites, as well as set the Billing Status for study environments from EDC Tools |
| Study File Format API Access | Ability to access and use the Study File Format API. |
| Vault File Manager Access | Ability to access and use Vault File Manager. |
| Manage Jobs | Ability to create, edit, and delete scheduled jobs |
| Run Rules | Ability to run rules from EDC Tools > Rules |
| Manage Outbound Connections | Ability to create and edit FTP and S3 Connections |
| Manage Study Countries | Ability to create and edit Study Countries in EDC Tools |
| View Study Sites | Ability to view Sites in EDC Tools |
| Edit Study Sites | Ability to create and edit Sites from EDC Tools |
| Manage Review Plan Assignment | Ability to access EDC Tools > Review Plan Assignments and update the study- and site-level templates |
| Manage Review Plan Assignment Criteria | Ability to access EDC Tools > Review Plan Assignment Criteria and update study- and site-level templates for assignment |
| Manage Review Plan Manual Assignment | Ability to access EDC Tools > Review Plan Manual Assignment and manually assign Review Plans |
| Manage Deployments | Ability to create and manage study Environments and deploy Studies from EDC Tools, manage and deploy vault-level configuration from Tools > System Tools, manage and deploy listings, checks, and views in CDB, and enter License Keys |
| Manage Learning | Ability to assign learning system Curriculums to Study Roles from EDC Tools |
| Manage Email Group Assignment | Ability to assign users to an Email Group from EDC Tools > Email Group Assignment |
| Manage Study Roles | Ability to create, edit, and delete custom Study Roles from Tools > System Tools > Role Management |
| View Users | Ability to view Users and their access |
| Edit Users | Ability to create and edit Users and their access |
| Restricted Data Access | Ability to view restricted (blinded) Forms and Studies that contain restricted data |
| Manage Amendments | Ability to initiate subject transfers and retrospective amendments from EDC Tools |
| Manage Data and Definition Export | Ability to schedule the Data and Definition Export job |
| API Access | Ability to access and use the Vault EDC API. (This permission is also required to use CDB.) |
| Schedule Reports | Ability to create and schedule flash reports |
| View Integration Mappings | Ability to view Integration Mappings |
| Edit Integration Mappings | Ability to edit Integration Mappings |
| Copy Study Data to PPT | Ability to copy study data to PPT environment |
| Vault Configuration Report | Ability to generate a Vault Configuration Report |
| Manage Safety Configuration | Ability to design and configure for the safety integration of a Study. This includes determining which Forms are involved, which Items on those Forms are sent to the safety system, and what Inclusion Criteria dictate when to include or exclude form data in the Safety Case. |
| Manage Study Priority | Ability to mark a study as a priority or remove priority from a study |
| Edit Study Settings | Ability to edit the Study Settings available in EDC Tools |
| Data Loader | |
| View Import History | Ability to access the Import History subtab within the Data Loader tab |
| Load Data | Ability to access the Import subtab within the Data Loader tab. Ability to edit the fields on the Import page and to run the Preview and Import jobs |
| Coder | |
| View Code | Ability to view coding progress |
| Assign Code | Ability to assign codes in Coder |
| Approve Code | Ability to approve or reject assigned codes in Coder |
| Manage Coder Study Settings | Ability to edit Study Settings in Coder Tools |
| Manage Coding Lists | Ability to create, edit, import, and export Synonym Lists and Do Not Autocode Lists in Coder Tools |
| Study Design | |
| View Study Grade | Ability to view Study Grade records |
| Review Study Grade | Ability to review Study Grade records |
| View Study Design | View-only access to Study Design |
| Design Study | Ability to create study design definitions and a study schedule from Studio |
| Library | |
| View Library | Ability to view library Collections and their designs from Studio > Library |
| Design Library | Ability to create study design definitions and a study schedule for a Collection from Studio > Library |
| View Classification | Ability to view Classifications in a library collection |
| Edit Classification | Ability to create and edit Classifications and their Values in a library collection |
| Protocol Deviations | |
| View Protocol Deviations | Ability to view Protocol Deviations |
| Edit Protocol Deviations | Ability to edit Protocol Deviations |
| Create Protocol Deviations | Ability to create Protocol Deviations |
| Labs | |
| View Lab Locations and Normals | Ability to view all Lab Locations and Normals |
| Edit Lab Locations and Normals | Ability to edit all Lab Locations and Normals. This permission can also see all Studies that are impacted, though they don’t have access to Clinical Data |
| Approve Lab Normals | Ability to approve Lab normals and add/merge Lab locations |
| View Lab Analyte Library | Ability to view Analytes in the Analyte Library |
| Edit Lab Analyte Library | Ability to edit and update Analytes in the Analyte Library |
| Manage Lab Units and Codelist | Ability to update Lab units and codelists |
| Manage Lab Study Settings | Ability to configure Study Settings in Labs |
| Manage Site Lab Assignment | Ability to associate Sites with Lab locations |
| View All Lab Settings | Ability to view all Lab configuration |
| Lab Mass Updates | Ability to view and run mass update jobs |
| Imaging | |
| Review Imaging Exam | Ability to view uploaded Imaging Exams |
| Upload Imaging Exam | Ability to upload Imaging Exams |
| Safety | |
| View Safety Cases | Ability to view Safety Case banners |
| Manage Safety Integrations | Ability to modify the safety configurations available for a Study in Tools > Safety Integrations |
| View Safety Integrations | Ability to view the safety configurations available for a Study in Tools > Safety Integrations in read-only mode |
| Randomization | |
| Randomize Subject | Ability for a Site to Randomize a Subject |
| View Randomization Kit/Device | Ability to view list to see what device/kit has been used and what’s available in the Randomization tab. |
| Configure Randomization | Access to the Randomization tab to configure Randomization settings |
| Manage Randomization List | Ability to upload a Randomization List |
| View Randomization Enrollment | Ability to see a list of all Sites/Subjects as they are randomized |
| Invalidate Randomization | Ability to invalidate the Randomization record in the Randomization tab |
| View Unmasked Data | Ability to see all unmasked Site/Subject data in the Randomization tab |
| Reveal Treatment | (No longer supported for any studies) Ability for a Site to see what treatment has been given to a subject. Login credentials are required. Not considered an emergency unmasking. Must have view data entry access. Note that this is only applicable for grandfathered studies. |
| Emergency Unmasking | (No longer supported for any studies) Ability for a Site to use Emergency Unmasking during adverse events to view treatment. Login credentials are required. Emergency unmasking will be logged in an unblinding report and notification emails (if configured) will go out. Note that this is only applicable to grandfathered studies. |
| Site Closeout | |
| Accept Closeout PDF | Ability to accept or reject Closeout PDFs |
| Generate Closeout PDF | Ability to generate the Closeout PDFs for a locked Site from EDC Tools > Sites |
| Notify Sites of Closeout PDF | Ability to set reminders and send a notification to a Site that the Closeout PDFs are ready for review |
| Review Closeout PDF | Ability to download the Closeout PDFs for a Site |
| Cdb | |
| View Selected Listings | Ability to view selected listings (selected in Workbench > Admin > Users) in CDB |
| Manage Sources | Ability to view and manage Sources from the import of third party data in CDB |
| Manage Unblinding Rules | Ability to create and manage Unblinding Rules for the conditional unblinding of data in CDB |
| View All Listings | Ability to view all listings |
| View Selected CDB Query Listings | Ability to view selected query listings (selected in Workbench > Admin > Users) in CDB |
| View All CDB Query Listings | Ability to view all query listings |
| Edit CQL | Ability to edit the CQL statement for a listing in the CQL Editor |
| Modify Listing | Ability to edit the CQL statement and properties of private listings (includes public listings, export listings, and check listings when combined with the Public Access permission) |
| Create Listing | Ability to create private listings (includes public listings, export listings, and check listings when combined with the Public Access permission) |
| Delete Listing | Ability to delete a public listing or check |
| Answer 3rd Party Queries | Ability to answer queries on third party data items in Workbench |
| Generate CSV | Ability to generate a CSV for a listing, view, or check |
| Public Access | Ability to create or modify a public listing, when combined with the Create Listing and Modify Listing permissions |
| View Export | Ability to access the Export page |
| Create Export Definition | Ability to create and copy Export Definitions |
| Generate Export Package | Ability to generate a CSV or SAS export package |
| Delete Export Definition | Ability to delete an Export Definition |
| View Export Packages | Ability to access Export > Packages to view generated export packages |
| View Import | Ability to access the Import page |
| Download Import Package | Ability to download import packages |
| Approve Import | Ability to approve or reject an import package that contains configuration changes |
| View Admin | Ability to access the Admin page |
| Manage Key Mappings | Ability to create and manage key mappings for import |
| Browse View | Ability to access the Views tab within Workbench and browse Views. Ability to save a View as a Check |
| Create View | Ability to create new Views in Workbench |
| Modify View | Ability to edit (modify) existing Views in Workbench |
| Delete View | Ability to delete Views in Workbench |
| CDB Tools | Ability to access the CDB Tools area of Workbench |
| Configure CDB | Ability to configure settings for Core Listings in Workbench |
| Upload Third Party Data Packages | Ability to upload third party data packages |
| Migrate Reviews | This permission was added in support of a feature in a future release. |
| Set Reviews | Ability to set the Review Status for rows in a Review Listing |
| Delete Data Sources | This permission was added in support of a feature in a future release. |
| Configure Queries | This permission was added to support features in a future release. |
| Upload 3PD Packages | Ability to import data via the CDB Package Loader. |
Dependent Permissions
Some permissions are dependent on or included with other permissions. If you have access to a controlling permission, you automatically have access to the dependent permissions listed. You can’t remove a dependent permission without removing the controlling permission. Refer to the table below for a comprehensive list of controlling and dependent permissions.
When a permission is dependent and disabled, you can hover over its checkbox to view the controlling permission.
| Controlling Permission | Dependencies |
|---|---|
| Answer Query |
|
| API Access |
|
| Approve Code |
|
| Assign Code |
|
| Close All Queries |
|
| Close Queries |
|
| Configure Randomization |
|
| Create Protocol Deviations |
|
| Data Entry |
|
| Delete View |
|
| Design Library |
|
| Design Study |
|
| Edit Classification |
|
| Edit DMR |
|
| Edit Form Linking |
|
| Edit Integration Mappings |
|
| Edit Lab Analyte Library |
|
| Edit Lab Locations and Normals |
|
| Edit Medical Assessments |
|
| Edit Protocol Deviations |
|
| Edit SDV |
|
| Edit Users |
|
| Emergency Unmasking |
|
| Invalidate Randomization |
|
| Load Data |
|
| Manage Amendments |
|
| Manage Data and Definition Export |
|
| Manage Randomization List |
|
| Manage Safety Integrations |
|
| Manage Study Deployments |
|
| Manage Study Sites |
|
| Modify View |
|
| Open Query |
|
| Randomization |
|
| Randomize Subject |
|
| Reveal Treatment |
|
| Review Imaging Exam |
|
| Upload Imaging Exam |
|
| Vault Configuration Report |
|
| View Casebook |
|
| View Protocol Deviations |
|
| View Randomization Enrollment |
|
| View Selected CDB Query Listings |
|
| View Selected Listings |
|
| View Unmasked Data |
|
Load Data & Dependent Permissions: The Load Data permission has dependent permissions that are required for the data loader to load study data into EDC. While these are all of the permissions required for data entry, this permission does not assign the Data Entry Tab permission. This means that users with the CDMS Data Loader permission or the Load Data permission are unable to access the Data Entry tab to enter data as a site user. If that is required, those users must have a custom role that grants both permissions. Users with this permission may also enter data via the EDC API if their role grants the API Access permission.
Permission Sets to Handle User Defined Objects & Tabs 21R2 & Later
If your organization is using Multi-Role Security, you can use a User Defined Permission Set to control access to user defined objects and tabs. This creates a single permission row in the Role Management table, where you can assign all permission granted in the set to a custom Study Role.
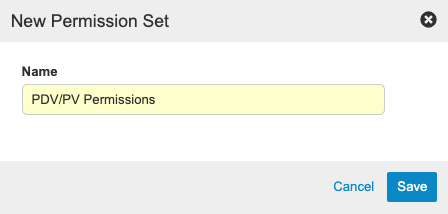
Create a User Defined Permission Set
To create a new User Defined Permission Set:
- Navigate to Tools > System Tools > User Defined Permission Sets.
- Click Save.
- Click the Name of your new Permission Set to open it.
- Click Manage Tabs.
- In the Manage Tabs dialog, use the shuttle menu to move the needed tabs from Available Tabs to Selected Tabs.
- Optional: To remove a Tab:
- Hover over the Tab row to show the Remove () button.
- Click Remove ().
- In the Remove Tab confirmation dialog, click Remove.
- Click Manage Objects.
- In the Manage Objects dialog, use the shuttle menu to move the needed objects from Available Objects to Selected Objects.
- Click Edit Objects.
- Select the checkboxes for Create, Read, Update, and Delete to assign those permissions.
- Click the Binoculars () to view a list of object fields.
- Select the Object Field Permissions checkbox to set Read and Update permissions at the field level:
- In the Object Field Permissions dialog, click Edit.
- Select the Read and Update checkboxes on each field that you want to give the permission to read or update.
- When finished, click Save.
- After you’ve assigned field permissions, Vault displays a checkmark in the Object Field Permissions column. Click the Checkmark () to view field permissions.
Once you finish assigning tab and object permissions to a User Defined Permission Set, you can assign it to Study Roles in the User Defined Permission Sets section of the Role Management table.
Edit the Assigned Permissions
To edit the permissions assigned to a User Defined Permission Set, follow steps 5-15 of the [Create a User Defined Permission Set](#create-a-user-defined-permission-set] instructions above.
Sync a User Defined Permission Set
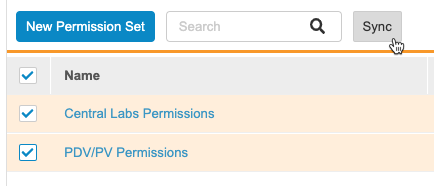
If you make changes to a User Defined Permission Set that is already assigned to a Study Role, you must use the Sync action to update the User Defined Permission Set on the Study Roles.
To sync a single permission set:
- Navigate to Tools > System Tools > User Defined Permission Sets.
- Locate the User Defined Permission Set you want to sync in the list.
- Hover over its Name to show the Actions menu.
- From the Actions menu, select Sync.
- In the Sync confirmation dialog, click Sync.
To sync multiple permission sets in one action:
- Navigate to Tools > System Tools > User Defined Permission Sets.
- Select the User Defined Permission Sets you want to sync in the list.
- In the Sync confirmation dialog, click Sync.
Rename a User Defined Permission Set
To rename a User Defined Permission Set:
- Navigate to Tools > System Tools > User Defined Permission Sets.
- Locate the User Defined Permission Set you want to edit in the list.
- Hover over its Name to show the Actions menu.
- In the Edit Permission Set dialog, enter a new Name.
- Click Save.
Delete a User Defined Permission Set
You can delete a User Defined Permission Set as long as it isn’t assigned to any Study Roles.
To delete a User Defined Permission Set:
- Navigate to Tools > System Tools > User Defined Permission Sets.
- Locate the User Defined Permission Set you want to delete in the list.
- Hover over its Name to show the Actions menu.
- In the Delete Permission Set confirmation dialog, click Delete.
User Defined Object Permissions
Role Management supports setting Read, Edit, and Delete permission on user-defined (custom) Vault objects for custom Study Roles. (Note that Create permission must be provided as part of a Security Profile.)
If your organization is using the Multi-Role Security model (new in 21R1, August 2021), then you can manage both object permissions and tab access for the custom object, including Create permission, from System Tools > User Defined Permission Sets. Then you can assign the entire User Defined Permission Set to a Study Role. Contact your Veeva Services representative to discuss upgrading to the new model.
To manage access to a user-defined object through Role Management, the object must meet all of these conditions:
- The object must be a custom object “__c” namespace.
- The object must have an object reference field to the Study (
study__v) object. - The object must have a Deployment List record.
- The object must have an object lifecycle.
- The object must have Matching Sharing Rules enabled.
If your object meets these four conditions, Vault automatically includes it in the permissions table, in the User Defined Objects section.
Each object includes three rows for the Read, Edit, and Delete permissions. When you create or edit a custom Study Role, you can select these permissions in the same way as standard permissions. Note that these permissions are dependent. If you assign Edit, Vault automatically assigns Read. If you assign Delete, Vault automatically assigns Read and Edit.
Providing a user with one of these permissions on an object does not provide them access to view the custom tab exposing that object. You must provide that access via the role’s Security Profile or, for multi-role security vaults, with a User Defined Permission Set.
Object Action Security: If your vault utilizes custom (user defined) objects, ensure that Object Action Security is not configured on your custom objects. Veeva EDC does not support Object Action permissions or security.
Use Cases Requiring Configuration with Role by Study 21R1 & Earlier
The sections below detail use cases that require additional configuration by a Vault Owner to work with the Role by Study security model. These configurations aren’t required for organizations using Multi-Role Security (introduced in 21R2, August 2021). Contact your Veeva Services representative to discuss enabling Multi-Role Security in your vault.
Users must have the Vault Owner security profile, or a custom permission set granting access to create and edit Security Profiles and Users from Admin > Users & Groups, to perform the actions described below.
Multiple Roles in a Vault
If a user in your vault has multiple Study Roles assigned in different Studies, you may need to create a custom Security Profile and map it to the custom Study Role to ensure that they have the permissions they need.
For example, if Amir is a lead data manager for the Deetoza study, but he also acts as an auditor for the Veeofen study, he will need a custom security profile to ensure that he has the appropriate access in both Studies.
When you create a custom Study Role, Vault automatically creates a Permission Set that contains all of the access and permissions specified in Tools > Role Management. You can assign the Permission Set from each role to the custom Security Profile for this user.
- From Admin > Users & Groups > Security Profiles, create a new Security Profile and assign the Permission Sets for both custom roles to the Security Profile.
- From Admin > Users & Groups > Users, assign the new custom Security Profile to your user.
- From Tools > EDC Tools, add the user to both Studies, assigning the chosen custom Study Roles.
Study Roles for Custom Tabs
If you create custom tabs in your vault, you must perform additional security configuration to manage access using Study Roles.
- Create a Permission Set (or more than one) that assigns access to those objects and tabs.
- Either add that Permission Set to the existing Security Profile for your custom role (this profile has the same name as your custom Study Role) or create a Security Profile that has that Permission Set assigned, as well as any other Permission Set that a user would require to use Veeva EDC with that profile.
- If you created a custom Security Profile update the Application Role Security Profile Rel mapping record for your custom Study Role to reference the custom Security Profile.
Mapping a Security Profile to a Custom Study Role
Veeva EDC uses the Application Role Security Profile Rel object to connect Study Roles (Application Roles) and Security Profiles. If you created a custom Security Profile for a Study Role to provide access to custom configurations, instead of updating the existing Security Profile for your Study Role, you must map the new Security Profile to the Study Role by updating the Application Role Security Profile Rels record for your role.
To update an Application Role Security Profile Rel record:
- Navigate to Admin > Business Admin > Security Profiles.
- Locate your custom Security Profile in the object record list.
- Copy or make a note of the Profile Name field value.
- Navigate to Admin > Business Admin > Application Role Security Profile Rels.
- Locate the record for your custom Study Role in the object record list.
- Click to open that record.
- Click Edit.
- In the Security Profile field, remove the existing value.
- Paste or enter the copied Profile Name into the Security Profile field.
- Click Save.

