Managing Safety Integrations
Veeva EDC provides the ability to transfer your study data into a safety system. Appropriate integration configuration sends all required and complimentary safety-relevant EDC Data to the safety system as Safety Cases. Examples include serious adverse events, adverse events of special interest, and unexpected pregnancy in a clinical trial.
Safety integrations are configured on a study-by-study basis, as every study can have a different structure and schedule. For information on the safety integration configuration steps specific to study designers, see these topics:
The administration of safety integrations involves activities at the vault, study, and environment level:
- Vault-level Activities: This is a one-time setup of the destination safety system for your EDC vault.
- Safety-EDC Connection - create the Vault-to-Vault Connection
- E2BLink - configure the AS2 gateway
- Set up the Transmission Profile that uses the base connection
- Study-by-study Administration: Perform each of these for each of your Studies.
- Activation of the integration
- Set up schedules for first sends and follow-ups in the Safety Settings
- Define other safety settings for the study
- Deploy the configuration into your production environment. This occurs automatically during normal study deployments. Changes to your safety configuration during a live study are versionless and can be deployed like any other versionless mid-study change.
Activation Required After Initial Deployment: When you first deploy your study’s safety configuration, the safety integration is in the Inactive status. You must specifically activate your study when appropriate to begin creating and transferring Safety Cases. Be sure to include this step in your checklist for live study deployment.
Prerequisites
A user with the Vault Owner security profile must create the connection between EDC and the third-party Safety System (for E2BLink studies) or the Vault Connection from Veeva EDC to Veeva Safety (for Safety-EDC Connection studies).
By default, users with the standard CDMS Safety Administrator or CDMS Lead Data Manager study roles can perform the actions described below. If your organization uses custom roles, your role must grant the following permissions:
| Type | Permission Label | Controls |
|---|---|---|
| Standard Tab | Safety Integrations Tab | Ability to access the Tools > Safety Integrations tab |
| Functional Permission | View Safety Integrations | Ability to view the safety configurations available for a Study in Tools > Safety Integrations in read-only mode |
| Functional Permission | Manage Safety Integrations | Ability to modify the safety configurations available for a Study in Tools > Safety Integrations |
| Functional Permission | Manage Jobs | Ability to create, edit, and delete scheduled jobs |
Learn more about Study Roles.
The Manage Jobs permission is only required when editing study settings for the safety integration.
Connection Setup
The procedure to set up the connection between your vault and your chosen safety system depends on which type of safety integration you are using: E2BLink (AS2 Gateway) or the Veeva Safety-EDC Connection (Vault-to-Vault Connection).
E2BLink: Set Up the AS2 Gateway
When you are using a third party safety system (any safety system destination other than Veeva Safety), you must use an AS2 Gateway. Vault uses the Gateway Profile to point to the destination gateway. The transfer of files to and from Veeva EDC requires a special encryption key configuration to link the two systems. Contact Veeva Services to set up this connection.
This configuration includes the following actions:
- Add the Safety Transmission Profile. This creates an associated Gateway Profile to further configure with certificates and other relevant information.
- Specific IP allowances are required in both systems. Ensure that these are made on both sides.
- Contact your Veeva Services representative to plan your necessary setup by environment. Involvement from Veeva Technical Services may be necessary.
Vault Owner Required: You must be a user with the Vault Owner security profile to configure the AS2 gateway.
To configure the Gateway Profile in your Veeva EDC vault:
- Navigate to Admin > Settings.
- In the left-hand Vault Settings navigation bar, click Gateway Settings.
- If there isn’t already a Gateway Profile in the list, add a Safety Transmission Profile. See the instructions below.
- Click the Label of the Gateway Profile to open it.
- Click Edit.
- Fill the necessary fields. The table below provides details about each field.
- When finished, click Save.
- Ensure the Gateway Profile is in the appropriate Status (Active or Inactive) based on your organization’s current need.
Transmission Profile Fields
This table lists fields applicable to your safety configuration on the Transmission Profile object. Any fields that are on the object, but not on this table, aren’t required or relevant to the safety integration.
| Field | Editable | Required | Description |
|---|---|---|---|
| Label | Yes | Yes | This field defaults to the value indicated when adding the Safety Transmission Profile in System Tools. *We recommend that you don’t edit this field for your safety integration. |
| Name | No | N/A | This value is derived from the Name indicated when adding the Safety Transmission Profile in System Tools. |
| Status | Yes | Yes | Your profile can be in the Active or Inactive status. To edit the status, there is either a Set Active or Set Inactive button (next to the Edit button) depending on the current state of your Gateway Profile. If your Gateway Profile is in the Inactive status, any active safety integration will fail with each message send attempt. |
| Description | Yes | No | Enter a description and any notes about this profile that you'd like to include. |
| Sponsor Email Address | Yes | Yes | Enter an appropriate email address for the study's sponsor. This is included in the header information of a send to the gateway. |
| Vault URL | No | Yes | This is the URL for the return of Acknowledgement files from the safety system/gateway. This value is populated by the Safety Transmission Profile in System Tools. |
| Sponsor Certificate | Yes | Yes | Click Choose to select the Private Key File for the certificate on the Veeva EDC side. |
| Sponsor Certificate Password | Yes | Yes | Enter the Password for the Veeva EDC side certificate. |
| Sponsor Certificate Expiration Date | No | Yes | Vault reads this value from the certificate during the upload of the private key. |
| Sponsor ID | Yes | Yes | In the context of your safety configuration in Veeva EDC, the “sponsor” is your EDC vault. This value should match exactly the Sender value on the Safety Transmission Profile in System Tools. |
| Health Authority Certificate | Yes | Yes | Click Choose to upload the Private Key File of the certificate on the AS2 Gateway side. |
| Health Authority Certificate Expiration Date | No | Yes | Vault reads this value from the certificate during the upload of the private key. |
| Health Authority ID | Yes | No | In this context, the Health Authority is the safety system itself. This value should exactly match the value defined for Receiver on the Safety Transmission Profile in System Tools. |
| Health Authority URL | Yes | No | In this context, this is the URL of the AS2 Gateway for the safety destination, or where Vault will send the E2B XMLs that represent Safety Cases in EDC. |
| Gateway User Required | No | No | This checkbox is always selected. It controls the availability of the Gateway User field. |
| Gateway User | Yes | No | Select a User from the current vault to own this Gateway Profile. There are no specific alerts from the safety integration in Veeva EDC for this user. It is for reference and a point of contact. |
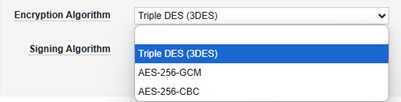
| Encryption Algorithm | Yes | No | This setting involves the carefully coordinated setup of the encryption keys (public/private) by the two systems. Always select Triple DES (3DES). The Gateway Profile is a generic facility that other Veeva applications use, but in the context of EDC and safety integration, only this option should be used.
|
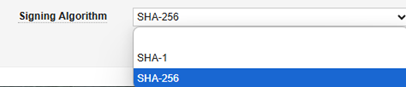
| Signing Algorithm | Yes | No | This setting involves the carefully coordinated setup of the encryption keys (public/private) by the two systems. Always select SHA-256. The Gateway Profile is a generic facility that other Veeva applications use, but in the context of EDC and safety integration, only this option should be used.
|
Veeva Safety-EDC Connection: Connect your Vaults
When you use Veeva Safety as your safety system destination, you can use a special Vault Connection for the integration. Vault-to-Vault Connections use a specific Vault platform technology to communicate back and forth which doesn’t use the E2B format or certificates.
Vault Owner Required: A user with the Vault Owner security profile must perform this configuration. We recommend that you consult your Veeva Services representative to plan each necessary step of your setup (Test, Production, etc.).
To configure the Safety-EDC Connection:
- In your EDC vault, navigate to Admin > Connections.
- In the list, locate the specific connection for the safety integration, Safety-EDC Connection. When you do this configuration, its status will be Pending.
- Hover over the Name of the connection to show the Actions menu.
- From the Actions menu (), select Download Connection File. This downloads the connection file (.cfg).
- Switch to your Safety Vault.
- Navigate to Admin > Connections.
- In the list, locate the specific connection for the safety integration, Safety-EDC Connection. When you do this configuration, its status will be Pending.
- Hover over the Name of the connection to show the Actions menu.
- From the Actions menu, select Connect from File.
- Upload your connection file (.cfg) from Step 4.
- When upload succeeds, scroll to and expand the Workflow Timeline section.
- From the Actions menu in the Details column, select Reassign.
- Select your own User.
- Click Continue.
- Click Complete to complete the workflow task.
- In the Review Connection confirmation dialog, select Approve Connection.
- Click Complete.
- Return to your EDC vault and complete Steps 11 through 17 on the Safety-EDC Connection.
Now that the connection is active, an administrator in the Safety vault must complete additional steps.
Once those are complete, you can set up the Transmission Profile in your EDC vault.
Safety Transmission Profile
The Safety Transmission Profile applies to the main, overall connection to the safety system that you set up in one of the two previous sections: the AS2 Gateway for E2BLink studies or the Vault-to-Vault Connection for Safety-EDC Connection studies.
For E2BLink studies, add your Safety Transmission Profile first. Doing so creates an associated Gateway Profile for a Vault Owner to further configure with certificates and other information.
To add a Safety Transmission Profile:
- Navigate to Tools > System Tools.
- In the left-hand navigation panel, click Connections.
- Click Safety to open that sub-tab.
- Click + New Connection.
- Fill the required fields. The table below summarizes these fields.
- Click Save.
| Field | Applies to | Description |
|---|---|---|
| Name | Both | The Name of the Connection. |
| Status | Both | The Status indicates whether the profile is Active or Inactive. This is typically set to Active, but it can be set to Inactive when shutting off all study integrations. |
| Type | Both | The Type of connection you want to use. Select AS2 Gateway for an E2B base connection, or select Vault Safety to use the EDC-Safety Connection. |
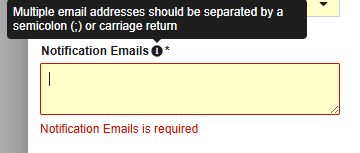
| Notification Emails | Both | Vault will send email notifications with crucial alerts about this profile to any email addresses or distribution lists entered in this field. You can enter multiple addresses, separated by a semicolon (;) or carriage return. See details below. |
| Vault Safety Inbox Type | Safety-EDC Connection | Always select Vault Safety-EDC Connection for this field. The other option, Main Inbox (E2B), is only for use in Studies that had a live integration setup to Veeva Safety with E2B before the Veeva Safety-EDC Connection feature was released. Any new studies connecting to Veeva Safety should use the Vault Safety-EDC Connection inbox. |
| Sender | E2B | The Sender (with Receiver) is used for routing at the AS2 gateway. The value you enter for Sender here is used in all E2B XML files for the E2B Locations N.2.r.2 - Message Sender Identifier and N.1.3 - Batch Sender Identifier. The value for Sender here must match the value for Sponsor ID in the Gateway Profile. |
| Receiver | E2B | The Receiver (with Sender) is used for routing at the AS2 gateway. The value you enter for Sender here is used in all E2B XML files for the E2B Locations N.2.r.3 - Message Receiver Identifier and N.1.4 - Batch Receiver Identifier. The value for Receiver here must match the value for Health Authority ID in the Gateway Profile. |
To edit an existing connection:
- Navigate to your Connection in Tools > System Tools > Connections > Safety.
- Click the Name of your connection to open it.
- Make your changes.
- When finished, click Save.
Vault Alert Types
The Safety Transmission Profile has a Notification Emails field, where you can indicate one or more email addresses to receive important alerts about the connection.
The supplied emails will receive the alerts for any Study that uses that transmission profile. Vault sends the following alerts, which vary by connection type:
| Alert | Applies to | Description |
|---|---|---|
| Failed Transmission | Both | When the connection used behind the safety transmission profile has a failure in an attempt to send to safety (e.g. cannot reach AS2 gateway server), the system will alert for each failure. The system will alert for each message that could not be sent. Actions should likely be taken with urgency to correct and get messages re-attempted. |
| Inactive Profile | Both | Studies can be set up and active for transmission, but the transmission profile and/or main connection behind the profile could be inactive. In such situations the system will alert for each message that could not be sent. Actions should likely be taken with urgency to correct and get messages re-attempted. |
| Certificate Expiry | E2B | Encryption certificates for E2B XML files are required on both ends of the safety connection. (Veeva and the destination AS2 gateway). As they typically need renewal at least once a year, the system will warn about expiration at these times: 3 months out, 1 month out, and day of expiration. |
Managing Studies
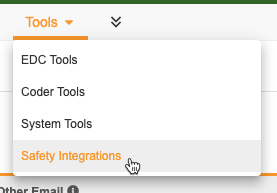
Accessing Safety Integrations
To access the Safety Integrations area, navigate to Tools > Safety Integrations. You can view specific configuration areas within Safety Integrations by opening that page from the Navigation Panel.
Safety Settings
Study safety settings answer the following questions:
- Where is the destination safety system?
- On what schedule will important First Send of Safety Cases happen?
- On what schedule will Vault look for possible data changes, warranting a Follow-up Send to the safety system?
- How will EDC react to the lack of acknowledgement from the safety system in a timely manner? (E2B only)
Some of these settings will differ between studies using E2B format (external safety systems from Veeva) or Safety-EDC Connection (using Veeva Safety).
Inactive after Initial Deployment: When a study’s safety configuration is first deployed, the safety integration has Inactive status. The study must be specifically activated as/when appropriate for safety cases to be created and transferred. Be sure to include this step in the checklist for live study deployment.
To configure your study with appropriate safety settings:
- Navigate to Tools > Safety Integrations
- Select your Study and Study Environment.
- Click Edit to setup these settings.
- Set your settings as appropriate.
- Click Save.
| Setting | Study Type | Description |
|---|---|---|
| Safety System Connection Profile | Both | This setting indicates where the Study will send its safety case data. The options available are the active Safety Transmission Profiles for your vault. See Safety Transmission Profiles above for details. Veeva EDC supports the use of both integration types (E2B and Safety-EDC Connection) in a single vault. This is typical in migration from another safety system to Veeva Safety, for example, the staged move of specific studies. If this is the case, use great care in assigning the appropriate profile for each study. |
| Study Transmission Status | Both | Vault will not begin sending Safety Cases until this is set to Yes, even if the other configuration is complete Inactive after Initial Deployment: When a study’s safety configuration is first deployed, the safety integration has Inactive status. The study must be specifically activated as/when appropriate for safety cases to be created and transferred. Be sure to include this step in the checklist for live study deployment. |
| Alerting on Unsubmitted Forms | Both | When set to Yes, Vault sends an email alert to a selected group of users if an Safety Case Initiation Event form has Item answers indicating it should transfer, but the site hasn’t submitted the Form for the first time. |
| Acknowledgement File Late Behavior | E2B | For non-Veeva safety system integration, E2B files will flow in both directions. When Veeva EDC sends content to a safety system, it will wait for the formal “ACK” file from the safety system before sending on another. If there is significant delay in that triaging or an issue with the safety setting, this setting can optionally mark the pending safety messages forward, thus allowing for additional follow-up (i.e. more data has changed in EDC).
|
| Data Synchronization Period (Days) | Safety-EDC Connection |
The Safety-EDC Connection will send not only safety case data, but also all other data not deemed "in case" by EDC. This setting involves the flow of that additional data, specifically, and when to turn off the flow For example:
Should data update in EDC that changes actual case content (e.g. seriousness criteria, severity, etc.) after this day number threshold, EDC will of course send on a follow-up normally. In the above example, if, on February 13th, the narrative was updated with more information, the follow-up would be sent at the next follow-up job run. |
| Send First New Case to Safety System In | Both |
|
| First Follow-up Scan Time of Day | Both | Select the time of day to run the First Follow-up Scan job. Daily Follow-up scans look for changes since the last completed run (e.g. 24 hours before). If a subject had data or link changes in that time period, all of their safety cases will be re-examined for potential follow-up transfer. |
| Second Follow-up Scan Time of Day | Both | Select the time of day to run the Second Follow-up Scan job. Daily Follow-up scans look for changes since the last completed run (e.g. 24 hours before). If a subject had data or link changes in that time period, all of their safety cases will be re-examined for potential follow-up transfer. |
| Full Scan Follow-up | Both |
|
| All Scheduled Follow-up Scans Expire After | Both (Non-production only) | Select a datetime to expire all follow-up scans. This is required in non-production studies because normally, recurring scans aren’t necessary outside of production. Testing in those environments is more situational, and ad hoc scans are the normal process. |
As is the case with other scheduled jobs, a locked study will auto expire all scheduled jobs after a period of days. If a study needs to be un-locked, the follow-up scan job must be re-setup once more from the settings page. Regulatory needs for timely follow-ups are a very significant topic, so be sure to carefully check the job schedule on un-lock of a study.
Run Follow-up Scan
There are two primary reasons to run the follow-up scan:
- Changes to a live study’s design could mean that previously sent Safety Cases require a follow-up, based on the adjusted rules. The scheduled full scan will catch those case changes on its next run, or a user can run the job ad hoc in full immediately after deployments.
- Non-production environments use the ad hoc job almost exclusively. With testing and specific study scenarios tries, users will want to run the scan as/when they expect to see follow-ups sent, as opposed to waiting for a scheduled run
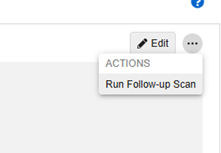
To run an ad hoc follow-up scan:
- Navigate to Tools > Safety Integrations.
- Select your Study and Study Environment.
-
From the Actions menu (), select Run Follow-up Scan.
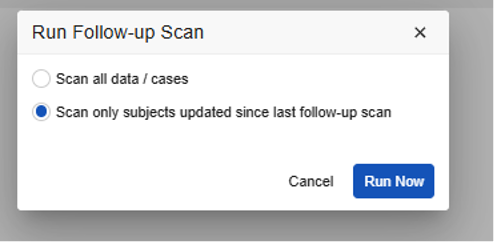
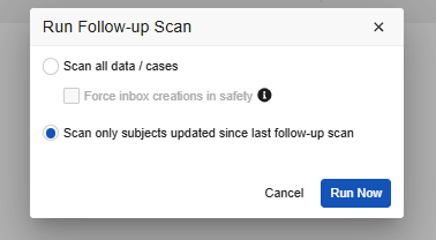
- By default, Vault runs the job incrementally. You can leave this with the default option, or choose the first option, Scan all data/cases, to run a full re-inspection. There are different dialog options for E2B studies and Vault Safety-EDC Connection studies. See details below.
- For Vault Safety-EDC Connection studies, you can select the Force inbox creations in safety. Do so for ad-hoc scans (full) when you have purposefully changed the study design and you want to get appropriate follow-ups due to those design changes.
- In the Job Queued dialog, click Close.
- When finished, Vault sends an email notification to the user that initiated the scan job with a link to download the results. You can also access job results from this and previous runs from Tools > EDC Tools > Job History for your Study.
Job Limits: Only one follow-up scan job can run at a time in your Study. This includes any scheduled jobs that may already be in progress.
E2B Study Run Follow-up Dialog:
Vault Safety-EDC Connection Study Run Follow-up Dialog:
Job Log
Incremental scans will indicate which cases were scanned or not, based on recent EDC activity.
Any case where current data changes the content relative to the last message sent to the safety system will note a follow-up being sent.
Incremental Scans
What determines whether a subject (their cases) are scanned or not for an incremental scan? Subjects are marked for inspection in the next scan when any of these EDC actions happens:
- Submit of any form that is configured for safety
- Site linking to any form configured to safety
- Site de-linking a form that is configured for safety
- Medical coding changes to a form configured for safety
Study Alert Types
The safety integrations module for Veeva EDC currently has these alert types:
| Type | Recipients | Description |
|---|---|---|
| Non Submitted Form | The site user who created the Form, as well as any Email Groups and Distributions List (cc’ed) | This is a critical alert type. The initiation of a Safety Case/transfer starts ith the first submit of the form where the data was entered. Site users can enter data indicating the form constitutes a safety case, but forget that first submit until perhaps hours or days later. This will delay the important first send until that first form submission is performed. To address this specific situation, this alert type scans every hour for this scenario:
|
Manage Study Alert Recipients
If your study has Alerting on Unsubmitted Forms set to Yes, you can manage which users receive those alerts from this page.
Add Recipients
To add recipients:
- Navigate to your Study from Tools > Safety Integrations.
- In the navigation panel, click Alert Recipients.
- Click + New Alert Recipient.
- For Type, select Non Submitted Form.
- Optional: To have users only receive alerts for a specific country, select a Study Country. To send alerts to these recipients for forms in any country, leave this blank.
- Select an Email Group. These groups are created by study designers in Studio.
- To send alerts to emails not in a configured group, enter a list of email addresses, separated by a semi-colon (;) or carriage return, in Other Email.
- Click out of the row to save.
As an example, the alert group configured below, “MainStudyAlerts” (Lead Data Managers in the study, perhaps) is set, along with country-specific safety user distribution lists:
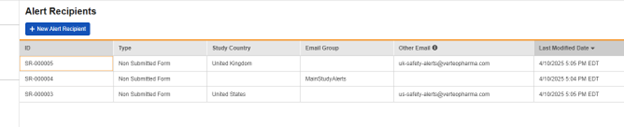
Remove Recipients
To remove recipients:
- Navigate to your Study from Tools > Safety Integrations.
- In the navigation panel, click Alert Recipients.
- Locate the row of the recipient you want to remove.
-
Hover over the recipient row’s ID to show the Remove () button.
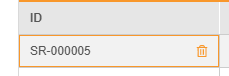
- Click Remove ().
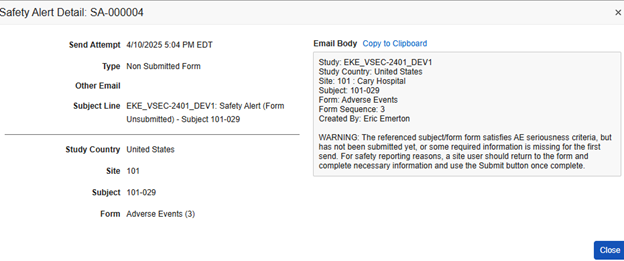
Alert History
Depending on the type of alert, it might be recorded when sent. You can review a history of alerts sent from Tools > Safety Integrations > Alert History.
The example below shows two alerts previously sent. You can view the content of an alert by clicking the ID link in a specific row.
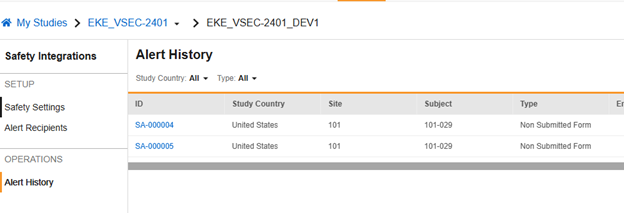
In this example, Vault sent an alert to the site user, along with the configured alert recipients, about an adverse event that initiated a safety case, but the site hadn’t yet submitted the form.