Exporting Data
You can group data listings together for export as Export Definitions from the Export area of EDC Clinical Reporting. For each Export Definition, you can add one or more of the data listings from your study. When you generate the export package, you can choose to generate it in CSV or SAS (sas7bdat) format. Note that the encoding for CSV and SAS files is UTF-8. It is recommended to set your encoding to UTF-8 when viewing these files in programs like Excel™.
After you select your desired format, Clinical Reporting then generates a set of files, one for each export listing. Once you generate the export package, you or any other Clinical Reporting user with access to your Study can download the export package (a ZIP file containing the collection of listing files, either CSV or sas7bdat, and the manifest, “manifest.json”, describing the package contents). Then, you can share it with study stakeholders, such as regulatory authorities, medical monitors, and statisticians. You can also send datasets from the Study Data Extract job in EDC Tools to Clinical Reporting
Prerequisites
You can export data based on system-generated Core Listings, but if you want to export data from custom listing formats, you must first create listings.
By default, users with the standard CDMS Lead Data Manager and CDMS Data Manager study roles are able to perform the actions described below. If your organization uses custom roles, then your role must grant the following permissions:.
| Type | Permission Label | Controls |
|---|---|---|
| Functional Permission | ||
| Functional Permission | View Casebook | Ability to view information about and from subject Casebooks (for reports, dashboards, and CDB) |
| Functional Permission | View Export | Ability to access the Export page |
| Functional Permission | Create Export Definition | Ability to create and copy Export Definitions |
| Functional Permission | Generate Export Package | Ability to generate a CSV or SAS export package |
| Functional Permission | Delete Export Definition | Ability to delete an Export Definition |
| Functional Permission | View Export Packages | Ability to access Export > Packages to view generated export packages |
If your Study contains restricted data, you must have the Restricted Data Access permission to view it.
Learn more about Study Roles.
Accessing Export
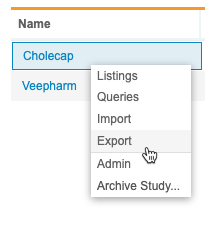
You can access your Export Definitions from the Export area of EDC Clinical Reporting. You can navigate to the Export area from the Navigation Drawer or the Study menu.

|
|
Viewing Exports
The Export page has two tabs, Definitions and Packages. From Export > Definitions, you can view, create, and edit Export Definitions for your Study. From Export > Packages, you can view all generated export packages and review an error log for any failures.
Definitions
Clinical Reporting lists all Export Definitions for your study in Export > Definitions. The table below details each column of the Export Definition listing:
| Column | Description |
|---|---|
| Name | The Title of the export definition, defined during definition creation. Clinical Reporting shows a clock icon () in this column if this definition has scheduled exports set up. Hover over the icon to show the schedule. |
| Status | An Export Definition can be in one of two statuses: Draft and Published. |
| Listings | The number of data listings within the Export Definition. |
| Type | The type of Export Definition. See Export Types below for details. |
| Created On | The date and time of the Export Definition creation and the name of the user who created it. |
| Last Modified | The date and time of the last modification to the Export Definition and the name of the user who made the change. |
| Latest Package | The status of the export package and the date and time the package was generated. Click Download () to download the package. |
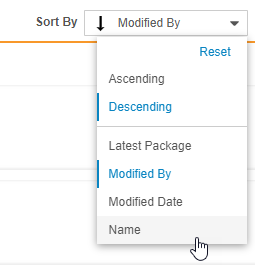
You can sort this listing by Latest Package, Modified By, Modified Date, or Name. Select a sort column and order from the Sort By menu.
Click Reset in the Sort By menu to return to the default sort order (Descending, Modified Date).
Packages
Clinical Reporting lists all packages generated for a Study in Export > Packages. The table below lists the details of each column for the package listing:
| Column | Description |
|---|---|
| Name | This column lists the Title of the Export Definition used to generate the package, the Date and Time the package was generated, and the number of listings included in the package. Clinical Reporting shows a clock icon () in this column if this package has scheduled exports set up. Hover over the icon to show the schedule that was run. |
| Type | This column lists the Type of the Export Definition used to generate the package. |
| Processed By | The Name of the user who initiated package generation and the Date and Time they did so. |
| Status | This column lists the status of the package: In Progress, Complete, or Error. When Complete, click Download () to download the package. |
Sort Packages
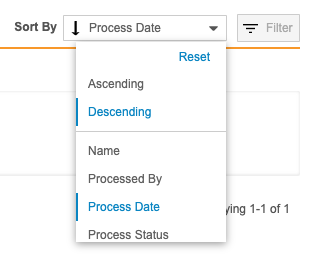
You can sort this listing by Name, Processed By, Process Date, and Process Status. Select a sort column and order from the Sort By menu.
Click Reset in the Sort By menu to return to the default sort order (Descending, Process Date).
Errors
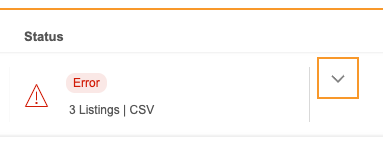
If package generation fails, you can view a list of errors from Export > Packages.
To view errors:
- Navigate to Export > Packages for your Study.
- Locate the failed package in the list.
- Clinical Reporting opens the Issues panel. This lists each error that occurred during package generation.
- Optional: Click Download () to download the issue log.
- Click Close () to close the Issues panel.
Export Types
Clinical Reporting supports two types of exports: Custom and Raw (SDTM was deprecated with the 25R1 release). The default is Custom, which allows you to create your own export definition without the defined conventions that raw-type exports include.
Custom
When creating an Export Definition, you can choose not to use the Raw format by selecting Custom for Type. When you don’t use a defined format, CDB only includes the listings and data that you define when configuring your definition.
Raw
When creating an Export Definition, you can choose to use Raw format (by selecting Raw for Type). Raw export packages have the following characteristics:
- The package contains an export listing for each core listing within the study, even if the form has no data.
- Any date and datetime items display both the default and the RawDate() format. See the table below for examples of
RawDate()format dates. - Items with units include columns for the translated name and unit value. See the table below for examples of unit columns.
- The package contains additional System Listings for contextual header information. See a detailed list below.
Export Listings for Forms
Each form’s listing in your raw export will include the following columns, in addition to columns for each Item on the Form:
- Study.Name
- Site.Number
- Subject.Name
- EventGroup.Name
- EventGroup.SeqNbr
- Event.Name
- Event.Date
- Event.VisitMethod
- Event.Status
- Form.Name
- Form.DataSource
- Form.SeqNbr
- Form.LastModifiedDate
- ItemGroup.SeqNbr
System Listings
Raw export types include the following System Listings by default. These listings provide operational metadata for your study. For Custom export types, System Listings are not included by default but can be added if needed.
The table below lists the columns included in each System Listing.
| System Listing | CQL | Columns |
|---|---|---|
| Sys_Sites | CALL Sys_Sites |
|
| Sys_Subjects | CALL Sys_Subjects |
|
| Sys_Events | CALL Sys_Events |
* This property is only available in Studies where Incremental Ingestion is enabled. If override labels aren’t configured for the Study, CQL returns the Event Group Label and the Sequence Number. |
| Sys_Forms | CALL Sys_Forms |
* This property is only available in Studies where Incremental Ingestion is enabled. If override labels aren’t configured for the Study, CQL returns the Event Group Label and the Sequence Number. |
| Sys_ILB | CALL Sys_ILB |
* This property is only available in Studies where Incremental Ingestion is enabled. If override labels aren’t configured for the Study, CQL returns the Event Group Label and the Sequence Number. |
| Sys_Links | CALL Sys_Links |
|
| Sys_PD | CALL Sys_PD |
* This property is only available in Studies where Incremental Ingestion is enabled. If override labels aren’t configured for the Study, CQL returns the Event Group Label and the Sequence Number. |
Core Listings
The following columns are included in Core Listings that are configured with Labs or Clinical Coding.
Coding for WHODrug Dictionary Columns:
- CodingStatus
- DictionaryRelease
- DrugCD
- DrugName
- PreferredCD
- PreferredName
- ATC4CD
- ATC4
- ATC3CD
- ATC3
- ATC2CD
- ATC2
- ATC1CD
- ATC1
- LastCodedBy
- LastCodedDate
Coding for MedDRA Dictionary Columns:
- CodingStatus
- DictionaryRelease
- LLTCD
- LLT
- PTCD
- PT
- HLTCD
- HLT
- HLGTCD
- HLGT
- SOCCD
- SOC
- PrimaryPath
- LastCodedBy
- LastCodedDate
Local Labs Columns:
| Column | Description |
|---|---|
| LBDTC | Collection Datetime |
| LBDTC_RAW | Raw value for the Collection Datetime |
| LBAGE | Lab Age |
| LBAGE_UOM | Lab Age Unit |
| LBAGE_TRANSLATED | Lab Age Translated Value |
| LBAGE_UOM_TRANSLATED | Lab Age Translated Unit |
| LBTEST | Lab Test |
| LABMODIFIER | Lab Modifier |
| LBORRES | Lab Result |
| DECODE_LBORRES | Lab Result Unit/Codelist |
| TRANSLATED_LBORRES | Lab Result Translated Value |
| UOMTRANSLATED_LBORRES | Lab Result Translated Unit |
| LBORNRLO | Normal Range Lower Limit |
| UOM_LBORNRLO | Normal Range Lower Limit Unit |
| TRANSLATED_LBORNRLO | Normal Range Lower Limit Translated Value |
| UOMTRANSLATED_LBORNRLO | Normal Range Lower Limit Translated Unit |
| LBORNRHI | Normal Range Upper Limit |
| UOM_LBORNRHI | Normal Range Upper Limit Unit |
| TRANSLATED_LBORNRHI | Normal Range Upper Limit Translated Value |
| UOMTRANSLATED_LBORNRHI | Normal Range Upper Limit Translated Unit |
| LBOVRDNRLO | Normal Range Override Lower Limit |
| UOM_LBOVRDNRLO | Normal Range Override Lower Limit Unit |
| TRANSLATED_LBOVRDNRLO | Normal Range Override Lower Limit Unit Translated Value |
| UOMTRANSLATED_LBOVRDNRLO | Normal Range Override Lower Limit Translated Unit |
| LBOVRDNRHI | Normal Range Override Upper Limit |
| UOM_LBOVRDNRHI | Normal Range Override Upper Limit Translated Value |
| TRANSLATED_LBOVRDNRHI | Normal Range Override Upper Limit Translated Value |
| UOMTRANSLATED_LBOVRDNRHI | Normal Range Override Upper Limit Translated Unit |
| LBSTNRC | Normal Value for Codelist/Text values |
| DECODE_LBSTNRC | Normal Value for Codelist/Text values Decode |
| LBOVRDNRC | Normal Value Override for Codelist/Text values |
| DECODE_LBOVRDNRC | Normal Value Override for Codelist/Text values Decode |
| LBNRIND | Normal Range Indicator |
| LBCLSIG | Clinical Significance |
Raw Date Formats
For date and datetime items, Clinical Reporting includes the default date format and the RawDate() format for the date. In RawDate() format, partial dates and times display without any modifications.
| Date or DateTime as Recorded | Raw Format | |
|---|---|---|
| 1 | 27-Oct-2020 | 27-Oct-2020 |
| 2 | ?-Oct-2020 | UN-Oct-2020 |
| 3 | ?-?-2020 | UN-UNK-2020 |
| 4 | 27-Oct-2020 10:40 | 27-Oct-2020 10:40 |
| 5 | 27-Oct-2020 ? | 27-Oct-2020 UN:UN |
| 6 | ?-Oct-2020 ? | UN-Oct-2020 UN:UN |
| 7 | ?-?-2020 ? | UN-UNK-2020 UN:UN |
Items with Unit Columns
For unit-type Items, Clinical Reporting includes additional columns for the translated name and unit value. The table below shows the included columns for the “Weight” item, which is collected in kilograms.
| Weight | Weight_UOM | Weight_TRANSLATED | Weight_UOM_TRANSLATED |
|---|---|---|---|
| 65 | kgs | 143.3 | lbs |
Codelist Decodes
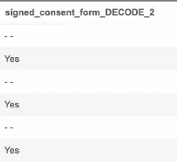
Raw export definitions include decoded values for codelist items. These values appear after the original item column in a new column with _DECODE appended to the item name. In the case of duplicate column headers, the name is followed by a number such as 2, 3, or 4.
For example, “signed_consent_form_DECODE_2”:
DECODE is added only for new export definitions and altered existing definitions. The DECODE column is included in the manifest file along with the itemtype attribute.
Duplicate Column Handling
Clinical Reporting allows duplicate columns and will display them in the UI.
System-generated columns, such as ones that have “_RAW” or “_UOM” appended, for example, automatically have “_2” appended to prevent duplicate column conflicts in certain scenarios. This occurs during the export transformation, before the Export Listing is exported to CSV or SAS.
For user-defined item names, Clinical Reporting attempts to preserve the original name by prepending the Name of the Item Group. This occurs when the CSV or SAS file is generated.
Restricted (Blinded) Data in Export Packages
Clinical Reporting determines the inclusion of restricted (blinded) data in the export package based on the Blinded property of the Export Definition.
When the Unblinded checkbox is selected, and one or more Export Listings contain restricted data, Clinical Reporting only allows users who have the Restricted Data Access permission to download the resulting export packages.
If your Export Listings contain restricted (blinded) data, Clinical Reporting only exports the restricted data if your Study Role grants the Restricted Data Access permission. By default, this permission is assigned to users with the standard CDMS Lead Data Manager study role.
The list below describes how Clinical Reporting handles restricted data when generating the package for an unblinded export definition:
- Source-level restriction: If an entire Source is restricted, which is only possible for third party data, the blinded export package will not contain any data from this source. If a listing only has data from the restricted source, then Clinical Reporting will not include that listing in the export package.
- Form-level restriction: If a Form is restricted, the blinded export package will not contain any data from that Form. If a listing only has data from the restricted Form, then Clinical Reporting will not include that listing in the export package. Clinical Reporting will not include any @HDR, @Form, or @ItemGroup information for the Form, and any Items from the Form are also excluded from export.
- Item-level restriction: If an Item is restricted, the blinded export package will not contain this Item. Clinical Reporting will not include any columns for the Item in any listings. If a listing uses this Item in the Listing Definition to derive the value of another column, that column will also be excluded.
Create an Export Definition
To create an Export Definition:
- Navigate to Export > Definitions.
- Enter a Title for your Export Definition. This displays in the Name column of the Export Definition list.
- Select Raw for Type to create an export definition of that type. Otherwise, leave this set to None.
- Optional: Enter a Description.
- Click Next.
- Optional: Click Expand or Collapse to expand and collapse listing categories and export definitions. Clinical Reporting groups listings by Category in Available Listings and by Export Definition in Export Definitions.
-
Drag and drop a Listing or Listing Category from Available Listings to Selected Listings. You can also drag and drop an Export Definition to Selected Listings to automatically add every listing from that definition.

- Continue dragging and dropping listings into Selected Listings until the Selected Listings include everything you want in your Export Definition.
-
To remove a listing from the definition, click Remove (). While you can’t remove System Listings for raw-type exports when creating an Export Definition, you can remove them later with the Modify Listings action.

- When finished, click Next.
- Optional: Enter a Short Title for your export listings. Clinical Reporting uses the Short Title as the filename for the listing in the export package.
- Optional: Edit the Title for your export listings.
- Click Save.
You can now generate and download the export package for this Export Definition.
Export Listing Creation: Adding a listing to the Export Definition creates a copy of that listing as an Export Listing. Any actions you take on the Export Listing only apply to it, and not the original core or custom listing.
Export Definition Workflow
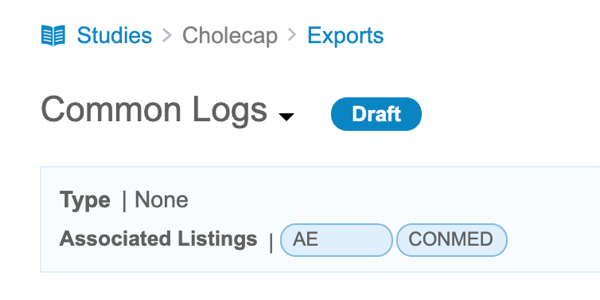
All Export Definitions start in the Draft status. Each listing within the definition also starts in Draft. Once all listings are marked as Ready, the Export Definition moves into the Published status. If at any time a listing is invalidated, the Export Definition moves into the Draft status. To return to Published, the invalid listing must be removed or updated. If any listings return to Draft, the Export Definition also returns to the Draft status.
You can generate an export package for an Export Definition that is in the Draft or Published statuses.
Look to the Status Badge to identify the status of an Export Listing or Export Definition. The Status Badge is displayed in the definition list, the list of listings within the definition, and on the listing page.
How to Mark a Listing as Ready
To mark an Export Listing as Ready:
- Open the Export Listing in Clinical Reporting> Export > Definitions.
- Verify that your listing is ready for use.
- Click Ready in the Status Toggle.
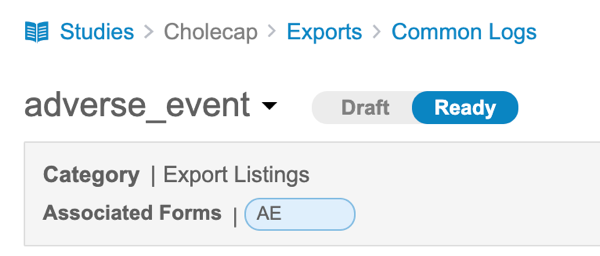
You can return the listing to the Draft status by clicking Draft in the Status Toggle.
Export Change Detection
When you create an Export Definition, it’s made up of Export Listings. Those Export Listings are snapshots of the listings they were created from. A “parent listing” refers to a listing that was used as the source to create an Export Listing. When the parent listing’s syntax is updated upstream, in some cases, the export listing’s Listing Definition may become out of sync with that of the parent listing. This can lead to outdated listing structure in export packages. For example, if the Listing Definition statement for a public Custom Listing was updated, any Export Listing that was created from that parent listing will still reflect the original statement that the Export Listing was created with.
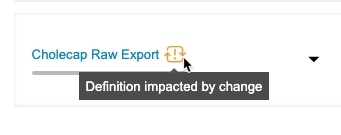
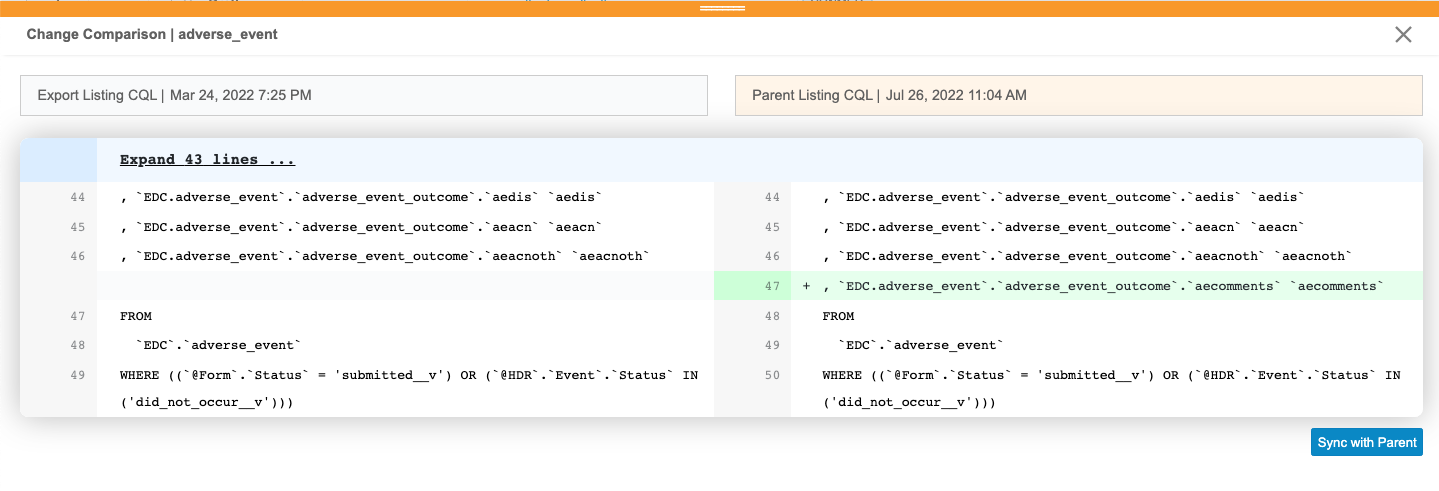
Clinical Reporting, at specific trigger points, checks the parent listings of your export definition’s Export Listings for changes. When you or another user modifies a parent listing, Clinical Reporting displays a change indicator on the Export Definition. Then, you can optionally review the Listing Definition changes and choose to sync the Export Listing with the parent.
You must be the owner of the Export Definition or have the Vault Owner security profile to sync an Export Listing with the parent.
Detected Changes
Clinical Reporting detects only changes in the same environment, and it doesn’t detect changes across different studies.
Clinical Reporting detects the following changes:
- Updates to the Listing Definition
- Changes to a study’s design, such as a new Item or Item Group, that are applied to a Core Listing used in a raw type export definition
- Updates to the Listing Definition for a parent listing whose child listing is used as an Export Listing
Clinical Reporting only considers study design changes that are applied to a Core Listing when that listing is used in an export definition with the Raw type.
Clinical Reporting doesn’t consider updates to a listing’s Name or other properties as changes.
Clinical Reporting checks for changes at these events:
- Swap (when new data becomes available after successful import): Clinical Reporting checks for changes across all Export Definitions.
- Saved changes to the LIsting Definition for public Custom Listings or Views: Clinical Reporting checks for changes in Export Definitions that contain the listing or view that was modified.
Review Listing Definition Changes
To review changes:
- Navigate to Export > Definitions.
- Click Impacted to filter the list of Export Definitions to only show those that are impacted by changes.
- Click to open the Export Definition containing changes.
-
Click Impacted to filter the list of Export Listings to only show those out of sync with their parent.

-
For the listing that you want to review, click Compare. This opens the Change Comparison panel.

- Review the changes.
- When finished reviewing, if you don’t want to sync with the parent, click Close () to close the panel.
Once you have reviewed the changes, you can sync the listing with the parent.
Sync with the Parent
To sync an Export Listing with the parent:
- Navigate to the impacted Export Definition.
- Click Impacted to filter the list of Export Listings to only show those out of sync with their parent.
- For the listing that you want to sync, click Compare.
- In the Change Comparison panel, click Sync with Parent.
- In the confirmation dialog, click Confirm.
To sync multiple Export Listings with their parents:
- Navigate to the impacted Export Definition.
- Click Impacted to filter the list of Export Listings to only show those out of sync with their parent.
- Select the Export Listing checkbox for each listing that you want to sync.
- Optional: Select the Select All checkbox to select all listings on the current page.
- In the confirmation dialog, click Confirm.
Edit an Export Definition
After creating an Export Definition, you can return later and modify which listings are included, edit the definition’s properties, and rename listings.
Note that you can only save changes to definitions that you create. To make changes to listings created by others, you must create a copy and then make your changes.
Vault Owners can make changes to Export Definitions created by all users.
How to Rename Listings
You can easily rename export listings in your Export Definition. Renaming a listing here only renames the Export Listing. It doesn’t rename the original data listing.
To rename a listing:
- Navigate to Export > Definitions.
- Open your Export Definition.
-
In the Export Listings table, click Edit () to enter Edit mode.

- Click View () to return to View mode and save your changes.

How to Modify Included Listings
You can add and remove listings from an Export Definition.
To modify included listings:
- Navigate to Export > Definitions.
- Click to open your Export Definition.
- Optional: Click Expand or Collapse to expand and collapse listing categories and export definitions. Clinical Reporting groups listings by Category in Available Listings and by Export Definition in Export Definitions.
-
Drag and drop a Listing or Listing Category from Available Listings to Selected Listings. You can also drag and drop an Export Definition to Selected Listings to automatically add every listing from that definition.

- Continue dragging and dropping listings into Selected Listings until the Selected Listings include everything you want in your Export Definition.
- Click Next.
- Optional: Enter a Short Title for your export listings. Clinical Reporting uses the Short Title as the filename for the listing in the export package.
- Optional: Edit the Title for your export listings.
- Click Save.
How to Edit Export Definition Properties
To edit the properties of an Export Definition:
- Navigate to Export > Definitions.
- Click to open an Export Definition.
- Click Save.
Copy an Export Definition
You can copy an Export Definition using Save As.
To copy an Export Definition:
- Navigate to Export > Definitions.
- Click to open your Export Definition.
- Optional: Enter a Title for your new export definition. By default, the Title is the title of the original definition with a “2” appended to it.
- Optional: Enter a Description.
- Click Save.
Delete an Export Definition
Note that you can only delete Export Definitions that you created.
To delete an Export Definition:
- Navigate to Export > Definitions.
- Locate your Export Definition in the list.
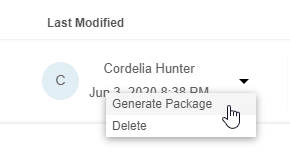
- From the Export () menu, select Delete.
Generate & Download an Export Package
You can generate and download an export package from any existing Export Definition as a set of CSV or SAS files and a manifest file.
- Navigate to Export > Definitions.
- Locate an Export Definition in the list.
- Select CSV or SAS for the export format.
- Once Clinical Reporting generates the package, click Download () to download the export package (ZIP).
Export Package Expiration: After an export package is generated, it is available to download for up to thirty (30) days. After thirty days, the package is expired, and a user must re-generate it to download. If the export package is modified, the thirty day period restarts.
Example Manifest File
The manifest file consists of system-generated listings and one Core Listing, with each containing the following:
- A description of the CQL used to create the file
- A list of columns and their descriptions
- For Items, attributes such as the Name, Type, Item Type, Item Label, Source, and Form
- For Codelist Items, Codes and Decodes
See below for an example manifest file.
Restricted data: If your export package is blinded, the manifest file will indicate the blinded attribute for each blinded item.
Schedule Recurring Exports
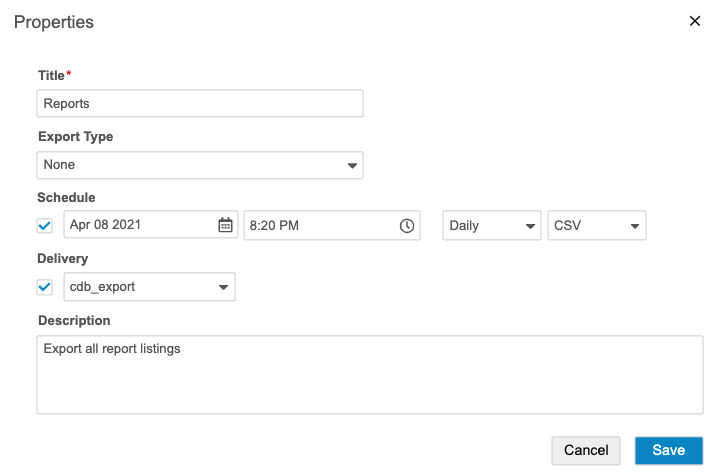
You can schedule a daily, weekly, or monthly export and select users to notify of the export package’s availability. Once a scheduled export finishes generating the package, you can download it from Export > Definitions, or deliver it via FTP to a location of your choosing.
To schedule a recurring export:
- Navigate to Export > Definitions.
- Click to open an Export Definition.
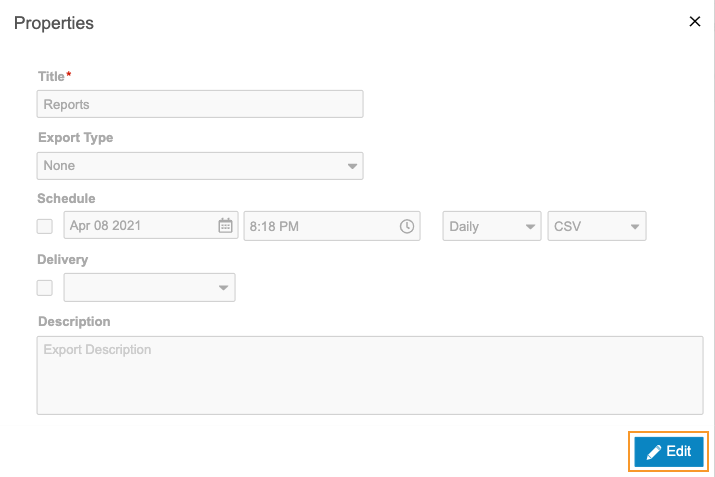
- From the Export Definition () menu, select Properties.
- Click Edit.
- If a scheduled export already exists, click Add Schedule. You can have up to five (5) scheduled exports per Export Definition. Clinical Reporting doesn’t allow duplicate schedules (matching date, time, interval, and format).
- Select the Schedule checkbox.
- Select a Date and Time (UTC). This is the date of the first export. Clinical Reporting will then generate future export packages after the chosen interval (step 8) has passed. For example, if you select “Weekly” and “7 December 2020, 12:00 AM”, Clinical Reporting will generate an export package at that time, and then the next export would occur on “14 December 2020, 12:00AM” (UTC).
- Select Daily, Weekly, or Monthly as an Interval.
- Select CSV or SAS for Format. This determines the type of files that Clinical Reporting generates for the export package.
- Optional: Select the Delivery checkbox and select an FTP delivery location. See Create an FTP Destination for details about creating destinations for delivery.
- Click Save.
How to Edit a Scheduled Export
To edit a scheduled export:
- Navigate to Export > Definitions.
- Click to open an Export Definition.
- From the Export Definition () menu, select Properties.
- Click Edit.
- Make changes as needed to the export Schedule and Delivery.
- Click Save.
How to Stop a Scheduled Export
At any time, you can stop a scheduled export. The export won’t reoccur until you start it again.
To stop a scheduled export:
- Navigate to Export > Definitions.
- Click to open an Export Definition.
- From the Export Definition () menu, select Properties.
- Click Edit.
- Clear the Schedule checkbox.
- Click Save.
Create an FTP Connection
Clinical Reporting supports the use of both the provided Vault FTP server and third party FTP servers. If you plan to use a location other than the provided Vault FTP server, you must already have that server set up.
A user with the Vault Owner security profile can set up the Destination for a scheduled export from Tools > EDC Tools > FTPs.
If your vault uses custom Study Roles, your role must have the following permissions:
| Type | Permission Label | Permission |
|---|---|---|
| Standard Tab | EDC Tools Tab | Ability to access the EDC Tools tab. |
| Functional Permission | Manage FTP | Ability to create and edit FTP Connections in EDC Tools. |
To set up an FTP Connection:
- Navigate to your Study in Tools > EDC Tools > FTPs.
- Click + New FTP.
-
Enter an FTP Name. This name will display in the Delivery drop-down menu of the Export Definition in the Exports section of EDC Clinical Reporting.
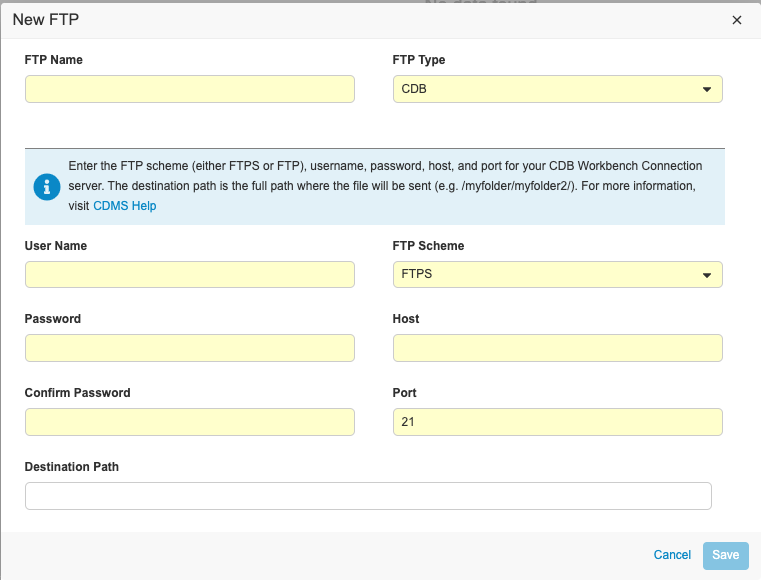
- Select CDB for Type, even if you’re creating a connection to send exports from Clinical Reporting to the Vault FTP.
- Enter your User Name. For the Vault FTP server, this is the User Name that you use to log in to Vault, including the domain, with the host in front. For example, “verteopharma.veevavault.com+cordelia.hunter@verteopharma.com”.
- Enter your Password.
- Confirm password.
- Select FTP Scheme. Select FTPS if you’re sending your export from Clinical Reporting to the Vault FTP server.
- Enter the Host. For the Vault FTP server, this is the URL of your vault: {DNS}.veevavault.com. For example, “veepharm” is the DNS in veepharm.veevavault.com.
- Enter Port.
- Enter the Destination Path for where you want to deliver the package. If necessary, you can create a Destination Path in the FTP server prior to entering it here. To create a Destination Path in the Vault FTP server, a user needs API Access permission.
- Click Save.
For more information on connection field details and how to edit the FTP record, see Connecting to an FTP Server from EDC Tools.
Subscribe for Package Notifications
Clinical Reporting can send an email notification when an export package enters a given status. Work with your organization’s user administrator to subscribe.
Clinical Reporting - Export
Last Updated: 24R1
This video shows how to export reports from EDC Clinical Reporting.
