Managing Connections
In the current release, System Tools only supports the creation and management of Connections to Safety Systems and the Veeva Training learning management system. The Connection object allows you to create integrations locally, between vaults, or with an external application. Connections other than safety systems or the Veeva Training LMS connection must be created in Admin > Connections.
This topic contains information relevant to the Veeva Training LMS connection. For information related to safety system connections, see Managing Safety Integrations.
Prerequisites
Only users with the default Vault Owner security profile may access and use Tools > System Tools > Connections. If your vault is not using Multi-Role Security and uses custom Security Profiles, your profile must grant the following permissions:
| Type | Permission | Controls |
|---|---|---|
| Security Profile | Tabs: System Tools | Ability to access the Tools > System Tools tab |
| Security Profile | Objects: Connection: Create, Edit | Ability to create and edit records in the Connection object |
| Security Profile | Objects: Connection Authorization: Create, Edit | Ability to create and edit records in the Connection Authorization object |
| Security Profile | Objects: CDMS Vault Settings: Create, Edit | Ability to create and edit records in the CDMS Vault Setting object |
Accessing System Tools
To access the System Tools area, click the Tools tab in the top navigation bar, and then click System Tools.
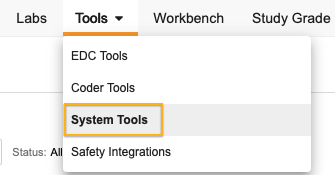
By default, System Tools opens to the Role Management area. You can select from the Navigation Panel to visit other System Tools areas. Learn more about each of these below.
How to Create an LMS Connection
Only Vault Owners can create an LMS connection.
To create a new Connection:
- Navigate to Tools > System Tools > Connections.
-
Click + New Connection.

- Enter a Name for the new Vault Training connection.
-
Set the Training Status When No Mapping Exists For Study field to Trained or Not Trained. This determines the default status for users assigned to studies or roles without mapped curricula.

- Click Save.
Training Status
The Training Status When No Mapping Exists For Study setting in System Tools allows you to define a global default for users assigned to studies or roles with no mapped curricula.
If curriculum mapping is absent for a study or role and this field is set to Trained, the user is marked as Trained and granted access to the study. If the field is set to Not Trained, the user is marked as Not Trained and access is blocked.
If a curriculum mapping does exist, the system ignores these defaults and determines the training status based on the user’s LMS training data. If you select Ignore LMS in System Tools > Users, the system still applies your chosen default status but allows the user to access the study with or without completed training.
When you select Ignore LMS, the Clinical Data vault stops all communication with the Training vault, including new training assignments and status updates.
How to Edit an LMS Connection
To edit a Connection:
- Navigate to Tools > System Tools > Connections.
- Locate the Connection you want to edit in the list.
- Hover over the Name to display the Actions menu.
-
Click Edit Learning System.
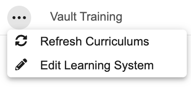
- Select Trained or Not Trained.
- Click Save.