Managing Study Environments
You can create and manage study environments from the Deployments listing page in EDC Tools.
Processing Time for Study Deployment: Study creation updates User Role Setup records and requires recalculation of group membership and sharing rules. The processing time when deploying a study to a production environment may take several hours, and user access is restricted until processing is complete.
Prerequisites
Before you can create Study Environments, a study designer must create a Study Master in Studio.
Users with the CDMS Deployment Administrator study role can perform the actions described above by default. If your vault uses custom Study Roles, your role must grant you the following permissions:
| Type | Permission Label | Controls |
|---|---|---|
| Standard Tab | EDC Tools Tab | Ability to access the EDC Tools tab |
| Functional Permission | Manage Deployments | Ability to create and manage study Environments and deploy Studies from EDC Tools, manage and deploy vault-level configuration from Tools > System Tools, manage and deploy listings, checks, and views in CDB, and enter License Keys |
| Functional Permission | Manage Study Milestones | Ability to lock and unlock Studies and Sites, as well as set the Billing Status for study environments from EDC Tools |
If your Study contains restricted data, you must have the Restricted Data Access permission to view it.
Learn more about Study Roles.
You must also have access to all environments and sites in addition to the permissions listed above.
About Study Environments
Study environments represent your Study as it exists in different stages of development. There are seven (7) types of environments:
- Development
- Migration (when enabled)
- Validation
- Test
- Training
- Production
- Post Production Test
You’ll build your study in your development environment, test it in one or more test environments, train staff on it in your training environment, and ultimately execute your study from your production environment.
Your environments may be spread across multiple vaults. Your development environment is in one, primary vault. Your test and training environments may be housed in that same vault or on a separate vault. Your production and PPT environments are on separate vaults from your development environment.
Study environments are tracked using the Study Instance object.
Migration Environments: Contact Veeva Support to enable migration environments in your vault.
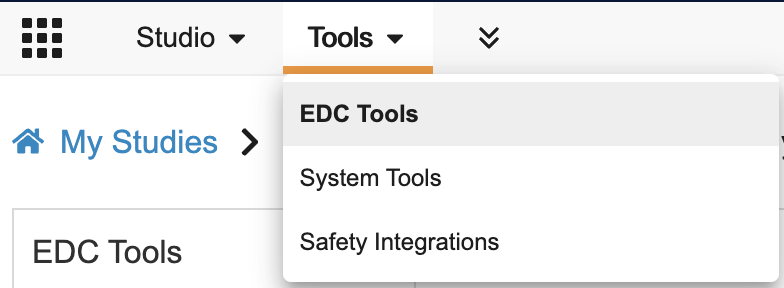
Accessing EDC Tools
To access the EDC Tools administration area, click the Tools tab in the primary navigation bar, and then click EDC Tools.
Viewing Study Environments
Once you open your Study Master in Tools > EDC Tools, Vault shows a listing of all Environments for that Study Master. From here, you can initiate deployments and create additional environments.
Latest Casebook Version vs. Build Number
The Latest Casebook Version column displays the latest Casebook Definition version that exists in that environment. The Study Build Number represents the number of changes since the last version. Vault increments the build number each time there is a change to any object after a version is created.
Once you create Version 1 of your Study, the Build Number starts at 1. For each change you make, such as adding a new definition or creating a rule, Vault increments the Build Number by 1. So, if you add Event Group first, Vault would then set the build number from 1 to 2. Vault continues to increment the build number for each change until you create a new version, even if you deploy. Once you create a new version, the build number resets to 1.
Use Latest Casebook Version to identify which version of the Study exists, but use Study Build Number to track unversioned changes across environments.
How to Create Study Environments
You can create new Study Environments for your study as needed from EDC Tools. Note that there are limits on how many Study Environments you can have of each type.
To create a new Study Instance:
- Navigate to Tools > EDC Tools.
- Click your Study Master’s Name in the Study Listing.
- From the Actions menu, choose an action to create an environment:
- + Development: Create a new development-type environment.
- + Migration: Create a new migration-type environment.
- + Test: Create a new test-type environment.
- + Validation: Create a new validation-type environment.
- + Training: Create a new training-type environment.
- + Production: Create a new production-type environment. (Note that this action is only available if your study doesn’t have a production environment).
- + Post Production Test: Create a new PPT environment. (Note that this action is only available if the “Enable Copy Study Data” feature is enabled. You must also have certain permissions and access. Learn more.)
- In the Create Environment dialog, select a Vault to create your Study Environment in.
- Click Continue.
- In the Create Environment confirmation dialog, click Create.
Vault creates a new Study Environment. You can now use this environment for development, test, or training.
Test Environments: You can create Test environments, previously known as UAT (user acceptance testing) environments, in any Studies created after the 22R2 release. UAT environments in Studies created before the 22R2 release are still labeled as UAT.
Post Production Test Environments (PPT)
If you have already deployed to your Production environment and would like to make changes post go-live, you can create a Post Production Test environment (PPT) in EDC Tools to test or preview post-production changes before the changes are applied to casebooks in production.
To create a PPT environment, you must have both the Manage Deployments permission and access to all environments and sites in both the DEV vault and the TST vault. You will also need access to the vault in which you’re creating your PPT environment.
To copy study data from production, you must meet the following criteria:
- Have access to the production sites from which you’ll copy data
- Be a cross-domain user or be using the Basic (non-SSO) security policy
- Be assigned a custom study role with the Copy Study Data to PPT permission
- Have an account in the source vault (PRD) and the target vault (PPT)
If your account has an SSO security policy, your User Name must be present in the DEV vault, the source vault (PRD), and the target vault (PPT) to copy study data.
When a copy job is run to copy study data from PRD to PPT, any already existing data on PPT is deleted. You do not need to manually delete data or study designs before subsequent copies to PPT.
To utilize the Post Production Test environment:
- Create a Post Production Test environment, following the steps above.
- Hover over your Development or TST environment to show the Actions menu ().
-
From the Actions menu, select Deploy.
-
In the Deploy Study Design dialog, select your PPT environment as the Destination Environment.
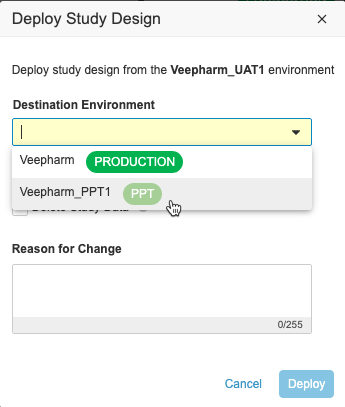
- Click Deploy.
- When deployment is finished, refresh the page.
- Hover over your PPT environment to show the Actions menu.
-
From the Actions menu, select Copy Study Data from Production.
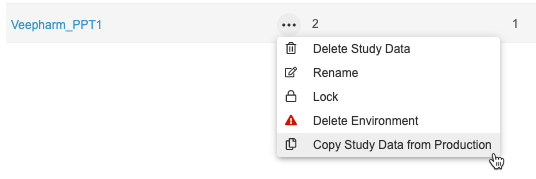
- Click Continue.
- Verify your login credentials.
- Click Continue. This opens the Copy Study Data from Production page.
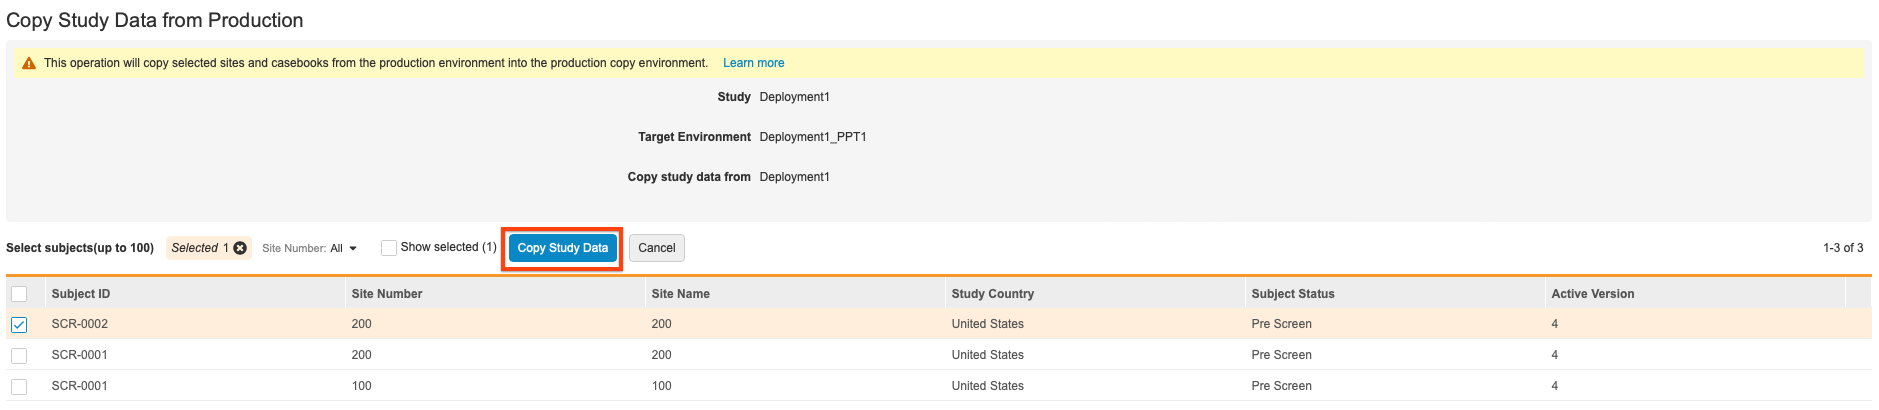
- Filter results by Site Number, then select the Subjects you want to copy study data from. You can select up to 100 subjects in each copy study data job.
- Click Copy Study Data. Vault begins a job to copy data.
Post Go-Live PPT Subject Copy and Site Casebook Version: When post go-live updates are implemented, the casebook version deployed to PPT will be higher than the casebook version of the subjects copied from PRD. After subject data is copied to PPT, to ensure the study design changes are tested, the sites should be upversioned and the Retrospective Amendment job run. Site upversioning and Retrospective Amendment must be the last step as it is not possible to copy Subject data from lower casebook versions to sites with higher casebook versions.
Site Number Filter: Note that changing the Site Number filter while choosing subjects will reset the contents of the grid and deselect any subjects that were chosen in the previous filter state.
You can track the progress of your copy on the Deployment History page.
Unsupported Study Data for Copy to PPT Environment
The following aren’t supported when copying data to PPT:
| Data Type | Unsupported Study Data for Copy to PPT Environment |
|---|---|
| Coding |
|
| Connections |
|
| Data Change Extract objects |
|
| Data Entry |
|
| Data Loader |
|
| Jobs |
|
| Labs |
|
| Listings |
|
| Object data |
|
| Review |
|
| Role management |
|
| Safety |
|
| Study administration |
|
| Study Data |
|
| Study Grade |
|
| Study Licensing |
|
Audit Trail Export Jobs Not Available in PPT: The audit trail of a study is not copied as part of the PPT data copy. Audit Trail Export jobs cannot be run in PPT environments.
When the copy is finished, Vault sends you an email notification. Once the copy is complete, the data in your PPT environment is available for testing post-production changes.
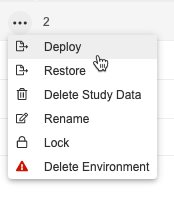
Available Environment Actions
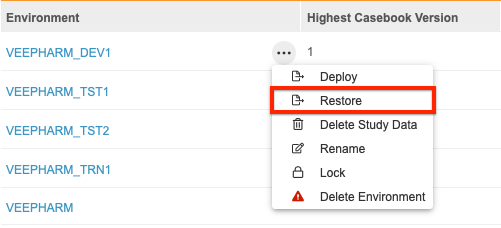
Hover over an environment in the list to show the Actions menu. You can perform environment-level actions using this menu.
The following actions are available in the environment-level Actions menu:
- Deploy: Use this action to deploy the latest casebook version in this environment to another environment. Learn more.
- Restore: Use this action to restore an environment from another.
- Delete study data: Use this action to delete study execution data in this environment. Note that this option is not available for production environments. Learn more.
- Rename: Use this action to rename a study environment.
- Delete: Use this action to delete a study environment.
- Study Data Lock: Use this action to lock a study environment. Learn more. When an environment is Locked, this becomes Unlock Study Data.
- Set Billing Status (Production only): Use this action to set the study’s Billing Status. Learn more.
How to Restore an Environment
There are two methods to restore your environment: from another environment or from a file.
Restoring from Another Environment
To restore from another environment:
- Navigate to EDC Tools > Deployments for your study.
- Locate your secondary development environment in the list of Environments.
- Hover over the environment to display the Actions menu ().
-
From the Actions menu, select Restore. Vault opens the Restore Study Design dialog.
- Select Restore from Environment.
-
Select the Source Environment.
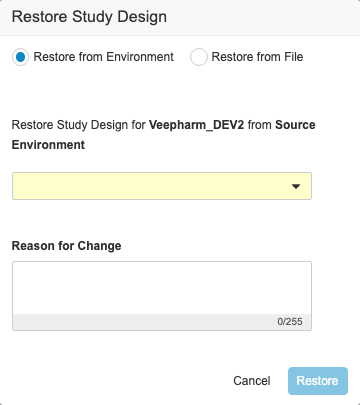
- Optional: Enter a Reason for Change.
- Click Restore. Vault begins a job to restore your environment from the other environment. When finished, Vault sends you an email notification.
Restoring from File
You can restore a deleted study design from the backup file that’s automatically created by the system for study deployment, or automatically when a study instance or environment is deleted. You can find your backup file(s) in System Tools > Deployment. Note that you can only restore the study design, not study data. To restore from production from a file, you must first obtain the study instance package file you want to use, and then you can use it to restore the environment from a file.
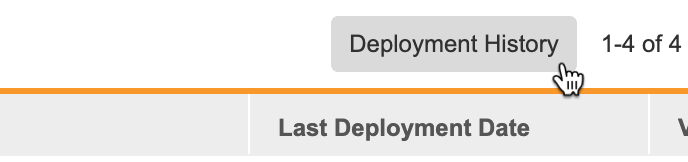
To obtain the study package file:
- Navigate to your Study in EDC Tools.
-
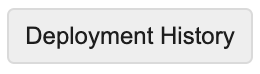
Click the Deployment History button on the upper right of the page.
- In the File column, click the Download icon () to download the package you want to use. The .ZIP package file download will begin, with the name structure File_{StudyName}_{DateTime}.zip.
- Extract the contents of the file package. The Pkg_{Version.Build}_{Env}_{DateTime}.zip file will be used to restore the environment.
To restore the environment from a file:
- Navigate to EDC Tools > Deployments for your Study.
- Locate your secondary development environment in the list of Environments.
- Hover over the environment to display the Actions menu ().
-
From the Actions menu, select Restore. Vault opens the Restore Study Design dialog.
-
Select Restore from File.
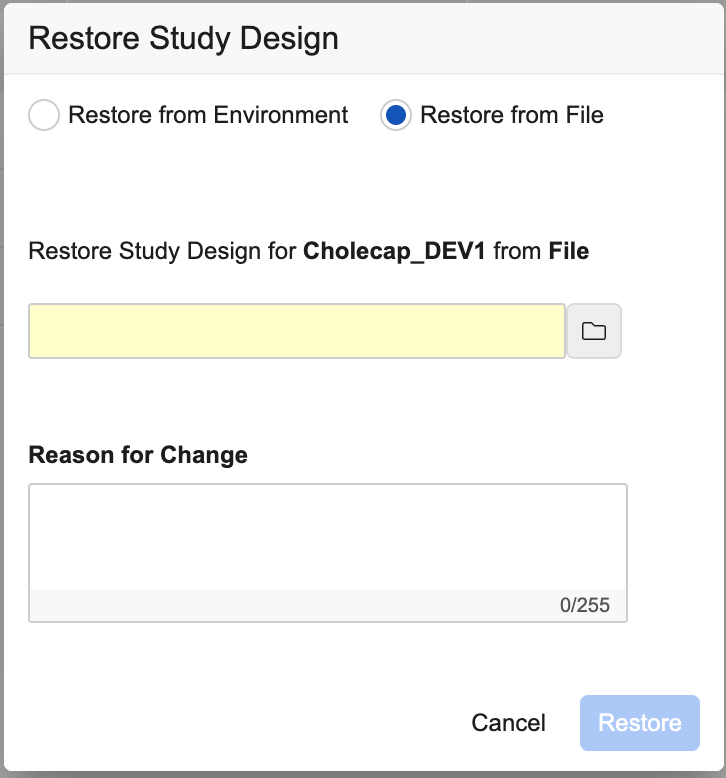
- Click the File icon () to browse to and select your file.
- Optional: Enter a Reason for Change.
- Click Restore. Vault begins a job to restore your environment from your production environment. When finished, Vault sends you an email notification.
How to Rename an Environment
Renaming an environment changes the name label of the environment’s Study Instance record, but does not change the Study Master name or the Study object name of the Environment which is also used outside EDC by CDB and the EDC API. Use this rename feature to provide useful names to your users or notes about the purpose of the environment. This change is reflected in the name label in the Studio, EDC Tools, Data Entry, Review, Assessments and Labs tabs. For example, if you do not want a user to test in an environment, you can append _do_not_use to the environment name.
To rename an environment:
- Navigate to Tools > EDC Tools.
- Click to open the Study Master containing the environment you want to rename.
- Locate the Environment in the list.
- Hover over the Environment to display the Actions menu.
- From the Actions menu, select Rename Environment.
- Enter a new Name.
- Click Continue.
- In the Rename Environment confirmation dialog, click Rename.
Vault renames your Environment. This changes the Label of the environment’s Study Instance record, but not the API Name.
How to Rename a Study
Study Rename Restrictions: Study rename permissions are restricted and can be enabled for a limited time via Veeva Support. For more information, contact Veeva Services.
Users with the Manage Deployments permission can rename a Study Master if the study has not yet been deployed to Production.
Requesting Study Rename Enablement
Renaming a study can impact connected Veeva products and external integrations. To reduce this impact, study renaming is currently only enabled by Veeva Support on a case-by-case basis. If you are a CDB customer, additional steps may be required before study renaming can be enabled. Veeva Support and Product teams will coordinate these steps as part of your request.
To request that renaming be enabled for your study:
-
Open a support ticket stating that you need to rename a study including the Study and the vault information and a brief explanation.
-
When you’ve completed the rename operation, inform Veeva Support. The study rename action will be disabled and the tickets will be closed.
Renaming a Study
To rename a study:
- Navigate to Tools > EDC Tools.
-
Hover over the study to display the Edit icon. Click the icon.

- Enter your new study name in the Edit Study dialog and click Save. Your new study can’t have the same name as an already existing study.
-
Click Rename in the confirmation dialog.

- The Study Rename job will queue. You can view the job status and log file in Deployment History.
How to Delete an Environment
In order to delete an environment, you must have the Edit Users permission in addition to the Manage Deployments permission, as deleting an environment will remove the environment from any other users’ study access.
To delete an environment:
- Navigate to Tools > EDC Tools.
- Click to open the Study Master containing the environment you want to delete.
- Locate the Environment in the list.
- Hover over the Environment to display the Actions menu ().
-
From the Actions menu, select Delete Environment.
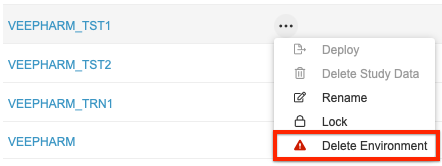
- In the Delete Environment dialog, enter the environment name to confirm.
- Click Delete. Vault begins a job to delete your Environment. When the job finishes, Vault sends you an email notification.
Vault automatically saves the study design’s backup file upon deletion. You can access the backup file from the deployment history and use it to restore the study design if needed.
Note that you can only delete a Production environment if it is empty/contains no data.
Environment Type Limits
The following limits apply for study instances:
| Type | Limit |
|---|---|
| Development | 2 |
| Migration | 3 |
| Validation | 2 |
| Test | 5 |
| Training | 2 |
| Production | 1 |
| PPT | 2 |
Deployment History
You can use the Deployment History to view a listing of all deployment events related to your Study.
Billing Status
All studies in non-ELA customer vaults have a Billing Status. Veeva uses the Billing Status to let Sales know if a Study is deployed, on hold, locked, decommissioned, and if it has active subjects. Veeva uses this information to create invoices for the studies based on the associated fees.
Once you deploy to production, Vault sets the Billing Status automatically to Deployed/In Progress. After that, the Locked, On Hold, and Decommissioned statuses become available.
Different statuses have different billing considerations, which your Veeva Representative will discuss with you to determine the appropriate status for your study’s circumstances.
Available Billing Statuses
The table below lists the available Billing Statuses in Veeva Clinical Data.
| Status | Description | Next Statuses |
|---|---|---|
| Deployed/In Progress | This is the initial status for your Study. Your Study is commencing. Deployment and casebook creation are both available if your Study is licensed. |
|
| On Hold | The Study is on hold. Casebook creation and study deployments are not allowed even if the Study is licensed. |
|
| Locked | The Study is locked. Casebook creation and study deployments are not allowed even if the Study is licensed. |
|
| Decommissioned | The Study is concluded. Casebook creation and study deployments are not allowed even if the Study is licensed. | None: Billing Status selection is disabled. |
How to Update the Billing Status
To update your study’s Billing Status:
- Navigate to your Study in Tools > EDC Tools.
- Hover over your study environment to show the Actions menu.
- From the Actions menu, select Set Billing Status.
- In the Set Billing Status dialog, select a Billing Status.
- Click Save.
- In the confirmation dialog, click Save.
You can also lock study data while setting the Billing Status or set the Billing Status to Locked when locking data.